
Installation Guide

LulzBot Mini 2 ABS+ Enclosure Instructions | 5
6
7
5 6
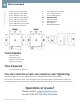
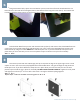
Step 7:
Using 2 M3-10mm bolts, square nuts and washer you can insert these from the outside with the nut
and washer on the inside of the 2 diagonal slots at the bottom of the long side cover (Part J). The washer and
nut help to hold the lower portion on the frame of the printer.
Step 9:
Step 10:
DO NOT OVER TIGHTEN THE BOLTS.
Step 11:
5 6
Step 7:
Step 9:
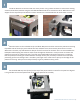
Take the black ABS front top cover with textured side up (Part F) and connect the 2 black ABS front side
covers (Part E) using 2 M3-10mm bolts and M3 square nuts. Then connect the black ABS front bottom cover
textured side up using 2 more M3-10mm bolts and M3 square nuts. If you find it difficult to keep the nut in
place while you insert the bolt you can use some painters tape to hold the nut in place for assembly.
Step 10:
DO NOT OVER TIGHTEN THE BOLTS.
Step 11:
8
5 6
Step 7:
Step 9:
Step 10:
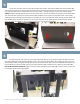
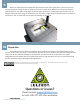
Set the front panel with the Lulzbot logo (Part A) on top with the logo in the upper right corner. The 8
square nut sits in the slot on the sides/top/bottom and the 8 M3-10mm bolt goes through the top panel into
the 8 square nut. If you find it difficult to keep the nut in place while you insert the bolt you can use some
painters tape to hold the nut in place for assembly. DO NOT OVER TIGHTEN THE BOLTS. Tighten them by hand
and slightly more than 1/8
th
of a turn with a hex driver is enough to hold everything together.
Step 11:
5 6
Step 7:
Step 9:
Step 10:
DO NOT OVER TIGHTEN THE BOLTS.
Step 11:
Repeat steps 7 and 8 for the back cover using parts A / B / C / D
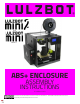
12mm
12mm
12mm
12mm