
Installation Guide

4 | LulzBot Mini 2 ABS+ Enclosure Instructions
4
5
4 6
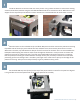
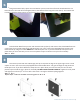
Step 4:
If you have an LCD screen on your Mini remove the screw in the picture below then set the black ABS
short side cover (Part I) on the left side of the printer by inserting the tabs into the slot on the top cover. Make
sure that the vent holes are towards the front of the printer. The square nut sits in the slot and the 2 M3-
10mm bolt goes through the top cover into the square nut. If you find it difficult to keep the nut in place while
you insert the bolt you can use some painters tape to hold the nut in place for assembly. Then insert a M3-
10mm bolt from the inside of the machine in the hole you see on the left side of the second picture below and
put the M3 square nut on the outside. Finally for the slot hole on the right side of the same picture below
screw in a M3-10mm bolt, no nut is required if you have an LCD screen installed.
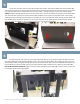
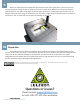
Step 6:
DO
NOT OVER TIGHTEN THE BOLTS.
4 6
Step 4:
Step 6:
Set the long side cover (Part J) on the right side of the printer by inserting the tabs into the slot on the
top cover. Make sure that the spool holder slot is in line with the spool holder. The square nut sits in the slot
and the 2 M3-10mm bolt goes through the top cover into the square nut. If you find it difficult to keep the nut
in place while you insert the bolt you can use some painters tape to hold the nut in place for assembly. DO
NOT OVER TIGHTEN THE BOLTS. Tighten them by hand and slightly more than 1/8
th
of a turn with a hex driver
is enough to hold everything together.
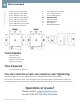
12mm
12mm
12mm
M3-12mm