
Installation Guide

LulzBot Mini 2 ABS+ Enclosure Instructions | 3
3 6
Step 1:
Step 2:
Step 3:
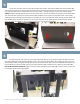
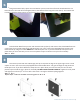
Set the black ABS top cover (Part K) on the top of the printer with the cutout for the spool arm aligned.
It is a good idea to have the spool holder in the upright position for assembly.
1
2
3
3 6
Step 1:
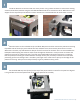
Install the brackets on the front and rear of the printer. Using a 2mm hex driver to remove the existing
screws and install the brackets using the included M3-40mm bolts and a 2.5mm hex driver. While there is still
support for the top of the printer with the screws removed it is recommended to do one bracket at a time. For
Step 2:
Step 3:
3 6
Step 1:
Step 2:
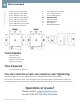
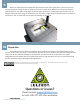
Note the letters on the individual acrylic and black ABS pieces and then remove the protective covering
from both sides of the acrylic pieces. While the front and back covers share similar pieces there are some
differences. The sides, top and bottom are deeper for the front than for the back. This is to accommodate the
build plate while keeping the enclosure total size at the tightest dimensions. It may be easier to remove the
protective coverings as you do each part if you feel more comfortable working that way but it is important
that the protective covering be removed before assembly of each part since they interlock into one another
preventing you from removing it later. Use either your finger nail or a flat razor to pull up on the edge of the
protective covering. Take your time and pull slowly to get any additional stray pieces.
Step 3:
3 6
Step 1:
Step 2:
Step 3: