
Service Manual User guide


General Maintenance
31200079
3-15
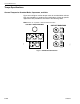
Adjustable O-ring Fittings
To install straight thread, adjustable O-ring fittings:
1. Check condition of O-ring and replace as necessary. Do not install a
fitting with a damaged O-ring.
2. Lubricate O-ring with clean hydraulic fluid.
3. Back off the locknut fully.
4. Screw fitting into port until backup washer contacts face of port.
5. Position fitting by unscrewing a maximum of one turn.
6. Hold the fitting in position with a wrench and torque locknut per Table
3-6.
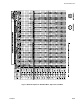
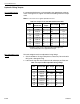
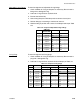
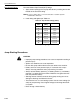
Table 3-6: Torque for Adjustable O-ring Fittings
O-ring Plugs To install straight thread O-ring plugs:
1. Check condition of O-ring and replace as necessary. Do not install a
plug with a damaged O-ring.
2. Lubricate O-ring with clean hydraulic fluid and torque per Table 3-7.
Table 3-7: Torque for O-ring Plugs
Size
SAE Port
Thread Size
Min. Torque Max. Torque
-2 5/16-24 60 in-lbs 70 in-lbs
-4 7/16-20 160 " 180 "
-6 9/16-18 25 ft-lbs 29 ft-lbs
-8 3/4-16 40 " 44 "
-10 7/8-14 58 " 63 "
-12 1 1/16-12 75 " 85 "
-16 1 5/16-12 109 " 121 "
-20 1 5/8-12 213 " 237 "
-24 1 7/8-12 238 " 262 "
SAE Port Hollow Hex Head Hex Head
Size Thread Size Min. Torque Max. Torque Min. Torque Max. Torque
-2 5/16-24 30 in-lbs 40 in-lbs 85 in-lbs 95 in-lbs
-4 7/16-20 125 " 145 " 205 " 235 "
-6 9/16-18 210 " 230 " 25 ft-lbs 29 ft-lbs
-8 3/4-16 44 ft-lbs 48 ft-lbs 46 " 50 "
-107/8-1470"80"85"95"
-12 1 1/16-12 80 " 90 " 105 " 115 "
-16 1 5/16-12 129 " 141 " 154 " 166 "
-20 1 5/8-12 213 " 237 " 213 " 237 "
-24 1 7/8-12 238 " 262 " 238 " 262 "