
Manual


32
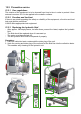
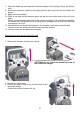
4. Remove the reservoir and the seal below it.
5. Free the entire reservoir of dirt using a smooth cloth.
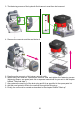
6. When tting the reservoir, replace the reservoir seal and tighten the fastening screws
(tightening torque, see spare parts list or separate instructions for your unit in the chapter
entitled "Technical data".).
7. Also replace the seal ring of the drain plug and t it as specied in the spare parts list.
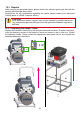
8. Add the new hydraulic uid to the reservoir through the lling plug.
9. Finally, the unit must be vented as described in the chapter entitled "Start-up"
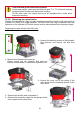
3. The fastening screws of the hydraulic uid reservoir must then be loosened.