
Installation Guide


Product Information | 5
III. INSTALLATION
•
Remove baseboard, quarter-round moldings,
wall base, appliances and furniture from
room. For best results, door trim should be
under-cut to allow flooring to move freely
without being pinched. After preparation
work, sweep and vacuum the entire work
area to remove all dust and debris.
• With a floating floor you must always ensure
you leave a 1/4” (6mm) gap between planks
and walls, pipes, pillars, stairs, etc. These
gaps will be covered with trim moldings after
the floor is installed. Tip: When installing
around pipes, drill the holes 1/2” (12mm)
larger than the diameter of the pipes.
•
Whenever possible, plan the layout so that
the joints in the planks do not fall on top of
joints or seams in the existing substrate. The
end joints of the planks should be staggered
a minimum of 8” (20.32 cm) apart. Do not
install over expansion joints. Avoid installing
pieces shorter than 12”(30 cm) at beginning
or end of rows.
• Do not install your kitchen cabinets directly
over your floor. Spacers should be placed
between the cabinets and the floor to ensure
quality of installation.
•
Decide the installation direction. It is
recommended to install the planks lengthwise
and parallel to the main light direction.
• Measure the area to be installed: The board
width of the last row shall not be less than
2” (50mm). If so, adjust the width of the first
row to be installed. In narrow hallways, it is
recommended to install the floor parallel to
the length of the hall.
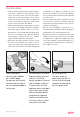
1
2
After thoroughly
cleaning the subfloor,
you should begin
laying from left to right.
Position the first plank
so that grooved edge is
facing you.
Second plank, first row.
Drop the plank of short
side first, and then
gently tap down the end
with a rubber mallet so
it firmly locks into the
previous plank until both
are at the same height.
Make sure both planks
are perfectly aligned.
Continue installing the
first row until you reach
the wall on the right.
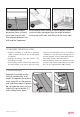
3
At the end of the
first row, leave an
expansion gap of 1/4”
(6mm) to the wall and
measure the length of
the last plank to fit.