
Installation Guide


Product Information | 7
11
10
2" (5cm)
12
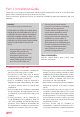
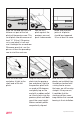
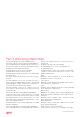
The floorboard should
be placed 5mm (at least)
away from the left wall.
Use spacers between the
wall and the floorboard.
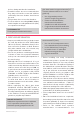
When drilling holes around a vertical object, make
sure the holes are bigger than the width of object,
cutting the small area and filling into the inner side.
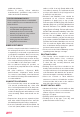
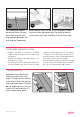
IV. FINISHING THE INSTALLATION
•
Replace molding or wall base, allowing
slight clearance between the molding and
the planks.
•
Nail the molding to the wall surface, not
through the flooring.
•
At doorways and at other areas where the
flooring planks may meet other flooring
surfaces, it is preferable to use a “T” molding,
or similar, to cover the exposed edge but not
pinch the planks. Leave a small gap between
the planks and the adjoining surface.
• After installation, make sure that the flooring
is not be exposed to temperatures less than
0°F (-15°C) or greater than 140°F (60°C).
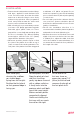
V. DISASSEMBLING
Separate the whole row by
lifting it up delicately at an
angle. To separate the planks,
leave them flat on the ground
and slide them apart. If planks
do not separate easy, you can
slightly lift up the planks (5°)
when sliding them apart.