CentreVu® Call Management System Release 3 Version 8 Disk-Mirrored Systems 585-210-940 Comcode 108502352 Issue 1 December, 1999
Copyright 1999 Lucent Technologies All Rights Reserved Printed in U.S.A. Notice Every effort was made to ensure that the information in this book was complete and accurate at the time of printing. However, information is subject to change. Your Responsibility for Your System’s Security Toll fraud is the unauthorized use of your telecommunications system by an unauthorized party, for example, persons other than your company’s employees, agents, subcontractors, or persons working on your company’s behalf.
CentreVu CMS Release 3 Version 8 Disk-Mirrored Systems i Table of Contents Chapter 1: Introduction to Disk Mirroring Disk mirroring defined . . . . . . . . Metadevices. . . . . . . . . . Concatenated metadevices State databases . . . . . . Mirrors. . . . . . . . . . . . . . . . . . . . . . . . . . . . . . . . . . . . . . . . . . . . . . . . . . . . . . . . . . . . . . . . . . . . . . . . . . . . . . . . . . . . . . . . . . . . . . . . . . 1 1 2 3 3 How CMS implements disk mirroring . .
CentreVu CMS Release 3 Version 8 Disk-Mirrored Systems ii Chapter 3: Maintaining Mirrored Systems Using the alternate boot device . . . . . . . . . . . . . . . . . . . . . . . . . . . . . . . . 39 Maintaining the chkDisks crontab . . . . Activating chkDisks . . . . . . . . Verifying chkDisks. . . . . . . . . Changing the scheduled run time Canceling chkDisks . . . . . . . . . . . . . . . . . . . . . . . . . . . . . . . . . . . . . . . . . . . . . . . . . . . . . . . . . . . . . . . . . . .
CentreVu CMS Release 3 Version 8 Disk-Mirrored Systems iii Partitioning disks with the format command . . . . . . . . . . . . . . . . . . . . . . . . . 76 How to tell whether your mirrored system is standard . . . . . . . . . . . . . . . . . . . . 78 Examples of valid system files . . . . . . . . . . . . . . . . . . . . . . . . . . . . . . . . . Valid vfstab files . . . . . . . . . . . . . . . . . . . . . . . . . . . . . . . . . . . . . Valid md.tab files . . . . . . . . . . . . . . . . . . . . . . . .
CentreVu CMS Release 3 Version 8 Disk-Mirrored Systems iv
Introduction to Disk Mirroring CentreVu CMS Release 3 Version 8 Disk-Mirrored Systems 1 Disk mirroring defined Introduction to Disk Mirroring 1 1 This chapter introduces you to “disk mirroring,” an optional feature of CentreVu Call Management System (CMS) that provides you with a completely redundant set of data, helping to ensure data security. To use disk mirroring, you must have a Sun* Enterprise* 3000 or Sun Enterprise 3500 platform running CMS r3v8.
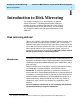
Introduction to Disk Mirroring CentreVu CMS Release 3 Version 8 Disk-Mirrored Systems 2 Disk mirroring defined The illustration below shows a simple, two-slice metadevice. Physical Disks A & B Metadevice d0 c0t0d0s2 c0t0d0s2 c1t0d0s2 c1t0d0s2 Concatenated metadevices 1 A metadevice can be configured as any one of three basic types: striped, concatenated, or concatenated stripes. The type used by CMS systems is the concatenated metadevice.
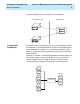
Introduction to Disk Mirroring CentreVu CMS Release 3 Version 8 Disk-Mirrored Systems 3 Disk mirroring defined The total capacity of this concatenated metadevice is the combined capacities of the three drives. If each drive is 4 gigabytes, for example, the metadevice has an overall capacity of 12 gigabytes. State databases 1 The Solstice DiskSuite software tracks which disk partitions belong to which metadevices with a state database.
Introduction to Disk Mirroring CentreVu CMS Release 3 Version 8 Disk-Mirrored Systems 4 Disk mirroring defined Metadevice d19 Chunk 1 Chunk 2 Metadevice d21 Chunk 3 Chunk 4 Chunk 1 Solstice DiskSuite Chunk 2 Chunk 3 Chunk 1 Chunk 2 Chunk 3 Chunk 4 Metadevice d20 Chunk 4
Introduction to Disk Mirroring CentreVu CMS Release 3 Version 8 Disk-Mirrored Systems How CMS implements disk mirroring 5 How CMS implements disk mirroring 1 A nonmirrored, CMS system with Solstice DiskSuite uses it to create a single metadevice, named d19, containing all the disk partitions used to store CMS data. For example: /cms ...
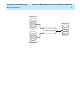
Introduction to Disk Mirroring CentreVu CMS Release 3 Version 8 Disk-Mirrored Systems How CMS implements disk mirroring 6 In a CMS computer system with /cms mirrored, root is also mirrored. The root mirror is d13; its submirrors are d11 and d12. For example: / (root) d11 c0t0d0s0 d13 d12 c0t1d0s0 If your computer system is running CMS r3v8, your swap partition is also mirrored. The swap mirror is d17; its submirrors are d15 and d16.
Introduction to Disk Mirroring CentreVu CMS Release 3 Version 8 Disk-Mirrored Systems How CMS implements disk mirroring 7 Mirror layouts Mirror layout on a Sun Enterprise 3000 computer 1 1 Mirror layouts on a factory-installed mirrored system differ depending upon the platform. When a system is upgraded to mirroring in the field, mirror layouts are essentially unpredictable, and depend on how many disk drives are already installed, and what their target numbers are.
Introduction to Disk Mirroring CentreVu CMS Release 3 Version 8 Disk-Mirrored Systems How CMS implements disk mirroring 8 Mirror layout on a Sun Enterprise 3500 computer 1 On a Sun Enterprise 3500 platform, the mirror layout must always be based upon the bays in which the disks are installed. Submirrors 11, 15, and 19 are the disks in the lower bay (targets 0 through 3 on controller 0); submirrors 12,16, and 20 are the disks in the upper bay (targets 4 through 7 on controller 1).
Introduction to Disk Mirroring CentreVu CMS Release 3 Version 8 Disk-Mirrored Systems How CMS implements disk mirroring 9 Required software 1 In order for your CMS system to be mirrored, it must be running the following software: CMS R3V8 Solaris 7 dated 3/99 Solstice DiskSuite 4.2 any CMS r3v8 load For a list of other software required for your system, see the Lucent Technologies Software Installation manual for your version of CMS.
Introduction to Disk Mirroring CentreVu CMS Release 3 Version 8 Disk-Mirrored Systems How CMS implements disk mirroring 10
Installing Mirrored Systems CentreVu CMS Release 3 Version 8 Disk-Mirrored Systems 11 How to upgrade an Enterprise platform to disk mirroring Installing Mirrored Systems 2 2 This chapter contains procedures for upgrading existing computer systems to use disk mirroring and for installing a mirrored system under factory conditions.
Installing Mirrored Systems CentreVu CMS Release 3 Version 8 Disk-Mirrored Systems 12 How to upgrade an Enterprise platform to disk mirroring Increasing system capacity Step 1: Identify mirror devices 2 If you intend to increase your system capacity as well as mirror your system, first install the new disks needed to increase capacity. For instructions, see the documentation that came with the new drives or the appropriate Lucent Technologies installation documents.
Installing Mirrored Systems CentreVu CMS Release 3 Version 8 Disk-Mirrored Systems 13 How to upgrade an Enterprise platform to disk mirroring b. Record existing nonboot disks under submirror 19, and empty slots for new nonboot disks under submirror 20. Example: Imagine a system that already has two disk drives in slots 0 and 1. In the previous step, you would have reserved slot 2 for the second boot disk. The remaining new disk is a nonboot disk and will be installed in slot 3.
Installing Mirrored Systems CentreVu CMS Release 3 Version 8 Disk-Mirrored Systems How to upgrade an Enterprise platform to disk mirroring Step 2: Install the mirror disks on an Enterprise 3500 system 14 Do this step only if you have an Enterprise 3500 system. 2 It is likely that your Enterprise 3500 system is currently using controller 1 (c1) for the internal CD-ROM drive. This step associates the CD-ROM drive with controller 2 (c 2) so controller 1 will be free for the new disk drives.
Installing Mirrored Systems CentreVu CMS Release 3 Version 8 Disk-Mirrored Systems How to upgrade an Enterprise platform to disk mirroring 3. Install the new disk drives in the upper drive bay. The illustration below shows where to install the new drives.
Installing Mirrored Systems CentreVu CMS Release 3 Version 8 Disk-Mirrored Systems 16 How to upgrade an Enterprise platform to disk mirroring 4. From the ok prompt, do a reconfigure boot by entering the following command: ______________________________________________________ ok boot -r ______________________________________________________ 5. Log in as root. 6.
Installing Mirrored Systems CentreVu CMS Release 3 Version 8 Disk-Mirrored Systems 17 How to upgrade an Enterprise platform to disk mirroring 4. Enter: partition> print The partition table displays and the partition> prompt returns. Compare the display to the Partitioning table below to see whether you need to re-partition the disk. You probably will need to repartition. 5. Enter the number of the partition to be reconfigured. The system begins a series of prompts for partitioning information.
Installing Mirrored Systems CentreVu CMS Release 3 Version 8 Disk-Mirrored Systems 18 How to upgrade an Enterprise platform to disk mirroring 8. Enter: y The partition> prompt returns. 9. Enter: partition> q The format> prompt returns. 10. To select the next disk to be partitioned, enter: and return to item 2. format> disk If you have finished partitioning all the new disks, enter: format> q and continue with the next step. Step 5: Create the state database replicas 1.
Installing Mirrored Systems CentreVu CMS Release 3 Version 8 Disk-Mirrored Systems How to upgrade an Enterprise platform to disk mirroring 19 The root metadevice definitions go into the #metaroot section, which you must create for the occasion; d20 goes into the #/cms section, which already exists in the file. The swap metadevice definitions go into the #swap section which, like #metaroot, must be created for the occasion.
Installing Mirrored Systems CentreVu CMS Release 3 Version 8 Disk-Mirrored Systems How to upgrade an Enterprise platform to disk mirroring Step 7: Set up the mirrors for the root file system 20 Set up the mirrors for the root file system with the following steps: 1. Activate metadevice d11: 2 # metainit -f d11 d11: Concat/stripe is set up # 2. Activate metadevice d13: # metainit -f d13 d13: Concat/stripe is set up # 3. Activate metadevice d12: # metainit -f d12 d12: Concat/stripe is set up # 4.
Installing Mirrored Systems CentreVu CMS Release 3 Version 8 Disk-Mirrored Systems 21 How to upgrade an Enterprise platform to disk mirroring 6. Set up d13 as the root mirror: # # metaroot d13 7. Reboot the system and log in as the root user: # /usr/sbin/shutdown -i6 . . .
Installing Mirrored Systems CentreVu CMS Release 3 Version 8 Disk-Mirrored Systems How to upgrade an Enterprise platform to disk mirroring Step 8: Set up the mirrors for the swap space 22 Set up the mirrors for the swap space with the following steps: 1. Activate metadevice d15: 2 # metainit -f d15 d15: Concat/stripe is set up # 2. Activate metadevice d17: # metainit d17 d17: Concat/stripe is set up # 3. Activate metadevice d16: # metainit d16 d16: Concat/stripe is set up # 4.
Installing Mirrored Systems CentreVu CMS Release 3 Version 8 Disk-Mirrored Systems 23 How to upgrade an Enterprise platform to disk mirroring 6. Edit /etc/vfstab. The relevant portion of the file looks like this: ----------------- /etc/vfstab ---------------. . . /dev/dsk/c0t0d0s4 - swap - no - /dev/dsk/c0t2d0s4 - swap - no - -------------------------------------------------Do the following steps to modify the file: a. Copy the c0t0d0s4 entry and insert the copy on the succeeding line. b.
Installing Mirrored Systems CentreVu CMS Release 3 Version 8 Disk-Mirrored Systems 24 How to upgrade an Enterprise platform to disk mirroring Step 9: Set up the /cms mirror 2 1. Edit /etc/vfstab. Copy the d19 entry to the succeeding line. Then comment out the original and change “d19” to “d21”. For example: ---------------- /etc/vfstab - EXAMPLE ONLY ----------------. . .
Installing Mirrored Systems CentreVu CMS Release 3 Version 8 Disk-Mirrored Systems 25 How to upgrade an Enterprise platform to disk mirroring Step 10: Verify disk space 1. Display available disk space by entering a df -k command. The system responds with a file system table.
Installing Mirrored Systems CentreVu CMS Release 3 Version 8 Disk-Mirrored Systems 26 How to upgrade an Enterprise platform to disk mirroring # metastat . . . d21: Mirror Submirror 0: d19 State: Okay Submirror 1: d20 State: Okay . . .
Installing Mirrored Systems CentreVu CMS Release 3 Version 8 Disk-Mirrored Systems 27 How to upgrade an Enterprise platform to disk mirroring 3. Reboot the system with the following command: # /usr/sbin/shutdown -y -i0 -g0 The system displays the ok prompt. 4. Create a device alias for the new boot device by entering the following command (for example): ok nvalias bootdevice2 Replace with what you recorded in item 2.
Installing Mirrored Systems CentreVu CMS Release 3 Version 8 Disk-Mirrored Systems 28 Factory installation procedures for disk mirroring Factory installation procedures for disk mirroring This section describes how a mirrored system is installed on a new Sun Enterprise 3xxx computer in the factory. You may use these instructions in the field to bring an existing system up to factory specifications.
Installing Mirrored Systems CentreVu CMS Release 3 Version 8 Disk-Mirrored Systems 29 Factory installation procedures for disk mirroring . Partitioning (Note: Never change the default size of the overlap slice!) CMS R3V8 4.2-GB Disk Disk Type Part Tag Flag Boot 0 boot disk 1: / or root boot disk 2: unassigned wm 1023 1 unassigned wm 2 overlap or backup 3 Nonboot Size (cyl.
Installing Mirrored Systems CentreVu CMS Release 3 Version 8 Disk-Mirrored Systems 30 Factory installation procedures for disk mirroring Step 4: Check the disk.type file 2 The olds commands, which you will be using to configure the Solstice DiskSuite software, obtain information about your disk configuration from the /olds/disk.type file. If your boot disks are not as specified in the Disks table in Step 2, check the disk.type file to verify that it names the proper boot disks for your system.
Installing Mirrored Systems CentreVu CMS Release 3 Version 8 Disk-Mirrored Systems 31 Factory installation procedures for disk mirroring 5. Check the disks: # olds -mirrored -check_disks number of external scsi controllers with disks is = 0 number of disks is = 4 . . . disk:c0t0d0 is partitioned ok disk:c0t1d0 is partitioned ok disk:c0t2d0 is partitioned ok disk:c0t3d0 is partitioned ok Success, checking disks for mirroring. # 6.
Installing Mirrored Systems CentreVu CMS Release 3 Version 8 Disk-Mirrored Systems 32 Factory installation procedures for disk mirroring Step 6: Run the setup scripts 2 1. Create the state database replicas by entering the following command: # olds -mirrored -metadbs . . . Success, setting up metadb replicas 2. Mirror the root file system by entering the following command: # olds -mirrored -setroot . . . Success, root mirrored successfully. 3.
Installing Mirrored Systems CentreVu CMS Release 3 Version 8 Disk-Mirrored Systems 33 Factory installation procedures for disk mirroring 5. Setup the /cms metadevices by entering the following commands: # ksh -o vi # export PATH=$PATH:/olds # olds -mirrored -setup . . .
Installing Mirrored Systems CentreVu CMS Release 3 Version 8 Disk-Mirrored Systems 34 Factory installation procedures for disk mirroring 2. Complete the table below by filling in (1a) and (1b) as instructed. Disk Space Verification Total No.
Installing Mirrored Systems CentreVu CMS Release 3 Version 8 Disk-Mirrored Systems 35 Factory installation procedures for disk mirroring Step 8: Install the CMS software 2 Now you will complete the installation of the usual software by installing CMS. In general, the steps are as listed below. Detailed installation instructions can be found in CentreVu CMS R3V8 Software Installation and Setup (585-210-941).
Installing Mirrored Systems CentreVu CMS Release 3 Version 8 Disk-Mirrored Systems 36 Factory installation procedures for disk mirroring 5. Enter the following command: ok devalias 6. Check the output for a line like this: bootdevice2 where, again, is the string recorded in item 2. 7. Verify that the system boots normally off the alternate boot device, and log in as the root user: ok boot bootdevice2 . . . console login: Password: . . .
Installing Mirrored Systems CentreVu CMS Release 3 Version 8 Disk-Mirrored Systems 37 Factory installation procedures for disk mirroring 13. Enter the following command: # chmod +x /olds/chkDisks 14. Do a CMSADM backup. For instructions, see the CentreVu CentreVu CMS R3V8 Administration (585-210-910) document or the maintenance and troubleshooting document for your hardware platform. When the CMSADM backup is finished, the factory installation procedure for disk mirroring is complete.
Installing Mirrored Systems CentreVu CMS Release 3 Version 8 Disk-Mirrored Systems Factory installation procedures for disk mirroring 38
Maintaining Mirrored Systems CentreVu CMS Release 3 Version 8 Disk-Mirrored Systems 39 Using the alternate boot device Maintaining Mirrored Systems 3 3 This chapter contains procedures you are likely to need to maintain a disk-mirrored system, including replacing disk drives, recovering from disk failures, and using the olds scripts. Using the alternate boot device When you set up your mirrored system, you created an alternate boot device named bootdevice2.
Maintaining Mirrored Systems CentreVu CMS Release 3 Version 8 Disk-Mirrored Systems 40 Maintaining the chkDisks crontab Maintaining the chkDisks crontab 3 The chkDisks crontab runs each night and checks to see whether any potential or actual drive problems have been logged. The results of the search are logged to /olds/elog and mailed to the root user. This section shows how to start and stop chkDisks, and how to verify that it will run.
Maintaining Mirrored Systems CentreVu CMS Release 3 Version 8 Disk-Mirrored Systems 41 Doing a CMSADM backup on a mirrored system Doing a CMSADM backup on a mirrored system This section describes how to perform a traditional CMSADM backup on a mirrored system. NOTE: Mirroring is intended as a way to minimize data loss should a system crash occur, not as a way to avoid backing up data. Mirrored systems must be backed up just as often as unmirrored systems.
Maintaining Mirrored Systems CentreVu CMS Release 3 Version 8 Disk-Mirrored Systems Doing a CMSADM backup on a mirrored system 42 3. Display the CentreVu CMS Administration menu by entering a cmsadm command. For example: # cmsadm Lucent Technologies CentreVu(R) Call Management System Administration Menu Select a command from the list below. 1) acd_create Define a new ACD . . . . 4. Enter the number of the backup option. The system prompts for the tape drive. 5. Enter the appropriate option number.
Maintaining Mirrored Systems CentreVu CMS Release 3 Version 8 Disk-Mirrored Systems 43 Restoring from a CMSADM Backup Restoring from a CMSADM Backup 3 This section contains the procedure for restoring /cms data files from a traditional CMSADM backup tape. You may want to perform a CMSADM restore when, for example, your file systems are still intact, but some data has been corrupted. If your CMS is running on a Sun Enterprise 3500, and you have had a crashed or corrupted disk, check the /kernel/drv/st.
Maintaining Mirrored Systems CentreVu CMS Release 3 Version 8 Disk-Mirrored Systems 44 Restoring from a CMSADM Backup NOTE: You may get error messages concerning the /home directory. These errors display when the directory is already present. Ignore them. 4. Restore any CentreVu CMS maintenance backups dated after the latest CDMADM backup. See the CentreVu CMS R3V8 Administration (585-210-941) document for details on restoring a maintenance backup.
Maintaining Mirrored Systems CentreVu CMS Release 3 Version 8 Disk-Mirrored Systems 45 Repairing or rebuilding the /cms file system Repairing or rebuilding the /cms file system 3 This section contains procedures for reinitializing the /cms file system. You may need to perform this procedure in case of disk corruption or some other catastrophic system problem. The point of the procedure is to repair /cms or, failing that, to rebuild it and restore the latest available CMS data.
Maintaining Mirrored Systems CentreVu CMS Release 3 Version 8 Disk-Mirrored Systems 46 Repairing or rebuilding the /cms file system The system prompt should return without error, as shown above. (Of course, file and block counts in the last line will vary.) In that case, continue with the next step. If you get an error message, however, repeat the fsck command. If the command still returns errors after 10 repetitions, stop this procedure and skip ahead to “Rebuilding /cms,” below.
Maintaining Mirrored Systems CentreVu CMS Release 3 Version 8 Disk-Mirrored Systems 47 Repairing or rebuilding the /cms file system 1. Add the Solstice DiskSuite directories to your path: # # export PATH=$PATH:/usr/opt/SUNWmd/sbin:/olds 2. Detach the d20 submirror: # metadetach d21 d20 d21: submirror d20 is detached # 3. Clear the d20 submirror: # metaclear d20 d20: Concat/Stripe is cleared # 4. Clear the cms mirror: # metaclear d21 mirror is cleared # 5.
Maintaining Mirrored Systems CentreVu CMS Release 3 Version 8 Disk-Mirrored Systems 48 Repairing or rebuilding the /cms file system 9. Prepare the cms mirror for a new file system (this will take 15 to 30 minutes to complete): # newfs -m 0 /dev/md/rdsk/d21 . . . 14550512, 14585216, 14619920, 14654624, 14689328, 14724032, 14758736, 14793440, 14828144, 14862848, 14897552, 14929952, ufs fsck: sanity check: /dev/md/rdsk/d21 okay Success, /cms mirrored successfully # 10. This step remounts /cms.
Maintaining Mirrored Systems CentreVu CMS Release 3 Version 8 Disk-Mirrored Systems Restoring a mirrored system from a CMSADM backup 49 Restoring a mirrored system from a CMSADM backup 3 This section shows you how to restore an entire mirrored system from a CMSADM backup. You might have to do this procedure, for example, if you have a disk crash that disables the operating system disk drive. To do this procedure, you will need the “Solaris 7 3/99” compact disc and the most recent CMSADM backup tape.
Maintaining Mirrored Systems CentreVu CMS Release 3 Version 8 Disk-Mirrored Systems 50 Restoring a mirrored system from a CMSADM backup Step 3: Boot the system from the compact disk The following tasks boot the system from the compact disc. Task 3 Action Result 1 Turn on the power to the system units in the opposite order in which you powered them off. The system begins to boot.
Maintaining Mirrored Systems CentreVu CMS Release 3 Version 8 Disk-Mirrored Systems 51 Restoring a mirrored system from a CMSADM backup Step 4: Identify the system The following tasks identify your system for the installation. 3 Task Action 1 No action required. The Host Name screen is displayed. 2 a. Click the Host name box The Network Connectivity screen is displayed. b. Type the host name for the workstation. Result c. Click the Continue button. 3 a. Click the Yes option. b.
Maintaining Mirrored Systems CentreVu CMS Release 3 Version 8 Disk-Mirrored Systems 52 Restoring a mirrored system from a CMSADM backup Step 5: Set the Name Service options The following tasks set the name service options. Task 3 Action Result 1 No Action Required. The Name Service screen is displayed. 2 a. Select the None option. The Confirm Information screen is displayed. b. Click the Continue button. 3 The Subnets screen is a. Check the information displayed on the screen. If it displayed.
Maintaining Mirrored Systems CentreVu CMS Release 3 Version 8 Disk-Mirrored Systems 53 Restoring a mirrored system from a CMSADM backup Step 6: Set the date and time The following tasks set the date and time. 3 Task Action 1 No action required. The Time Zone screen is displayed. 2 a. Select Geographic region. The Geographic Region screen is displayed. b. Click Set. a. Select the region where this system is located. The Date and Time screen is displayed. 3 Result b.
Maintaining Mirrored Systems CentreVu CMS Release 3 Version 8 Disk-Mirrored Systems 54 Restoring a mirrored system from a CMSADM backup Step 7: Select the operating system files to be installed This procedure selects Solaris system files for the installation. Task 3 Action 1 No Action Required. 2 Click the Initial button. 3 Click the Continue button. 4 Click the Continue button. 5 a. Select the languages you want to see displayed in the user interface.
Maintaining Mirrored Systems CentreVu CMS Release 3 Version 8 Disk-Mirrored Systems 55 Restoring a mirrored system from a CMSADM backup Step 8: Select the hard disks This procedure selects hard disks for partitioning. 3 Task Action Result 1 No Action Required. The Select Disks screen is displayed. 2 Check the list of disk drives in the Available column: it should list every disk in your system. If it doesn’t, you probably have a connectivity problem.
Maintaining Mirrored Systems CentreVu CMS Release 3 Version 8 Disk-Mirrored Systems 56 Restoring a mirrored system from a CMSADM backup 3 a. Click the space at the right of the slice number. Slice numbers b. Type the slice name (see the table below). c. Click the next space to the right and type the size (see the table below). Sizes in Names in this column this column d. Repeat a through c until the disk is properly partitioned. 4 Click the OK button. The Customize Disks screen is displayed.
Maintaining Mirrored Systems CentreVu CMS Release 3 Version 8 Disk-Mirrored Systems 57 Restoring a mirrored system from a CMSADM backup Step 10: Install the operating system 3 This procedure installs the Solaris 7 3/99 operating system using the system software and disk partitioning already specified. Task Action Result 1 No action required. The Customize Disks screen is displayed. 2 Click OK. The File System and Disk Layout screen is displayed. 3 Click Continue.
Maintaining Mirrored Systems CentreVu CMS Release 3 Version 8 Disk-Mirrored Systems 58 Restoring a mirrored system from a CMSADM backup Step 11: Complete the OS installation This procedure completes the operating system installation. 3 Task 1 Action No action required. When the installation completes, the machine reboots and prompts for a root password. Result On this screen you can create a root password. . . . Root password: Press Return to continue.
Maintaining Mirrored Systems CentreVu CMS Release 3 Version 8 Disk-Mirrored Systems 59 Restoring a mirrored system from a CMSADM backup Step 13: Restore the backup With the system prompt displaying, insert the CMSADM backup tape into the tape drive and enter the following command: 3 # cpio -icmudfv -C 10240 -I /dev/rmt/0c -M “Insert Tape %d” “/etc/vfstab” “/cms/*” “/etc/path_to_inst” “/etc/mnttab” “/swap*” This command restores essential system files.
Maintaining Mirrored Systems CentreVu CMS Release 3 Version 8 Disk-Mirrored Systems 60 Restoring a mirrored system from a CMSADM backup 4. Add the Solstice DiskSuite directories to your path: # # PATH=$PATH:/usr/opt/SUNWmd/sbin:/olds export PATH 5. Create md.tab.new: # olds - mirrored -mk_files . . . Success, creating md.tab.new # 6. Check the disk: # olds -mirrored -check_disk . . . Success, checking md.tab.new # 7. Activate the state database: # olds -mirrored -meatdbs . . .
Maintaining Mirrored Systems CentreVu CMS Release 3 Version 8 Disk-Mirrored Systems 61 Restoring a mirrored system from a CMSADM backup 10. Reboot using a boot -r command and log in as the root user: ok boot -r . . . login: root Password: . . . # 11. Add the Solstice DiskSuite directories to your path: # # PATH=$PATH:/usr/opt/SUNWmd/sbin:/olds export PATH 12. Activate the /cms metadevice: # olds -mirrored -setup . . .
Maintaining Mirrored Systems CentreVu CMS Release 3 Version 8 Disk-Mirrored Systems 62 Restoring specific files from a CMSADM backup Restoring specific files from a CMSADM backup To restore specific files from CMSADM backup tapes, enter the following commands at the system prompt (for example): # cd / # cpio -icmudv -C 10240 -I /dev/rmt/0c -M “Please remove the current tape, insert tape number %d, and press ENTER” (where is the full path name of the file to be restored)
Maintaining Mirrored Systems CentreVu CMS Release 3 Version 8 Disk-Mirrored Systems 63 Adding new disks to a standard mirrored system Adding new disks to a standard mirrored system The procedure in this section adds new disks to a system that is already mirrored. In order to use this procedure, your assigned boot disks must be the same as those assigned during a factory installation of disk mirroring.
Maintaining Mirrored Systems CentreVu CMS Release 3 Version 8 Disk-Mirrored Systems 64 Adding new disks to a standard mirrored system 6. Reboot the system and log in as the root user: ok boot -r . . . login: root password: . . . # 7. Partition the new disks by following the instructions in “Partitioning disks with the format command” on page 76. 8. Check disk space by entering a df -k command.
Maintaining Mirrored Systems CentreVu CMS Release 3 Version 8 Disk-Mirrored Systems 65 Adding new disks to a standard mirrored system 13. Add the new disks to the existing metadevices by entering the following command: # olds -mirrored -setup (where, again, and are the device names of the disks you have added). The system responds with the following: Warning: Current Disk has mounted partitions. device: c0t6d0 will not be used . . .
Maintaining Mirrored Systems CentreVu CMS Release 3 Version 8 Disk-Mirrored Systems 66 Adding new disks to a nonstandard mirrored system Adding new disks to a nonstandard mirrored system A “nonstandard” disk drive addition is one that cannot take advantage of advanced features of the olds setup scripts because the disk configuration is not standard. The procedure is as follows: 1. Turn off CMS. (From the command line, enter the cmsadm or cmssvc command, and select the cms_run option.
Maintaining Mirrored Systems CentreVu CMS Release 3 Version 8 Disk-Mirrored Systems 67 Adding new disks to a nonstandard mirrored system 7. Add the olds directories to your path: # # PATH=$PATH:/usr/opt/SUNWmd/sbin:/olds export PATH 8.
Maintaining Mirrored Systems CentreVu CMS Release 3 Version 8 Disk-Mirrored Systems 68 Adding new disks to a nonstandard mirrored system 13. Grow the /cms file system by entering the following command: # growfs -M /cms /dev/md/rdsk/d21 If the operation should fail, do the following: a. Restore the original md.tab file by entering the following command: # cp /etc/opt/SUNWmd/md.tab.mirror /etc/opt/SUNWmd/md.tab b. Look up the error message in Chapter 4, “Troubleshooting.” 14.
Maintaining Mirrored Systems CentreVu CMS Release 3 Version 8 Disk-Mirrored Systems 69 Replacing a faulty disk Replacing a faulty disk This section explains how to replace a faulty disk. The system does not need to be powered off or rebooted to perform this procedure. Step 1: Identify the faulty disk A disk problem is usually indicated in the /var/adm/messages file.
Maintaining Mirrored Systems CentreVu CMS Release 3 Version 8 Disk-Mirrored Systems 70 Replacing a faulty disk Step 2: Identify the submirrors 1. Add the Solstice DiskSuite directories to your path: 3 # export PATH=$PATH:/usr/opt/SUNWmd/sbin:/olds 2. Enter a metastat command: # metastat 3. Scan the output of the metastat command to find the name of the faulty disk. The following lines, for example, indicate that the faulty c0t2d0 disk is in d20: # metastat . .
Maintaining Mirrored Systems CentreVu CMS Release 3 Version 8 Disk-Mirrored Systems 71 Replacing a faulty disk Step 3: Detach the submirrors 3 To detach a submirror means to put it off line so you can access its constituent disk drives. You detach a submirror with a metadetach command. The command is in the format: metadetach where is the mirror and is the submirror to be detached.
Maintaining Mirrored Systems CentreVu CMS Release 3 Version 8 Disk-Mirrored Systems 72 Replacing a faulty disk Step 4: Remove state database replicas (boot disks only) When you replace a boot disk, you must remove the state database replicas from the old disk and recreate them on the new one. A boot disk is one that is a member of metadevice d11 or d12 (see “Step 2: Identify the submirrors” on page 70).
Maintaining Mirrored Systems CentreVu CMS Release 3 Version 8 Disk-Mirrored Systems 73 Replacing a faulty disk Step 6: Recreate the state database replicas 1. Recreate the primary boot disk replicas you removed earlier by entering the following command: # 3 metadb -a -c4 -f /dev/rdsk/devname 2. Recreate the secondary boot disk replicas you removed earlier by entering the following command: # metadb -a -c3 -f /dev/rdsk/devname 3.
Maintaining Mirrored Systems CentreVu CMS Release 3 Version 8 Disk-Mirrored Systems 74 Replacing a faulty disk Step 7: Reattach the submirrors 1. Enter a metainit command to reinitialize the submirror. For example: 3 # # metainit d20 If you receive an “already set up” message, ignore it. 2. Reattach the submirror by issuing a metattach command. For example: # # metattach d21 d20 If the disk you are replacing is a boot disk, be sure to reattach both the submirrors of which it is a member.
Maintaining Mirrored Systems CentreVu CMS Release 3 Version 8 Disk-Mirrored Systems 75 State Database Replicas State Database Replicas Setting up replicas 3 3 1. Verify that the /etc/opt/SUNWmd/md.tab file is correct (see “Examples of valid system files” on page 79). 2. Enter the metadb command: # # Replacing replicas 3 metadb -a -c4 -f /dev/dsk/c0t0d0s1 metadb -a -c3 -f /dev/dsk/c0t1d0s1 Sometimes replicas may have to be replaced.
Maintaining Mirrored Systems CentreVu CMS Release 3 Version 8 Disk-Mirrored Systems 76 Partitioning disks with the format command Partitioning disks with the format command 3 To use the format command to partition a disk, do the following steps: 1. Enter: # format A menu of disks displays. You are asked to select one. 2. Enter the menu number of the disk to be partitioned. A list of commands displays, followed by the format> prompt. 3. Enter: format> partition The partition> prompt displays. 4.
Maintaining Mirrored Systems CentreVu CMS Release 3 Version 8 Disk-Mirrored Systems 77 Partitioning disks with the format command 6. Enter: partition> print The partition table displays and the partition> prompt returns. Compare the display to the Partitioning table to make certain you have repartitioned the disk properly. If not, repeat step 5. 7. Enter: partition> label The system responds Ready to label disk, continue?. 8. Enter: y 9. The partition> prompt returns. 10.
Maintaining Mirrored Systems CentreVu CMS Release 3 Version 8 Disk-Mirrored Systems 78 How to tell whether your mirrored system is standard How to tell whether your mirrored system is standard To tell whether mirroring was installed as a “standard” or “nonstandard” configuration, you can do one of two things. Either: a. Enter the command: # metastat d11 d12 b. Edit the /etc/opt/SUNWmd/md.tab file Examine the command output or the contents of the file.
Maintaining Mirrored Systems CentreVu CMS Release 3 Version 8 Disk-Mirrored Systems 79 Examples of valid system files Examples of valid system files Valid vfstab files 3 3 Valid vfstab file for a non mirrored R3V8 CMS system: ___________________________________________________________________ #device device #to mount to fsck # #/dev/dsk/c1d0s2 /dev/rdsk/c1d0s2 fd /proc /dev/dsk/c0t0d0s4 /dev/dsk/c0t0d0s0 /dev/rdsk/c0t0d0s0 swap /dev/md/dsk/d19 /dev/md/rdsk/d19 mount point FS type fsck pass /usr /d
Maintaining Mirrored Systems CentreVu CMS Release 3 Version 8 Disk-Mirrored Systems 80 Examples of valid system files Valid md.tab files 3 Valid md.tab file for a 3 disk non mirrored R3V8 CMS system: ____________________________________________________ #state database replicas mddb00 c0t0d0s1 mddb01 c0t1d0s0 #/cms d19 3 1 /dev/rdsk/c0t0d0s3 1 /dev/rdsk/c0t1d0s1 1 /dev/rdsk/c1t0d0s1 d21 -m d19 ____________________________________________________ Valid md.
Troubleshooting CentreVu CMS Release 3 Version 8 Disk-Mirrored Systems 81 Solstice DiskSuite problems 4 Troubleshooting 4 This chapter contains procedures for troubleshooting problems you may experience while installing or maintaining systems that use disk mirroring.
Troubleshooting CentreVu CMS Release 3 Version 8 Disk-Mirrored Systems 82 The system fails to recognize all disk drives The system fails to recognize all disk drives 4 If the system should fail to recognize all disk drives, do the following: 1. Reboot the system by entering the following command: # /usr/sbin/shutdown -y -g0 -i0 The system reboots and displays the ok prompt: 2. Turn off the system unit. 3.
Troubleshooting CentreVu CMS Release 3 Version 8 Disk-Mirrored Systems 83 The system fails to recognize all disk drives /sbus@3,0/SUNW,fas@3,8800000 Target 0 Unit 0 Disk SEAGATE ST34371W SUN4.2G74629737K6748 Copyright(c) 1997 Seagate All rights reserved . . . Target 6 Unit 0 Disk Removable Read Only device TOSHIBA XMS5701TASUN12XCD099704/09/97 ok 7.
Troubleshooting CentreVu CMS Release 3 Version 8 Disk-Mirrored Systems Fixing “needs maintenance” messages 84 Fixing “needs maintenance” messages On rare occasions mirrors may get severely out of sync. An extreme example is when a disk is removed from a powered system without first being detached with a metadetach command. The situation is indicated by the appearance of a Needs maintenance message in a State line of a metastat response.
Troubleshooting CentreVu CMS Release 3 Version 8 Disk-Mirrored Systems 85 Boot problems Boot problems 4 Generally speaking, most boot problems are the result of one of two problems: either you are trying to boot from the wrong device or the primary boot device is not available. This section suggests remedies for those situations. Trying to boot from the wrong device 4 If you are trying to boot from the wrong device, you must change the boot device. Here is a quick way to do that: 1.
Troubleshooting CentreVu CMS Release 3 Version 8 Disk-Mirrored Systems 86 Boot problems Excessive reboot time 4 Problem: The system takes a long time to come back up after a reboot and seems to stop at the configuring multicast point. Possible workaround: The Enterprise 3000, by default, tries to configure itself as a router/gateway.
Troubleshooting CentreVu CMS Release 3 Version 8 Disk-Mirrored Systems 87 Log files Log files 4 A disk-mirrored system contains the following system log files: File Name Description /var/adm/messages Contains all console error messages, including hardware messages. (For an example of how to use this log to detect a bad disk drive, see Replacing Faulty Disks” in Chapter 3.) /olds/elog Contains olds error messages.
Troubleshooting CentreVu CMS Release 3 Version 8 Disk-Mirrored Systems 88 Error messages Error messages 4 The table that follows lists and explains error messages you can receive related to Solstice DiskSuite and disk mirroring. The messages are presented in alphabetical order, ignoring special characters and replacement strings. (For example, you would find the message “filename restored” in alphabetical order by the word restored.
Troubleshooting CentreVu CMS Release 3 Version 8 Disk-Mirrored Systems 89 Error messages Error Messages (Continued) Message: component is attached metattach: hostname: d21: growing of metadevice delayed Explanation: Submirrors are out of sync. Response: Enter the command: metasync d21 This command effectively resyncs submirrors.
Troubleshooting CentreVu CMS Release 3 Version 8 Disk-Mirrored Systems 90 Error messages Error Messages (Continued) Message: /etc/system has been updated since the last reboot. CMS cannot run without an upto-date /etc/system file. Explanation: /etc/system can change when a particular Solaris patch is applied to the system or when state database replicas are removed and re-added during a boot disk replacement. Response: Reboot the system.
Troubleshooting CentreVu CMS Release 3 Version 8 Disk-Mirrored Systems 91 Error messages Error Messages (Continued) Message: metadb: hostname: cxtyd0sz has a metadevice database replica Explanation: The slice named in the message already has a replica. Response: If you really need to add another replica, choose a different slice. Message: metadetach: systemname: d21: resync in progress Explanation: You cannot detach a metadevice while a resync is in progress. Response: Try again later.
Troubleshooting CentreVu CMS Release 3 Version 8 Disk-Mirrored Systems 92 Error messages Error Messages (Continued) Message: panic: vfs_mountroot: cannot mount root rebooting... resetting.... Explanation: The system is misconfigured. Response: There are two possible causes: 1. You attempted to boot from a nonbootable device. Check the device name and try again. The alternate boot device may be set up incorrectly. 2.
Troubleshooting CentreVu CMS Release 3 Version 8 Disk-Mirrored Systems 93 Error messages Error Messages (Continued) Message: stale databases Response: The state database contains old information. Recreate (see “Recreating the Replicas and Reattaching the Disk” in Chapter 3). Message: state database information not found, DiskSuite must not be installed Response: Install and set up Solstice DiskSuite before doing this task.
Troubleshooting CentreVu CMS Release 3 Version 8 Disk-Mirrored Systems 94 Error messages Error Messages (Continued) Message: The disk is not recognized by cms. Explanation: The disk is either not a standard Sun disk drive, or is larger than 4.2 gigabytes. Response: Replace the disk with a standard Sun disk drive of not more than 4.2 gigabytes capacity. Message: The DiskSuite Software must be installed to run this script.
Troubleshooting CentreVu CMS Release 3 Version 8 Disk-Mirrored Systems 95 Error messages Error Messages (Continued) Message: Response: This command may hang the system if a StopA or halt command has been executed. Please type reset-all to reset the system before executing this command. Do you wish to continue? 1. Enter: N (to prevent the probe from continuing). 2. Enter: setenv auto-boot? false (to keep the system from rebooting) 3. Enter: reset-all The reset may take a minute to complete.
Troubleshooting CentreVu CMS Release 3 Version 8 Disk-Mirrored Systems 96 Error messages Error Messages (Continued) Message: Usage: olds -mirrored -check_disks| -mirrored -mk_files|-metadbs|-cleanup| -mirrored -setup [disk name] Explanation: You have mistyped a command. Response: Retry the command. See Chapter 3 for information about olds command syntax. Message: Warning: inode blocks/cyl group (230 >= data blocks (135) in lost cylinder group. This implies 2160 sector(s) cannot be allocated.
CentreVu CMS Release 3 Version 8 Disk-Mirrored Systems 97 Index Symbols /cms mirror . . . . . . . . . . . . . . . . . . . . . .5 A disk partitioning . . . . . disk partitions . . . . . . disks.type file . . . . . . DiskSuite see Solstice DiskSuite drive slots . . . . . . . . . . . . . . . . . . . .56, 76 . . . . . . . . . . . . . . 1 . . . . . . . . . . . . . .30 . . . . . . . . . . . . . .11 alternate boot device creating. . . . . . . . . . . . . . . . . . . . 26, 35 testing . . . . . . . . . . . . .
CentreVu CMS Release 3 Version 8 Disk-Mirrored Systems 98 N T needs maintenance messages . . . . . . . . . . . 84 tape drives st.conf file. . . . . . . . . . . . . . . . . . . . . 43 three-way mirror . . . . . . . . . . . . . . . . . . . 3 two-way mirror. . . . . . . . . . . . . . . . . . . . 3 P partitioning procedure . . partitioning disks partitioning, disk printing vfstab . . . . . . . . . . . . . . . . . . . . . . . . . . . . . . . . . . . . . . . . . . . . . . . . . . . . . . . . .
How Are We Doing? Document Title: CentreVu Call Management System Release 3 Version 8 Disk-Mirrored Systems Document No.: 585-210-940 Issue 1 Date: December 1999 Lucent Technologies welcomes your feedback on this document. Your comments are of great value in helping us to improve our documentation. 1.