INTUITY™ Voice/FAX Messaging User’s Guide 585-310-733 Comcode 107731481 Issue 2 February 1996
Copyright 1998, Lucent Technologies All Rights Reserved, Printed in U.S.A. Notice Every effort was made to ensure that the information in this book was complete and accurate at the time of printing. However, information is subject to change. Your Responsibility for Your System’s Security Toll fraud is the unauthorized use of your telecommunications system by an unauthorized party, for example, persons other than your company’s employees, agents, subcontractors, or persons working on your company’s behalf.
Contents ■ Welcome 1 ■ Call Answering 1 ■ Voice Mail 1 ■ FAX Messaging 1 ■ Intuity Advantages 2 ■ Voice Prompts and Help 2 ■ Terms and Concepts 3 Activity Menu 3 Address 3 Address Before Record (ABR) 4 Autodelete 4 Autoprint 4 Header 4 Mailbox 5 Personal Fax Extension 6 ■ How to Navigate Your Mailbox Options 7 ■ How to Log In 9 Creating or Changing Your Password 10 Recording Your Name 11 Creating Your Personal Greeting 12 Recording Your Basic Greeting 12 Co
Contents Composing a Greeting If You Have a Personal Fax Extension ■ ■ ■ iv How to Record and Send Messages 13 14 Setting Addressing Options 15 Selecting Delivery Options 15 Creating and Sending a Fax-only Message (ABR on) 16 Creating and Sending a Voice Message (ABR on) 17 Creating and Sending a Voice Message (ABR off) 19 Creating and Sending a Voice-fax Message (ABR on) 21 Sharing Fax Machines 23 How to Get and Respond to Messages 23 Listening to a Message Header 23 Responding to a
Contents ■ ■ ■ How to Access Outgoing or Filed Messages 32 Accessing Outgoing Messages 32 Selecting a Message 32 Modifying a Message 33 Re-sending a Message 34 How to Create Mailing Lists 35 Creating a List 35 Deleting Addresses from a List 36 Scanning List Summaries 37 Reviewing and Modifying a List 38 How to Create a Personal Directory 39 Creating and Appending a Directory 39 Reviewing and Deleting Entries from a Directory 40 ■ How to Use Directory Assistance 41 ■ How to L
Contents vi
Welcome INTUITYTM Voice/FAX Messaging is a powerful call answer, voice mail, and faxmessage system. Besides sending and receiving voice mail, you can send, receive, forward, and voice annotate faxes. Call Answering INTUITY Voice/FAX Messaging answers calls when you are unavailable or too busy to answer your telephone. Callers may then leave messages in your voice “mailbox.” Later, you can access your mailbox to get those messages.
Intuity Advantages INTUITY Voice/FAX Messaging provides four key voice and fax advantages: Mobility You can access your voice, fax, and voice-fax messages from anywhere. You can retrieve a fax from your mailbox and have it printed anywhere a fax machine is available. With compatible fax software and a modem, you can access and download faxes to a PC or laptop computer for later use.
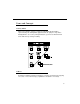
Terms and Concepts Activity Menu After you log into the system, you have six principal keypad activities, represented by the Activity Menu graphic below. As you press keys in the Activity Menu to access the principal functions, you move to different menu levels and the keys change meaning. Address A telephone number (usually an extension) or a name specified for an outgoing voice, fax, or voice-fax message (equivalent to an address on a letter).
Address Before Record (ABR) A user-selected option (on/off) that defines whether a message is addressed before it is created, or created before it is addressed. Autodelete A user-selected option (on/off) that defines whether the system automatically removes faxes from the mailbox as they are printed. Autoprint A user-selected option (on/off) that defines whether the system automatically sends faxes to a designated fax printer.
Mailbox Your personal storage area for incoming and outgoing voice, fax, or voice-fax messages and headers. Your incoming and outgoing voice, fax, or voice-fax messages are stored in categories according to their status. The system keeps incoming messages until you delete them or until an automatic deletion date. Because space is limited, it is wise to review and delete messages regularly. Incoming Messages (received by you) Voice Message A voice-only transmission. Fax Message A fax-only transmission.
New Fax, voice, or voice-fax messages you haven’t retrieved. Unopened Fax, voice, or voice-fax message headers to which you've listened, but have not yet listened to the message itself. Old Fax, voice, or voice-fax messages to which you've listened or printed, but haven’t deleted. Outgoing Messages (sent by you) Accessed Fax, voice, or voice-fax messages delivered and listened to by the recipient. Undelivered Fax, voice, or voice-fax messages not yet sent but scheduled for future delivery.
■ The system sends faxes and the fax portion of voice-fax messages to this extension automatically. Fax headers are stored in your primary mailbox. ■ Fax-only messages addressed to your fax extension do not ring your telephone. ■ Fax-only messages addressed to your fax extension do trigger your message light. ■ Activity Menu access to your personal fax extension and your personal mailbox extension is the same—the system does not separate them.
To select and set your personal mailbox options, you will press Activity Menu, and select from these submenus: 5 from the 1. Mailing list submenu 1 To create a list 2 To scan an existing list 3 To modify a list 2. Personal directory submenu 1 To create a directory 2 To review a directory 3. Fax option submenu 1 Select a default print number Y or N 9 Turn autoprint on or off Select autodelete Y or N Turn autodelete on or off 4. Password 5. Account name 6.
NOTE: Because the system doesn’t signal a caller that call answer is off, compose a greeting that tells callers when call answer is disabled and, if you wish, other options for reaching you. How to Log In Your system administrator establishes your extension or telephone number and a default password for login and assigns a system mailbox-access number, your system extension.You should receive directions specific to your system prior to logging in.
Creating or Changing Your Password After logging in to your mailbox the first time, replace the default password with your personal password. To change your password any time after logging in: 1. Press 5 4 from the Activity Menu. 2. Enter new password (up to 15 digits) and press 3. Re-enter new password and press # # . .
Recording Your Name Record your name to replace the system greeting for your mailbox. Callers hear your voice speaking your name and feel comfortable about leaving messages. You can record your name any time after logging in. 1. Press 5 5 from the Activity Menu. 2. Say your name after the tone. 3. Press 1 4. (Optional) Press one of the following: 1 to re-record (return to step 2). 2 5. Press to play back. 3 # to approve. NOTE: This capability may not be available on your system.
Creating Your Personal Greeting Your system allows you to record and store several personal greetings, each for a specific situation. You can manually activate each greeting as needed (basic mode), or you can keep a number of greetings active at once. See “How to Create Multiple Personal Greetings.” Recording Your Basic Greeting 1. Press 3 from the Activity Menu. 2. Listen to a summary of active greetings. 3. Press 1 to record or re-record a greeting. 4. Enter a number (1 to 9) for the greeting. 5.
Composing a Single Voice-fax Extension Greeting Fax messaging is a new capability and many callers will be unfamiliar with it at first. Callers will find it helpful if you record a greeting that briefly instructs them about your fax messaging. Explain how to transmit a fax: “This is Richard Hyatt at Gobels & Nixon. I’m away from my desk; please leave a message at the tone. If you want to include a fax with your message, press START on your fax machine when you finish speaking.
If you have a personal fax extension, you may want to list your extension on your business card or company stationery and/or instruct callers to send faxes to your fax-only number. Instructional greeting if you have a personal fax extension: “This is Diane Downer at the Commander Heater Company. I’m unable to take your call; please leave a message at the tone. If you want to send me a fax, please call my fax number at 332-3626.
Setting Addressing Options Before moving into the “Creating a Message” category, it is necessary to determine whether messages will be recorded first or addressed first. The options are address before record (ABR) on or address before record off. Once set, addressing can be left in the selected option with no further action by the user, or modified according to individual requirements.
To schedule delivery: 1. Enter delivery time (405 = 4:05). 2. Enter A (or 2 ) for AM or P (or 7 ) for PM and press # 3. Enter delivery month and day (502 = May 2) and press 4. Press # to approve or 3 * (or * D . # . ) to start over. 4 File a copy. (Press again to undo.) 5 To include a fax (in voice-fax mode).
17
Creating and Sending a Voice Message (ABR on) Access the Activity Menu by entering your system extension and password. 1. Press 1 from the Activity Menu. 2. To address a voice message, select one of the following: ■ Enter recipient’s address (that is, the telephone extension, if internal; or the telephone number, if external) and press # . ■ To send to a mailing list: a. Press L * to access a list. b. Enter list owner’s extension and press owner, just press # .) c.
19
Creating and Sending a Voice Message (ABR off) Access the Activity Menu by entering your system extension and password. 1. Press 1 from the Activity Menu. 2. Record message at the tone. 3. (Optional): To edit your message before approving: ■ Press ■ Press one of the following: 1 to stop recording or pause. Continue recording. 1 4. Press # 2 3 * D Play back. (or * 3 ) Delete (and begin again). to approve voice message. 5. Address voice message (ABR off). 20 6.
21
Creating and Sending a Voice-fax Message (ABR on) Access the Activity Menu by entering your system extension and password. 1. Press 1 from the Activity Menu. 2. To address a voice-fax message, select one of the following: ■ Enter recipient’s address (that is, the telephone extension, if internal; or the telephone number, if external) and press # . ■ To send to a mailing list: a. Press L * to access a list. b. Enter list owner’s extension and press owner, just press # .) c.
NOTE: The button label on your fax machine may be different from START. Common alternate keys for this function are SEND, TRANSMIT, and CONNECT. At the prompt, press the key that begins the transmission process.
Sharing Fax Machines If you use a shared or public fax machine (such as a departmental fax), you may wish to avoid tying it up while you transmit to multiple addresses. You may want to store a fax for later use, or it may simply be more efficient to send a fax from your own desk, particularly if you want to attach a private voice message to your fax.
Responding to a Message (Optional) You can respond to a message during or after listening to the header or message. 1. Press 0 to call sender or press one of the following: Reply to sender by voice mail. 1 1 2 Forward with comment at beginning. 1 3 Forward with comment at end. 2. With ABR on, address your message, then record new message. 3. With ABR off, record your message, then address. 4. Press # to approve. 5. Schedule delivery or press # to send now.
3. Press 1 * to print the fax, and choose one of these print options: Print to < default fax machine extension or name>. # * Specify a destination. This number becomes the default for the remainder of the call. # Print at this fax machine (if you have fax capability at your desk or are at the default fax machine or any other fax machine, including off-site). 6 Wait for the START prompt. NOTE: The button label on your fax machine may be different from START.
NOTE: If you have a personal fax extension, you receive only voice messages and fax message headers through your telephone set. Faxes go directly into your personal fax extension without ringing your telephone. Fax headers do trigger your message light. The header may give you a length of time in seconds. This is the length of the message. The header also gives you the fax page count. Scanning Messages Quickly Once you are familiar with how to get messages, try the easier autoscan method.
■ 1) prime-time internal, 2) prime-time external, and 3) out-of-hours calls ■ 1) prime-time busy, 2) prime-time no answer, and 3) out-of-hours calls The first step is to define the types of calls you want to differentiate; then move on to changing call type definitions and assigning greetings to call types. Call Types Internal Those from callers at your business location. External Those from outside your business location. Busy Those that come in when you are using your telephone line(s).
☞ Tips When you select the out-of-hours call type, the other call types automatically apply only to prime-time calls. You must make a choice between internal/external and busy/no answer call types. The system is not set up to handle both sets of situations simultaneously. Changing Call Type Definition 1. Press 3 4 from the Activity Menu. 2. Press any of the following: 1 Differentiate internal/external calls. 2 Differentiate busy/no answer calls. 3 Differentiate out-of-hours calls.
Assigning Greetings to Call Types 1. Press 3 from the Activity Menu. 2. Listen to the summary of active greetings. 3. Press 3 to activate a greeting. 4. Enter a number (0 to 9) to indicate which greeting you want to assign to a call type. 5. Press any of the following: 1 Use the greeting for each call type. 2 Use the greeting for internal (or busy) calls. 3 Use the greeting for external (or no answer) calls. 4 Use the greeting for out-of-hours calls.
Scanning All Greetings 1. Press 3 2 from the Activity Menu. 2. Listen to first greeting status statement. 3. Press any combination of the following: 0 Listen to a greeting. 1 Re-record a greeting. * D ( * 3 ) Delete and skip to the next greeting. 2 Return to the previous greeting. # Save and skip to the next greeting. 4. Press * # to quit scanning.
32
How to Access Outgoing or Filed Messages To check the status of outgoing messages, access them by following the steps listed below, then move on to selecting, modifying, and re-sending them. Accessing Outgoing Messages 1. Press from the Activity Menu. 4 2. Listen to the first category and message header. Categories: Undeliverable Can’t be delivered, usually because the recipient’s mailbox is full. You can listen to, re-address, and rerecord these messages.
2 Return to previous messages. 2 # Save and skip to the next message. # Skip to the next message category NOTE: For delivered or accessed messages, you can listen to the headers only. You can’t change or re-send these messages. After you review an accessed message header, the system deletes the header automatically. Modifying a Message When you have selected a message to modify or re-send, choose one of the following options. 1. Press 1 to modify and/or re-send the selected message.
Press # # to re-send an undelivered message to the original recipient only.
Re-sending a Message When you have selected a message to modify/re-send, choose one of the following options to re-direct your message. 1. For filed and undeliverable messages: a. Enter address(es) or list via b. Press # # * L (* 5 ). to approve and send immediately. or c. Enter delivery options and press # . 2. For undelivered messages: a. Enter additional addresses and press b. Press * 1 # . to review and edit original addresses. c. Change delivery times or options.
3. Press one of the following: 1 Make the list private. 2 Make the list public 4. Enter an address and press # . 5. Repeat step 4 until list is complete. 6. Press # to approve. NOTE: After you address a message using a list, the system asks for more extensions. Do not add extensions that are already used in addressing of the list just appended. Specify an address as a number or name—press modes.
Scanning List Summaries 1. Press 5 1 from the Activity Menu. 2 2. Listen to the list summary. 3. Press any of the following: Skip to next list. # * 0 38 D (* 3 ) Delete the entire list. Review/modify list members. (Return to “Reviewing and Modifying a List.
Reviewing and Modifying a List 1. Press 5 1 from the Activity Menu. 3 2. Enter list owner’s extension and press press # .) 3. Enter list ID and press # # . (If you own the list, simply . 4. Listen to the first name, then press any of the following: Skip to the next name. # * (* D 3 ) Delete name. Repeat name. 2 2 2 Return to previous name. * 1 Review from beginning. Add/delete specified entries or change public/private status, then do the following: 1 a.
How to Create a Personal Directory The system allows you to create a personal directory of abbreviated names (aliases) for frequently used addresses. It’s essentially a sophisticated speeddialing feature. Creating and Appending a Directory You must be addressing by name ( * A / * 2 ) to use your personal directory. You can create your personal directory in name or number addressing mode. 1. Press 5 2 1 from the Activity Menu. 2. Enter an address and press # . 3. Listen to your entry’s address.
Reviewing and Deleting Entries from a Directory 1. Press 5 2 . 2.
■ Press 2 to review all aliases. While listening to each entry, press Skip to next alias. # * D 2 2 (* 3 ) Delete. Return to the previous alias. Stop reviewing. # ■ Press 3 to review specific aliases: a. Enter alias to review and press # . b. Listen to corresponding address. c. Repeat for more aliases. d. Press 3. Press * R (* 7 * # to stop reviewing. ) to return to the Activity Menu.
1. Press N * * (* * 6 ) from anywhere in the system. 2. Do one of the following: ■ To hear the extension number associated with a name, enter the name (last name first, with no spaces between the first and last name), then press # . ■ To hear the name associated with an address, press 2 ), enter the address, then press # . * A ( * ☞ Tips The extension you hear associated with a name is not always the entire address. You must add the appropriate prefix numbers for users on remote systems.
b. Enter the extension. c. Press # . NOTE: If you record a message and either hang up or go to another option, the system automatically delivers your message to the person you are calling.
45
Tips and Highlights General Message Handling Logging in quickly From your telephone, dial the system extension, press # (you don’t need to enter your extension), and enter your password. Logging in from a system telephone From any telephone connected to your company’s system, dial the system extension, then enter your extension and password.
Getting Messages Scan messages quickly You can automatically play all your messages by pressing just two buttons, 7 plus either 1 to scan messages and headers, 2 to scan headers only, or 3 to scan messages only. Scanning is especially useful with a car telephone. Use playback controls When listening to messages, you have controls for loudness, speed, stepping back and forth, pausing, and repeating messages. Record a personal greeting Replace the automatic system greeting with your personal hello.
Leaving Messages When No One Answers Use playback and record controls To listen to and edit the messages you leave when there’s no answer, you have many controls. Bypass greetings and record immediately You don’t have to listen to another user’s call answer greeting. You can, instead, press 1 to bypass the greeting and begin recording immediately. Use directory assistance If you don’t know the extension of another user, find it with your voice messaging system.
Schedule delivery Schedule a message for delivery to others at a specified time and date. Use the system as a calendar/reminder by scheduling messages to yourself. Use mailing lists Create a mailing list of extensions. Then send your message to one destination—the mailing list. All extensions in the list receive the message. You can also forward messages to a mailing list. Send messages to a name, not an extension When you send a message and don't know the extension of the recipient, press * A (* 2 ).
50