
Installation Guide


Installation Instructions
3 | P a g e v 1 . 0 (06 / 2 0 2 2 )
Installation Directions
1. Remove all packaging material from the product and be careful not to throw away accessories that may be hidden
within the packaging material.
NOTE: Before the installation, plug the downlight into a socket outlet to ensure it is working correctly.
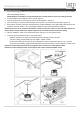
2. Cut an installation hole of Ø 90mm into the ceiling. (Figure 1)
3. Insert the plug into the socket outlet and ensure it is fully plugged in. (Figure 2)
4. Push the springs up and put the LED downlight up through the cut-out hole and into the ceiling. (Figure 3)
5. Ensure all the clearance values are maintained during and after installation of the LED module, LED driver, thermal
insulation, loose fill insulation, loose combustible materials and any structural members. (Figure 4)
NOTE: Please refer to the Clearance Information section and the IC-4 section in this instruction manual for
further details. Keep the LED driver 100mm away from the recessed luminaire to allow for cooling.
6. After the installation, switch on the recessed luminaire and enjoy your new lighting product.
7. To operate the colour shifting function, use the wall switch.
− While the luminaire is on, toggle the wall switch OFF and ON again within 3 seconds.
− The colour shifting sequence will jump from 3000K – 5000K – 4000K.
− For the colour shifting to memorise the colour temperature, leave the wall switch OFF for over 7 seconds.
To reset the colour shifting, toggle the wall switch OFF and ON twice within 1 second. Repeat if it doesn’t reset.
NOTE: The colour shifting function will only operate with a mechanical or relay ON/OFF switch.
NOTE: The colour shifting function will not operate with a semi-conductor ON/OFF switch.