
Manual


>>Stand-alone DVR User Manual
21
a) Manual recording:
After choose the channel, this channel will start to recording under scheduled parameters (refer to
recording parameter setting), and you should manual stop the recording if you need to, the method
is to anti-election and confirm it.
b) Schedule Recording
First you should set the recording time period and then turn on this channel recording. When in
scheduled time period, the system will start recording automatically till the time period over.
Time period setting: press relevant channel time period setting button to enter setting page.
Please be noted that the time period can not be in two days.
c) Alarm recording:
Refer to alarm setting
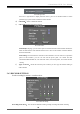
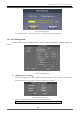
2) Bit stream parameter setting:setting interface as below.
Pic.23 Stream setting
a) CH title Added:Add the channel title into bit rate, so that the recording file and long range
preview picture will have channel title information.
b)
Time Info. Add:Add the time into bit rate, so that the recording file and long range preview.
c)
Picture will have time information.
d)
Data Cover Automatically:When HDD is full, new recording file will automatically cover old
files from beginning.
e)
Add audio:Video and audio recording simultaneously, can remote monitoring voice.
f)
Frame rate setting:you can set recording frame rate,PAL format from 1~25FPS optional,
NTSC format from 1~30FPS optional.
g)
Image quality level:There are 6 level image quality. 1 is the best,6 is the worst。The higher
level of image quality, the greater the stream. The more clear image, the greater the share of
network bandwidth and disk space.
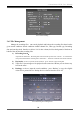
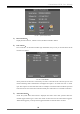
3.6.4 Alarm set
Set the host alarm trigger channel and relevant trigger condition, setting interface as below:
include “motion ” and “sensor” setup: