
User guide

CHARGE PROCESS
PROGRAMME STRUCTURE - SETUP
VIEW LAST DATA
P1 PROFILE NAME .
LINEAR CHARGE
SETUP START
P1 PROFILE NAME .
DISCHARGE
SETUP START
P1 PROFILE NAME .
CYCLE
SETUP
START
P1 PROFILE NAME .
BALANCE
VIEW
START
P1 PROFILE NAME .
CONFIG
SETUP
P1 PROFILE NAME .
MOTOR-ESC-SERVO
SETUP
START
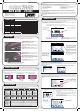
P1 CHARGE [1/2] X
Chg Mode : Linear
Current : 4.0A
DPeak : 20mV
Trickle : Off
Safety Time: 90min
SET
NEXT
P1 CHARGE [2/2] X
Cut-Temp : 55°C
SET
NEXT
P1 DISCHARGE X
Current : 20.0A
Pack.Volt : 7.4V/2S
Cutoff.V. : 3.2V/C
Cut-Temp : 50°C
SET
P1 CYCLE X
Direction : CD
Cycles : 1
Chg Delay : 10min
Dischg Delay: 10min
SET
P1 BALANCE [1/2] X
1s:0.000V
▲2s:0.000V
3s:0.000V
▼4s:0.000V
Gap 0.000V
NEXT
P1 DATA VIEW [1/3] X
Input : 0.000V
Output : 0.000V
Batt.Temp : 0.0°C
Max Temp : 0.0°C
Resistance : 0.0mΩ
NEXT
P1 CONFIG [1/2] X
Button Sound : ON
Finish Sound :15sec
Finish Melody: 1
LCD Contrast : 10
Temp Scale : °C
MOTOR-ESC-SERVO X
Signal Min : 1100
Signal Max : 1900
SET
P1 PROFILE NAME .
LINEAR CHARGE
SETUP
START
CHARGE START X
Chg Mode : LiPo
Pack.Volt : 7.4V/2s
Current : 6
.0A
Cut-Temp : 40°C
P1 PROFILE NAME .
.
LIPO CHARGE
SETUP START
P1 PROFILE NAME ..
STEP CHARGE
SETUP
START
P1 PROFILE NAME .
.
LIFE CHARGE
SETUP
START
CHARGE START X
Current 0.0
0.0 0.0 0.0 0.0
Capacity 0.0
0.0 0.0 0.0 0.0
CHARGE START X
Chg Mode : Linear
Pack.Volt : Auto
Current : 4
.0A
DPeak : 2
0mV
Trickle : Off
Cut-Temp : °C
CHARGE START X
Chg Mode : LiFe
Pack.Volt : 6.6V/2s
Current : 6
.0A
Cut-Temp : 40°C
CHARGE START X
Autostart : 0min
Storage Charge
XXXX : 0.0X
START
CHECK STATUS:
BATTERY......ok
Connection...ok
AUTOSTART TIMER _
Time to Start
00m00s
STOP START
P1 PROFILE NAME .
VIEW LAST DATA
START
_XXXX CHARGE 02m30s
Capacity 250mAh
Current 6.00A
Voltage 7.82V
Resistance 0.0mΩ
Temperature 0.0°C
NEXT
STOP
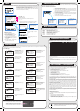
P1 CHARGE [1/2] X
Chg Mode : Step
1st: _ _ 1.0A/0.1Ah
2nd: _ _ 4.0A/1.0Ah
3rd: _ _ 8.0A/4.0Ah
4th: 4.0A/5.5Ah
SET
NEXT
P1 CHARGE [2/2]
X
DPeak : 15mV
Trickle : Off
Safety Time : 120min
Cut-Temp : 50°C
SET
NEXT
P1 DATA VIEW [1/3] X
Input : 0.000V
Output : 0.000V
Batt.Temp : 0.0℃
Max Temp : 0.0℃
Resistance : 0.0mΩ
NEXT
GRAPH VIEW [3/3] X
0:00:00 0.00V Gr=V
0.000Vc 0.000V =A 0X
P1 PROFILE NAME ..
VIEW LAST DATA
START
CYCLE DATA 0 [2/3] X
-Chg- -Dischg-
000m00s 000m00s
0.000Vp 0.000Va
000.0Ah 000.0Ah
NEXT
DATA VIEW [3/3] X
0:00:00 0.00V Gr=V
0.000Vc 0.000V =A 0X
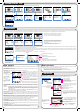
Autostart: This handy feature lets you preselect when you want to start charging your battery with the Pulsar Touch. The Autostart Timer is adjustable from 0 - 99min. If you stay in the „Autostart Display“ for longer then
30sec without setting a value, the charging process will start automatically.
Storage Charge: Never store your batteries completely empty as this will harm them and lower their performance. Due to this fact, the Pulsar Touch features a „Storage charge“ mode. With this function, you can set a
fixed voltage (vor Lixx batteries) or fixed capacity (for Nixx batteries) value and the battery will be partially charged or discharged (in case of Lixx) exactly to this level. Thus you can always perfectly prepare your battery
for storage, if you want to store them over a longer period of time.
Our recommendations: NiMH/NiCd: 50% of nominal capacity *** LiPo: 3.8V/cell *** LiFePo: 3.4V/cell
After starting the operation by pressing „START“ button or cell
symbol (both works!) the choosen settings will be indicated
for you again to avoid incorrect settings for the battery you
intend to charge.
You can cancel the operation, and return to main menu, by
pressing the „X“ symbol in the upper right corner.
Depending on which profile you have choosen or if you altered
the settings under „SETUP“ the designated charge type „LINE-
AR“, „LIPO“, „LIFE“ or „STEP“ will be indicated on the screen.
time until charging starts, you
can skip and start immediate-
ly by pressing „START“ or you
can return to the main menu
by pressing „STOP“.
your charger checks if all con-
nections and the battery itself
are ok and if charge process
can be started.
After powering up your Pulsar Touch you are in the main menu where you can scroll through all functions (Charge / Discharge / Cycle / Balance / View Last Data / Config / Motor-ESC-Servo) and either start the required process by press „START“ button or access the
particular functions setup by pressing „SETUP“. All the functions and our recommendations are explained in detail on next pages.
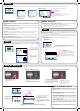
CHARGE - explanations:
LiPo/LiFe pack voltage: The packs rated voltage for LiPo/LiFePo batteries must be set according to the packs rating.
Linear Charge: the most common method for NiMH/NiCd cells, a constant current from beginning to end of charge
process, the easiest method for charging.
Step Charge: should only be used by experienced racers and only for NiMH cells!
Charge Algorithms: the Pulsar Touch contains high-accuracy charge profiles for each type of battery, make sure you
always use the correct „Chg Mode“ setting for the battery you want to charge, as wrong setting may result in damage to
the battery!
LiPo/LiFePo charging using the CC/CV-charging method. With this charging method, the battery gets charged with
a constant current first. As soon as the battery voltage reaches the max. allowed charging voltage per cell
(for example, LiPo 4.2V and LiFePo 3.7V), the charger automatically reduces the charging current till the
battery is fully charged.
NiMH/NiCd charging with constant current (Linear- or Step-Mode!) + delta-peak detection. This is the most
popular charging method for NiMH/NiCd-batteries in competition
Charge Current: The charge current can be set from 0.1 to 12.0A, for racing cells (Sub-C size) in LiPo, LiFe and NiMH
technology you can usually use 1.5C charge rate (e.g. 7.5A for a 5000mAh pack) with no problem. However, for lower
grade cells and receiver-/transmitter battery packs you should use a lower charge current and should follow your battery
manufacturer‘s recommmendations.
Delta Peak: With NiMH/NiCd-batteries, you only obtain the optimum battery performance by slightly „overcharging“ the
battery. In real terms, it will not be overcharged, but charged to an optimum level. The battery voltage drops at the end of the
charging process (delta). The size of the drop (delta peak) is adjustable in the range between 1 - 200mV. The higher the value,
the hotter the battery will be at the end of the charge. We recommend to start with the works-default settings.
Note: The adjustable Delta-Peak value applies to the whole battery pack and not to one single cell!
Trickle Charge: This current, which flows after delta peak cutoff, is adjustable from 0.0 - 0.5A to achieve the highest
possible voltage for NiCd cells. Set this function to „Off“ for NiMH cells. Alternatively you can use the Auto Trickle Function
for an automatic Trickle Charge setup.
Connections: make sure you use high-quality wire and connectors for maximum accuracy, a poor connector or poor wire
may create heat and affect the accuracy,
Temperature Sensor: there is an optional temperature sensor available, so you can monitor the battery temperature
during charging and discharging. As it‘s normally not required for most users, we didn‘t include it with the charger as it would
have only increased cost for everyone. When no sensor is connected, display will indicate „0.0°C“
The Pulsar Touch
can charge LiPo, LiFePo, NiMH and NiCd batteriesand incorporates the designated charge algorithms for each particular cell type for best performance, reliability and safety with up to 12.0A charge current. Please always follow your battery
manufacturers recommendations for maximum allowed charge current and make sure you always use the correct „Chg Mode“ setting for the battery you want to charge, as wrong setting may result in damage to the battery!
Time elapsed since start of charge
Charge capcacity
Charge current (adjustable during charging!)
Actual pack voltage
Internal resistance of your pack during charging
Temperature of your pack (optional with sensor)
Chg Mode
Current and Capacity for 1
st
step, should be a low
value for current and capacity (1.0A and 0.1Ah is our
suggestion)
2
nd
step current can be higher, we suggest to charge for
25% of batteries nominal capacity with 1C charge.
3
rd
step, this current you can set fairly high (up to 2C
charge rate), only charge to 75% of batteries nominal
capacity with this rate.
4
th
step, use lower current again to end of charge for
accurate peak detection and best performace. Set ca-
pacity for this step to ~110% of nominal capacity.
Same settings on the second screen of „Step Char-
ging“ as for normal linear charge of NiMH/NiCd cells!
You may select special
charging methods for
1
st
to 3
rd
step (4
th
step is
fixed to linear!):
_ = Linear charge
∏ = Impulse -
charges with 1.5x of
selected current for
short periods.
∐ = Refl ex - char ge s
with short discharge
spikes every few se-
conds.
The Pulsar Touch allows to view the stored data of the last 11 processes (charge, discharge or cycle). You can access the
same data also during any operation (charge, discharge, etc) by pressing the „NEXT“ button, this means you can view the
stored data from a previous operation during actual use! The last operation is always the memory „0“.
using up/down arrow keys allows you to scroll
through the stored 11 cycle data‘s (number is
indicated in headline, 0 - 10).
discharge time
average voltage during discharging
discharged capacity
here you can view the charge or discharge
curve of the selected data and can even select
different curves, zoom into the curve, etc as
explained below (this is only useful for expe-
rienced users!)
charge time
peak voltage at end of charge
charge capacity
Charger‘s input voltage
Voltage at output socket
Actual battery temperature
Maximum temperature which battery reached
Internal resistance of battery
you can display three different parameters
as a curve and you hop through them by
pressing circled area briefly (V = voltage,
I = current, T = temperature
increase or decrease the marked (inversed/
black background) value.
Zoom Level of X-Axis (Time, horizontal):
AT = Automatic Zoom
1x to 43x = Manual Zoom
press curve to activate
measurement line, which
can be moved with up/
down buttons.
Resolution of Y-axis (voltage,
current or temperature), if „=A“
it‘s on automatic setting
middle point of Y-axis
CHARGE - further screens:
During running charge process there is additional information available, by pressing „NEXT“ button you may access those.
The available screens are (you jump to next by pressing „NEXT“ again):
- Voltage of each cell in pack (if balancer is used!), for description see section „Balancer“.
- Internal resistance of each cell in pack (if balancer is used!), for description see section „Balancer“.
- Data View screens, , for description see section „View Last Data“.