
Instruction Manual


TROUBLESHOOTING
II. No audio present.
a. Using a DC Voltmeter, check the voltage across terminal “A” and “C” (”A” positive; “C” ground) of the Mic 3-Pin
Terminal Block[12]. It should read 12V. The microphone requires 12Vdc to work.
1) Check connections to the microphone.
b. Remove the wire connected to the “B” terminal of the Mic 3-Pin Terminal Block. Using an AC meter (set to
lowest voltage range), check the presence of audio from the microphone. Place the meter leads between wire
removed (positive) and terminal “C” (ground). Generate some loud noise close to the remote microphone
while observing the meter reading. If audio is present, the meter reading will start to fluctuate. If there is no
movement, the remote microphone is defective. Call factory for assistance.
Factory assistance is available between 8:30 AM to 4:00 PM Pacific time. Call (818) 994-6498.
INSTALLATION AND OPERATING INSTRUCTIONS
Page 7 of 8
LOUROE ELECTRONICS 6 9 5 5 VA L J E A N AVENUE, VAN NUYS, CA 91406 TEL (818) 994-6498 FAX 994-6458
website: www.louroe.com e-mail: sales@louroe.com
(818)
®
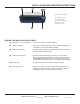
SPECIFICATIONS - Verifact™ A
Frequency response
Output
Current drain
40 Hz to 15 kHz ± 1 dB
4 mA
Supply voltage 12 Vdc
Microphone housing High impact ABS
Dimensions US
Weight
4” " dia x 1 ½ H
(10cm dia x 3.8cm H)
0.5 Lb (0.2 Kg)
Line Level (0 dB @ 1000W)
metric
ask4_108_inst_9/13
SPECIFICATIONS (APSeries)
Input impedance
(from remote mic)
100KW
Monitor power output 1W @ 8
Audio input impedance 10k
Freq. response 100 Hz to 10kHz
Power input 12 Vdc, 500mA
Dimensions 6 5/8"W x 8 5/8 x 2 1/8"H"L
Headphone impedance
Current Drain
8 to 600
200mA
Weight 1lb 12oz
Audio output impedance
1KW
Power Input Frequency
50 / 60 Hz