
User's Manual
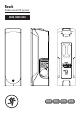


Reach Professional PA System
8
Reach Professional PA System
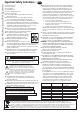
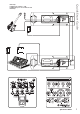
Rear Panel Descriptions –
EN ES FR DE
1. Power Connector & Switch Connect the supplied AC power
cord to this IEC jack. The power switch turns the Reach on and
off.
2. Combo Inputs Connect a balanced or unbalanced mic,
instrument or line-level signal using an XLR or 1/4" connector.
3. OL LED The OL LED illuminates when an input signal
is too high.
4. Aux Input Connect a line-level signal from an MP3 player,
smart phone or other signal source.
5. Phones Connect stereo headphones using a 1/4" connector.
6. Footswitch Connect a footswitch to mute or un-mute the
internal effects.
7. Link In / Out Using two 1/4" TRS cables, feed the Link Input
of each Reach from the Link Output of each Reach. Alternately,
connect the Link Output jack to a subwoofer or external monitor.
8. Meters Used to gauge the input and output levels.
9. FX / LVL Press to select and adjust the channel’s input level;
press and hold to select and adjust the channel’s FX send level.
10. Hold To Pair Press and hold to pair with a Bluetooth device.
The Bluetooth connection may disconnect when affected by
electrostatic discharge (ESD) or electrical fast transients (EFT).
If this occurs, manually reconnect the Bluetooth connection.
11. Side Mon Press to select and adjust the side mon output
level.
12. Main & Phones Press to select and adjust the main output
and the phones output level.
13. Front Panel LED Press the “Side Mon & Mon Out” and “Main
& Phones” buttons to turn the front panel Running Man logo LED
on and off.
14. Level Adjusts the input levels, FX send levels, and overall
output level.
15. Feedback Destroyer Hunts down offending frequencies
and destroys feedback to maximize gain.
16. FX Change the selected FX to be Verb 1, Verb 2, Delay 1,
or Delay 2.
17. EQ Optimizes speaker voicing for the selected application.
18. Speaker Selection Choose to activate only the left, only
the right, both or neither (mute) of the side monitor speakers.
1. Interruptor y toma de corriente Conecte el cable
de alimentación incluido a esta toma IEC. El interruptor
le permite encender y apagar el Reach.
2. Entradas Combo Conecte a esta toma combinada un
micrófono, instrumento o señal de nivel de línea balanceada
o no balanceada usando una clavija XLR o de 6,3 mm.
3. Piloto OL Este piloto se ilumina cuando la unidad esté
recibiendo una señal demasiado potente.
4. Entrada Aux Conecte una señal de nivel de línea de un
reproductor MP3, smartphone u otra fuente.
5. Toma de auriculares Conecte unos auriculares estéreo
usando una toma de 6,3 mm.
6. Footswitch Conecte aquí un pedal para anular o activar la
unidad de efectos interna.
7. Link In / Out Por medio de dos cables con conectores TRS de
6,3 mm, conecte la toma Link Input de un Reach a la toma Link
Output de otro Reach. Alternativamente, conecte la toma Link
Output a la entrada de un subwoofer o monitor externo.
8. Medidores Se utilizan para calibrar los niveles de entrada
y salida.
9. FX / LVL Pulse este botón para elegir y ajustar el nivel de
entrada del canal; manténgalo pulsado para elegir y ajustar el
nivel de envío de efectos del canal.
10. Hold To Pair Manténgalo pulsado para conseguir la
sincronización con un dispositivo Bluetooth. En enlace Bluetooth
puede desconectarse si se ve afectado por una descarga
de electrostática (ESD) o transitorios eléctricos bruscos (EFT).
En esos casos, reconecte manualmente el enlace Bluetooth.
11. Side Mon Pulse este botón para seleccionar y ajustar el nivel
de salida del monitor lateral.
12. Main & Phones Pulse este botón para seleccionar y ajustar
el nivel de salida de auriculares y la salida principal.
13. Piloto del panel frontal Pulsados los botones “Side Mon &
Mon Out” y “Main & Phones” para encender y apagar el piloto del
logo en el panel frontal.
14. Level Este mando le permite ajustar los niveles de entrada,
niveles de envío de efectos y el nivel de salida global.
15. Feedback Destroyer Localiza las frecuencias molestas
y suprime la retroalimentación para maximizar la ganancia.
16. FX Le permiten cambiar el efecto elegido a Verb 1, Verb 2,
Delay 1 o Delay 2.
17. EQ Optimice con este ecualizador la respuesta del altavoz
para cada aplicación concreta.
18. Selector de altavoces Con este selector puede elegir entre
activar solo el monitor lateral izquierdo, solo el derecho, ambos o
ninguno (mute).
Descripción del panel trasero –
EN ES FR DE