
Installation Guide
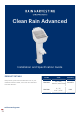


INSTALLATION
Installation
WHAT’S IN THE BOX? TOOLS/MATERIALS YOU MAY REQUIRE
Clean Rain Advanced Tape measure
Marker pen
Saw
Screws
Screwdriver or drill
Solvent cement glue
rainharvesting.com
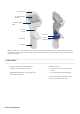
1 - Remove 600mm of downpipe from where the Clean Rain® is to be situated. Ensure all edges are clean
and smooth.
2 - Using the quick release tabs remove the Clean Shield™ by lifting it up and out.
3 - Fit the correct downpipe adaptor to the bottom of the Clean Rain®.
4 - Install the Clean Rain® by sliding it up behind the top section of cut downpipe and then down into
position. The Clean Rain® should be slid firmly onto the bottom downpipe until it can be pushed no
further.
5 - Screw the top of the Clean Rain® in position through the screw slots provided. Ensure appropriate
screws and anchors (if required) are used.
6 - Insert the Clean Shield™ back into the Clean Rain®. Ensure the Clean Shield™ is sitting firmly in place
and check installation is secure.
7 - Fit the hose or pipe of your choice (20mm garden hose thread, 22mm greywater hose, 38mm pool
hose or 90mm pipe) to the outlet.
(a) For a garden hose, unscrew one or two caps and screw one or two garden hoses onto the outlet.
(b) For a 22mm greywater hose and 38mm pool hose, unscrew the cap and push the hose onto the outlet.
(c) For 90mm pipe, remove the outlet cap and cut off the hose fittings, then insert the cap into 90mm
pipe and glue. Reinsert the cap into the Clean Rain outlet and swivel the Clean
Rain body to direct the pipe towards your rainwater tank or where the rainwater is being diverted to.