
User Guide
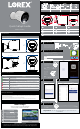

Dimensions
Camera Overview
Package Contents
Power AccessoriesMounting StandsHD Wi-Fi Camera Mounting Kit
×12
×12
×8
×1
• Read this guide carefully and keep it for future reference.
• Follow all instructions for safe use and handling of the product.
• Use the camera within given temperature, humidity and voltage levels noted in the camera’s specications.
• Do not disassemble the camera.
• Do not point the camera directly at the sun or a source of intense light.
• Periodic cleaning may be required. Use a damp cloth only. Do not use any harsh, chemical-based cleaners.
Safety Precautions
a
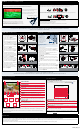
Plug in the camera:
DO NOT DOWNLOAD
Lorex Home
Congratulations! You can now view live video from your camera on your
mobile device.
Verify your camera image by temporarily plugging it in indoors. You will complete nal installation and
mounting later in the process.
• Connect the included power
adapter to the camera cable.
No need to use the included
extension cable at this time.
b
Download and sign up with Lorex Home:
• Download and launch the Lorex Home app from the App
Store or Google Play Store.
• Tap Sign up, then follow the on screen prompts to create an
account. Record your account details below:
Email:
Account Password:
c
Add your camera:
• Wait until the startup
chime is heard and the
status LED on the camera
is ashing green.
• From the Devices tab, tap .
NOTE: If this is not your rst device, tap +
in the top-right corner.
• Scan the QR
code on the
bottom of
the camera:
NOTE: If your mobile device cannot scan the
QR code, tap Manually enter Device ID.
d
Create password
• Create a secure password for the
camera.
e
Connect to Wi-Fi
• Select your Wi-Fi network from the list.
• Enter your Wi-Fi password, then tap Connect.
Camera Password:
f
Finishing touches
• Wait until the status LED on
the camera is solid green,
then tap Next.
• The camera is added to your Lorex Home account.
• Set the camera name and timezone, then tap Complete.
STEP 1: Getting Started
Status LED Behavior
See table below for denitions of camera’s LED behaviors:
Behavior Meaning
(steady)
Operating correctly.
(ashing)
Ready for connection.
(ashing rapidly)
Mobile device is attempting to connect to the camera.
(steady)
Device malfunction. Try resetting the camera (see ‘Camera Overview’ for details) and
repeating the setup.
(ashing)
Network connection failed. Try resetting the camera (see ‘Camera Overview’ for details)
and repeating the setup.
(ashing rapidly)
microSD error. Try removing and re-inserting the included microSD card, or try a different
card.
(alternating)
Firmware upgrade in progress.
W282CA_QSG_EN_R1
W282CA Series
Quick Setup Guide
5.3” / 134mm
3.1” / 78mm
3.4”
85mm
Copyright © 2020 Lorex Corporation
As our products are subject to continuous improvement, Lorex reserves the right to modify product design,
specications and prices, without notice and without incurring any obligation. E&OE. All rights reserved.
Need Help?
Visit us online for up-to-date software
and complete instruction manuals.
Click on the Downloads tab
4
Visit lorex.com
Search for the model
number of your product
Click on your product
in the search results
3
2
1
Camera with wall mount
Camera with ceiling mount
5.1” / 129mm
3.1” / 78mm
4.6”
118mm
D
A
E
H
E
C
F
A
Microphone
D
Warning Light
B
Image Sensor
Status LED
IR LED
Power Cable
I
J
C
B
G
F
H
IG
Mounting Point
Speaker
microSD Slot
J
Reset Button: Press and hold for 10 seconds until you hear the audible chime.