
User`s guide


1
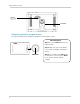
Video monitor overview
Video monitor
Video Button
Press the Video button to
turn off the screen until the
Video button is pressed
again. The speaker will
remain on.
Press to access the monitor menu
options. Press Menu again to exit.
Joystick
Use to navigate monitor
menus. Press down on the
joystick to confirm a
selection.
Volume Control
Press + / - to control the
volume level.
Audio Level Indicator
Displays the level of sound
detected by the camera.
Menu Button
Talk Button
Hold the talk button to
enable two-way audio
between the video monitor
and camera.
ON/OFF Switch
Slide the power switch to the
ON position to turn the video
monitor on.
Music Buttons
Press the button once to
begin playing a tune. Press
the button again to stop
the tune.
Press the button to skip to
the next tune.
Power LED
Glows green to indicate unit
is powered on. Blinks when
the battery is low.
Microphone
Allows you to speak to the
person on the camera side
when you press the Talk
button.
Slide the switch to release the
monitor antenna.
Antenna Unlock Switch
Sequence/Quad Button
Press the Sequence/Quad button
to view video in Quad view (4 screen
split view), or in Sequence view.
Scan Button
Turns off the video monitor, and
waits for a camera to detect a
sound. When sound is detected,
the video monitor turns back on.
Charging LED Indicator
Glows red to indicate video
monitor is charging.
Glows green to indicate video
monitor is finished charging.
Cam Button
Press the Cam button to manually
switch between channels 1-4.
Power Port
Connect the power adapter
into the power port to charge
the video monitor.
Mini-USB Port
Connect a mini-USB cable
(included) between the video
monitor and a computer to
view video remotely using
Skype (setup required).
SCAN
Lights up when the video
monitor is in Scan mode.
SCAN LED
overview