Handheld Thermal Temperature Monitoring Camera Manual LTH02 Series lorex.
Foreword General This manual introduces the appearance and basic operations of the handheld thermal temperature monitoring camera (hereinafter referred to as "the Camera"). Safety Instructions The following categorized signal words with defined meaning might appear in the manual. Signal Words Meaning Indicates a high potential hazard which, if not avoided, will result in death or serious injury. Indicates a medium or low potential hazard which, if not avoided, could result in slight or moderate injury.
Important Safeguards and Warnings This chapter describes the contents covering proper handling of the Camera, hazard prevention, and prevention of property damage. Read these contents carefully before using the Camera, comply with them when using, and keep it well for future reference. Power Requirements ● All installation and operation should conform to your local electrical safety code. ● Check whether the power supply is correct before operating the Camera.
● Do not aim the lenses at intense radiation source (such as sun, laser, and molten steel) to avoid damage to thermal detector and visible lens. ● Prevent liquid from flowing into the Camera to avoid damage to the internal components. In case the liquid entering the Camera, immediately stop using the Camera, cut off the power, and disconnect all the cables. Then contact the local customer service center.
Table of Contents Foreword .................................................................................................................................................... I Important Safeguards and Warnings ..................................................................................................... II 1 Checking the Package .......................................................................................................................... 1 2 Structure....................................
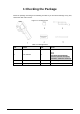
1 Checking the Package Check the package according to the following checklist. If you find device damage or any loss, contact the after-sales service. Figure 1-1 Package items Table 1-1 Package items No. Name No. Name Adapter 1 The Camera 2 3 USB cable 4 Quick start guide 5 Wrist rope — — 1 Five plugs are provided for Chinese, American, European, Australian, and British standards.
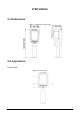
2 Structure 2.1 Dimensions Figure 2-1 Dimensions (mm [inch]) 2.
Table 2-1 Front panel description No. Component Description 1 Display screen Displays live interface and menu interface. Power button ● Press and hold the power button to power on or off the Camera. ● On the live interface, press the power button, and the Camera goes to the standby state; under standby state, press any button to wake up the Camera. ● On the menu interface, press the power button to go to the submenu interface.
No. Component Description ● Charging: Red light on. ● Full charging: Green light on. 4 Charging indicator light The battery can be recharged repeatedly, but it is a wearable product. If the standby time of the Camera has been greatly reduced, please contact the after-sales support to replace the battery. 5 USB port Used for connecting the USB cable. 6 SD card slot Used for installing a SD card. 7 Thermal lens Used for monitoring.
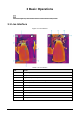
3 Basic Operations Interfaces might vary with models and the actual interface shall prevail. 3.1 Live Interface Figure 3-1 Live interface Table 3-1 Live interface No. Name 1 Recording videos. 2 Temperature unit. 3 Highest temperature spot. 4 Center spot temperature monitoring. 5 Center spot cursor. 6 Recording duration. 7 Color bar. 8 Head detection mode. 9 Time display. 10 SD card status. 11 Battery status.
3.2 Installing SD Card If you want to store images and recorded videos, you need to purchase and install an SD card first. Step 1 Open the silicone plug on the top of the Camera. Step 2 Face the label side of the SD card to the camera screen, and then insert the SD card slowly until you hear a click sound. Step 3 Cover the silicone plug. The SD card does not support hot swapping during image capturing or recording. 3.
Video playback on the Camera is not supported. To play back the recorded videos, you can copy them to your PC. 3.7 Exporting Images and Recorded Videos You can export images and recorded videos locally. Step 1 On the live interface, press , and the Menu interface is displayed. Step 2 Press to select System Settings, and then press , and the System Settings interface is displayed. Step 3 Select USB Option, and then press , and the USB Option interface is displayed.
● Do not perform any operation during the backup. ● The Camera will be automatically restored to the backup program if the upgrade is failed. 3.9 Auto Maintenance Step 1 Step 2 On the live interface, press to go to the Menu interface. Select System Settings > Auto Maintain, and the Auto Maintain interface is displayed. You can set auto standby time and auto shutdown time of the Camera. ● Auto Standby Press to switch and select time.
4 Temperature Monitoring Configuration ● Interfaces might vary with models and the actual interface shall prevail. ● The following cases will reduce battery life: Enabling head temperature monitoring, sound alarm linkage, snapshot linkage, and video recording. 4.1 Temperature Settings The Camera supports monitoring the real-time temperature of target objects in different scenarios. Temperature monitoring parameters affect the accuracy of monitoring results.
4.2 Temperature Monitoring Settings The Camera supports temperature monitoring. An alarm will be triggered when the temperature of the monitoring target exceeds the alarm threshold. Monitoring method includes Max Temp Point and Head Detection. Step 1 On the live interface, press , and the Menu interface is displayed. Step 2 Press to select Temp Settings, and then press , and the Temp Monitor interface is displayed.
5 System Settings On the live interface, press to go to the Menu interface. Press / to select System , and the System Settings interface is displayed. You can Settings, and then press configure USB options, time and date, screen brightness, auto maintenance, restore defaults and restart the Camera. For details, see the user’s manual.