
User's Manual
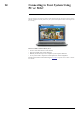
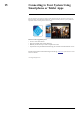
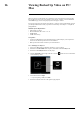
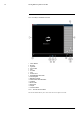


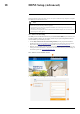
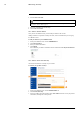

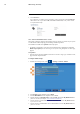
Table Of Contents
- 1 Important Safeguards
- 2 Package Contents
- 3 Recorder Overview
- 4 Basic Setup
- 5 Using the Mouse
- 6 Using the Recorder’s On-Screen Display
- 7 Recording
- 8 Playback
- 9 Search & Backup
- 10 Managing Users, Passwords and Permissions
- 11 Pairing Cameras
- 12 Storage
- 13 Using the Main Menu
- 13.1 Main Menu Overview
- 13.2 Settings Menu
- 13.2.1 Changing a Camera’s On-Screen Display (OSD)
- 13.2.2 Enabling / Disabling Cameras
- 13.2.3 Camera Firmware
- 13.2.4 Enabling Audio
- 13.2.5 Changing the Display Resolution
- 13.2.6 Menu Transparency
- 13.2.7 Configuring Basic Network Settings
- 13.2.8 Setting up Email Notifications
- 13.2.9 Setting an Email Schedule
- 13.2.10 Configuring Motion Detection Settings
- 13.3 System Menu
- 13.4 Advanced Menu
- 14 Connecting to Your System Using PC or MAC
- 15 Connecting to Your System Using Smartphone or Tablet Apps
- 16 Viewing Backed Up Video on PC/Mac
- 17 Smart Home & Voice Assistance
- 18 DDNS Setup (Advanced)
- 19 Troubleshooting
- 20 Technical Specifications

Viewing Backed Up Video on PC/Mac16
16.2 Lorex Player 11 Interface Overview
1. Video Window
2. Rewind
3. Open File
4. Previous File
5. Play
6. Next File
7. Stop
8. Fast Forward
9. Enable/Disable Watermark
10. Take Snapshot
11. Hide/Show Playlist
12. Mute/Unmute and Volume Bar
13. Add File
14. Remove File
15. Delete File
16. Playlist
17. Advanced Menu
16.2.1 About the Advanced Menu
The Advanced Menu allows you to select where the screen captures are stored.
#LX400115; r. 3.0/57178/57178; en-US 68