
User's Manual


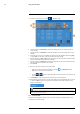


Table Of Contents
- 1 Important Safeguards
- 2 Package Contents
- 3 Recorder Overview
- 4 Basic Setup
- 5 Using the Mouse
- 6 Using the Recorder’s On-Screen Display
- 7 Recording
- 8 Playback
- 9 Search & Backup
- 10 Managing Users, Passwords and Permissions
- 11 Pairing Cameras
- 12 Storage
- 13 Using the Main Menu
- 13.1 Main Menu Overview
- 13.2 Settings Menu
- 13.2.1 Changing a Camera’s On-Screen Display (OSD)
- 13.2.2 Enabling / Disabling Cameras
- 13.2.3 Camera Firmware
- 13.2.4 Enabling Audio
- 13.2.5 Changing the Display Resolution
- 13.2.6 Menu Transparency
- 13.2.7 Configuring Basic Network Settings
- 13.2.8 Setting up Email Notifications
- 13.2.9 Setting an Email Schedule
- 13.2.10 Configuring Motion Detection Settings
- 13.3 System Menu
- 13.4 Advanced Menu
- 14 Connecting to Your System Using PC or MAC
- 15 Connecting to Your System Using Smartphone or Tablet Apps
- 16 Viewing Backed Up Video on PC/Mac
- 17 Smart Home & Voice Assistance
- 18 DDNS Setup (Advanced)
- 19 Troubleshooting
- 20 Technical Specifications

Using the Main Menu13
1. From the live viewing screen, click > Advanced > Warning.
2. Use the dropdown next to Warning Type to select the system warning you would like to
configure.
3. Check boxes next to features you would like to activate when the selected event occurs.
NOTE
Enabling Send Email requires you to set up email notifications. See 13.2.8 Setting up Email Notifications,
page 48 for full instructions.
4. Use the dropdown next to Buzzer to have the recorder make an alarm sound when the se-
lected system warning occurs, or select OFF to have the recorder remain silent.
5. Click Save.
6. (OPTIONAL) Use the Copy function to copy your settings to another or all system warning
types.
#LX400115; r. 3.0/57178/57178; en-US 64