
User's Manual


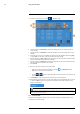
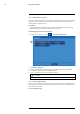
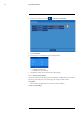


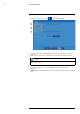
Table Of Contents
- 1 Important Safeguards
- 2 Package Contents
- 3 Recorder Overview
- 4 Basic Setup
- 5 Using the Mouse
- 6 Using the Recorder’s On-Screen Display
- 7 Recording
- 8 Playback
- 9 Search & Backup
- 10 Managing Users, Passwords and Permissions
- 11 Pairing Cameras
- 12 Storage
- 13 Using the Main Menu
- 13.1 Main Menu Overview
- 13.2 Settings Menu
- 13.2.1 Changing a Camera’s On-Screen Display (OSD)
- 13.2.2 Enabling / Disabling Cameras
- 13.2.3 Camera Firmware
- 13.2.4 Enabling Audio
- 13.2.5 Changing the Display Resolution
- 13.2.6 Menu Transparency
- 13.2.7 Configuring Basic Network Settings
- 13.2.8 Setting up Email Notifications
- 13.2.9 Setting an Email Schedule
- 13.2.10 Configuring Motion Detection Settings
- 13.3 System Menu
- 13.4 Advanced Menu
- 14 Connecting to Your System Using PC or MAC
- 15 Connecting to Your System Using Smartphone or Tablet Apps
- 16 Viewing Backed Up Video on PC/Mac
- 17 Smart Home & Voice Assistance
- 18 DDNS Setup (Advanced)
- 19 Troubleshooting
- 20 Technical Specifications

Using the Main Menu13
1. From the live viewing screen, click > Advanced > Maintenance.
2. Click IPC Upgrade.
3. The drive menu appears. Navigate to and select the .bin firmware file, then click OK.
4. A confirmation window appears. Click OK to confirm.
5. Allow 5-10 minutes for the system to upgrade and reboot.
CAUTION
Do not power off the recorder or disconnect cameras during firmware upgrade.
13.4.6 Configuring System Warning Settings
Set preferences for system warnings including video loss, hard drive errors, and warnings when
the hard drive is full.
To configure system warning settings:
#LX400115; r. 3.0/57178/57178; en-US 63