
User's Manual


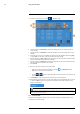
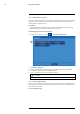
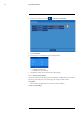


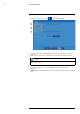
Table Of Contents
- 1 Important Safeguards
- 2 Package Contents
- 3 Recorder Overview
- 4 Basic Setup
- 5 Using the Mouse
- 6 Using the Recorder’s On-Screen Display
- 7 Recording
- 8 Playback
- 9 Search & Backup
- 10 Managing Users, Passwords and Permissions
- 11 Pairing Cameras
- 12 Storage
- 13 Using the Main Menu
- 13.1 Main Menu Overview
- 13.2 Settings Menu
- 13.2.1 Changing a Camera’s On-Screen Display (OSD)
- 13.2.2 Enabling / Disabling Cameras
- 13.2.3 Camera Firmware
- 13.2.4 Enabling Audio
- 13.2.5 Changing the Display Resolution
- 13.2.6 Menu Transparency
- 13.2.7 Configuring Basic Network Settings
- 13.2.8 Setting up Email Notifications
- 13.2.9 Setting an Email Schedule
- 13.2.10 Configuring Motion Detection Settings
- 13.3 System Menu
- 13.4 Advanced Menu
- 14 Connecting to Your System Using PC or MAC
- 15 Connecting to Your System Using Smartphone or Tablet Apps
- 16 Viewing Backed Up Video on PC/Mac
- 17 Smart Home & Voice Assistance
- 18 DDNS Setup (Advanced)
- 19 Troubleshooting
- 20 Technical Specifications

Using the Main Menu13
13.4.1 Manual Firmware Upgrade
The system supports automatic firmware upgrades over the network to ensure your unit is always
up-to-date. It is recommended to always use automatic upgrade unless directed to perform a
manual upgrade by technical support.
Prerequisites:
• Save the .bin firmware upgrade file in the root folder of a USB flash drive (not included),
and connect the drive to one of the USB ports on your recorder.
To manually upgrade the recorder’s firmware:
1. From the live viewing screen, click
> Advanced > Maintenance.
2. Click Firmware Upgrade.
3. The drive menu appears. Navigate to and select the .bin firmware file, then click OK.
4. A confirmation window appears. Click OK to confirm.
5. Allow 5-10 minutes for the system to upgrade and reboot.
CAUTION
Do not power off therecorder during firmware upgrade.
13.4.2 Restoring Default Settings
Reset the recorder settings to their out-of-box state. You can choose to reset all settings at once,
or just settings on specific menus. Restoring default settings will not delete recordings and snap-
shots saved to the hard drive.
To restore default settings:
#LX400115; r. 3.0/57178/57178; en-US 59