
User's Manual
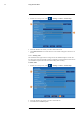
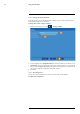
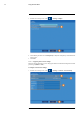

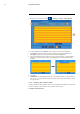
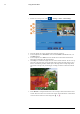


Table Of Contents
- 1 Important Safeguards
- 2 Package Contents
- 3 Recorder Overview
- 4 Basic Setup
- 5 Using the Mouse
- 6 Using the Recorder’s On-Screen Display
- 7 Recording
- 8 Playback
- 9 Search & Backup
- 10 Managing Users, Passwords and Permissions
- 11 Pairing Cameras
- 12 Storage
- 13 Using the Main Menu
- 13.1 Main Menu Overview
- 13.2 Settings Menu
- 13.2.1 Changing a Camera’s On-Screen Display (OSD)
- 13.2.2 Enabling / Disabling Cameras
- 13.2.3 Camera Firmware
- 13.2.4 Enabling Audio
- 13.2.5 Changing the Display Resolution
- 13.2.6 Menu Transparency
- 13.2.7 Configuring Basic Network Settings
- 13.2.8 Setting up Email Notifications
- 13.2.9 Setting an Email Schedule
- 13.2.10 Configuring Motion Detection Settings
- 13.3 System Menu
- 13.4 Advanced Menu
- 14 Connecting to Your System Using PC or MAC
- 15 Connecting to Your System Using Smartphone or Tablet Apps
- 16 Viewing Backed Up Video on PC/Mac
- 17 Smart Home & Voice Assistance
- 18 DDNS Setup (Advanced)
- 19 Troubleshooting
- 20 Technical Specifications

Using the Main Menu13
2. Select DHCP (default — recommended) or Static.
NOTE
Selecting Static requires you to edit the IP Address, Subnet Mask, Gateway and DNS settings. This option
is for advanced users only.
3. Click the fields next to Client Port and HTTP Port to change port numbers if required.
4. (FOR STATIC IP ONLY) Click the fields next to IP Address, Subnet Mask, Gateway
and DNS to edit as required.
5. Click Save.
13.2.8 Setting up Email Notifications
You can configure the system to send email notifications about important activity from your se-
curity system. To have the option of using Lorex’s free email server (recommended) or using a
different one.
• For instructions on enabling email notifications using the Lorex server, see 13.2.8.1 Email
Notifications — Using the Lorex server (recommended), page 48.
• For instructions on enabling email notifications using a different mailing server, see 13.2.8.2
Email Notifications — Using your own server information, page 49.
13.2.8.1 Email Notifications — Using the Lorex server (recommended)
1. From the live viewing screen, click
> Settings > Network > Email.
2. Select Default from the dropdown next to Email to enable the default Lorex mail server.
3. Click to enter up to 3 email addresses that will receive email notifications from the system.
4. Use the dropdown next to Interval to set the minimum amount of time between email notifi-
cations. This can be used to limit the number of notifications you receive throughout the day.
5. Click Save.
Email notifications are now enabled. The default schedule is set to send email notification
whenever motion is detected or a system warning occurs. To configure the schedule for
email notifications, see 13.2.9 Setting an Email Schedule, page 49.
#LX400115; r. 3.0/57178/57178; en-US 48