
User's Manual
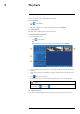
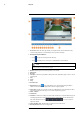


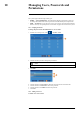
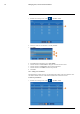
Table Of Contents
- 1 Important Safeguards
- 2 Package Contents
- 3 Recorder Overview
- 4 Basic Setup
- 5 Using the Mouse
- 6 Using the Recorder’s On-Screen Display
- 7 Recording
- 8 Playback
- 9 Search & Backup
- 10 Managing Users, Passwords and Permissions
- 11 Pairing Cameras
- 12 Storage
- 13 Using the Main Menu
- 13.1 Main Menu Overview
- 13.2 Settings Menu
- 13.2.1 Changing a Camera’s On-Screen Display (OSD)
- 13.2.2 Enabling / Disabling Cameras
- 13.2.3 Camera Firmware
- 13.2.4 Enabling Audio
- 13.2.5 Changing the Display Resolution
- 13.2.6 Menu Transparency
- 13.2.7 Configuring Basic Network Settings
- 13.2.8 Setting up Email Notifications
- 13.2.9 Setting an Email Schedule
- 13.2.10 Configuring Motion Detection Settings
- 13.3 System Menu
- 13.4 Advanced Menu
- 14 Connecting to Your System Using PC or MAC
- 15 Connecting to Your System Using Smartphone or Tablet Apps
- 16 Viewing Backed Up Video on PC/Mac
- 17 Smart Home & Voice Assistance
- 18 DDNS Setup (Advanced)
- 19 Troubleshooting
- 20 Technical Specifications

Playback8
1. Event List: Shows all video clips that fit your original search criteria. Double-click any
event to begin playback, or check multiple events to perform a backup.
2. Backup and Playback Buttons:
• Click
to play the currently selected video clip.
• Click
to backup one or more clips to a USB flash drive (not included).
NOTE
You must check off video clips in the event list to backup multiple files at once. For more details on per-
forming a backup, see 9 Search & Backup, page 27.
3. Return: Return to previous screen to perform a new search.
4. Full Screen
5. Rewind
6. Slow Play: Click to slow playback by half-speed. Click repeatedly to play as slow as 1/16 of
normal speed.
7. Play
8. Pause
9. Stop
10. Fast-Forward
11. Digital Zoom: Click
, then click-and-drag on a camera image during playback to
zoom in on the selected area. Right-click to return to regular playback.
12. Video Clip: Quickly save a section of video to a USB flash drive (not included). For full in-
structions on using the Video Clip, see 9.2.2 Video Clip Backup, page 30.
13. Mute / Unmute
14. Volume Bar
15. Timeline: Continuous recordings are shown with colored bars to represent different types of
recording (legend shown in the bottom-right corner of the display). Use the timeframe op-
tions in the bottom-left corner (
) to view a smaller or
larger time period.
16. Video Playback Area: Double-click any channel to view in full screen.
17. Exit Playback: Return to live viewing mode.
#LX400115; r. 3.0/57178/57178; en-US 26