
User's Manual
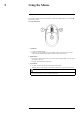
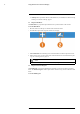
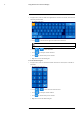
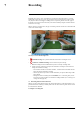
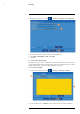
Table Of Contents
- 1 Important Safeguards
- 2 Package Contents
- 3 Recorder Overview
- 4 Basic Setup
- 5 Using the Mouse
- 6 Using the Recorder’s On-Screen Display
- 7 Recording
- 8 Playback
- 9 Search & Backup
- 10 Managing Users, Passwords and Permissions
- 11 Pairing Cameras
- 12 Storage
- 13 Using the Main Menu
- 13.1 Main Menu Overview
- 13.2 Settings Menu
- 13.2.1 Changing a Camera’s On-Screen Display (OSD)
- 13.2.2 Enabling / Disabling Cameras
- 13.2.3 Camera Firmware
- 13.2.4 Enabling Audio
- 13.2.5 Changing the Display Resolution
- 13.2.6 Menu Transparency
- 13.2.7 Configuring Basic Network Settings
- 13.2.8 Setting up Email Notifications
- 13.2.9 Setting an Email Schedule
- 13.2.10 Configuring Motion Detection Settings
- 13.3 System Menu
- 13.4 Advanced Menu
- 14 Connecting to Your System Using PC or MAC
- 15 Connecting to Your System Using Smartphone or Tablet Apps
- 16 Viewing Backed Up Video on PC/Mac
- 17 Smart Home & Voice Assistance
- 18 DDNS Setup (Advanced)
- 19 Troubleshooting
- 20 Technical Specifications

Using the Mouse
5
The recorder is designed for mouse navigation. Connect the included mouse to one of the USB
ports on the recorder.
To use the USB mouse:
1. Left Button:
• Click to select menu options.
• During live viewing in split-screen view, double-click on a channel to view it in full-
screen. Double-click the channel again to return to split-screen viewing.
2. Right Button:
• During live viewing in split-screen view, click to open the Quick Menu (see 6.2 Using the
Quick Menu, page 17).
• In menus, click to go back / close menus.
3. Scroll Wheel:
• In menus, scroll to move up / down through the menu content.
• While hovering over the volume control wheel, scroll to turn system volume up / down.
NOTE
In live view, hover the mouse cursor over the top of the screen to open the Navigation Bar. Move the mouse
cursor away from the top of the screen to close the Navigation Bar.
#LX400115; r. 3.0/57178/57178; en-US 16