
User's Manual

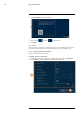


Table Of Contents
- 1 Important Safeguards
- 2 Package Contents
- 3 Recorder Overview
- 4 Basic System Setup
- 5 Camera Installation
- 6 Using the Mouse
- 7 Using the On–Screen Display
- 8 Recording
- 9 Playback
- 10 Backup
- 11 Motion Detection
- 12 Face Detection
- 13 Active Deterrence
- 14 Managing Passwords and User Accounts
- 15 Using the Main Menu
- 16 Smart Home & Voice Assistance
- 17 Pan/Tilt/Zoom (PTZ) Cameras
- 18 Connecting Audio Devices
- 19 Replacing the Hard Drive
- 20 DDNS Setup (Advanced)
- 21 Troubleshooting
- 22 Technical Specifications
- 23 Notices

Using the Main Menu15
3. Click Add.
4. Configure the following:
• Name: Enter a name for this holiday.
• Effective Mode: Select Once for the holiday to occur only this year or Always for the
holiday to be repeated each year.
• Period: Select Date to select a specific date, or select Week to select holidays based on
which week they fall on.
• Start Time / End Time: Set the start and end time for this holiday.
5. Click OK.
15.8.4 Configuring IP Filter
Configure permissions for external IP addresses attempting to access the unit.
To configure the IP filter:
1. From the Live View display, right-click to open the Quick Menu, then click Main Menu.
2. Click SYSTEM, click the Security tab, then clickFirewall on the top panel.
3. Click to enable ( ) / disable ( ) the selected filter type.
4. Under Mode, select which type of filter to apply:
• Whitelist: IP addresses that are permitted to access the recorder.
• Blacklist: IP addresses that are not permitted to access the recorder.
#LX400111; r. 5.0/56648/56651; en-US 67