
User's Manual

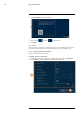


Table Of Contents
- 1 Important Safeguards
- 2 Package Contents
- 3 Recorder Overview
- 4 Basic System Setup
- 5 Camera Installation
- 6 Using the Mouse
- 7 Using the On–Screen Display
- 8 Recording
- 9 Playback
- 10 Backup
- 11 Motion Detection
- 12 Face Detection
- 13 Active Deterrence
- 14 Managing Passwords and User Accounts
- 15 Using the Main Menu
- 16 Smart Home & Voice Assistance
- 17 Pan/Tilt/Zoom (PTZ) Cameras
- 18 Connecting Audio Devices
- 19 Replacing the Hard Drive
- 20 DDNS Setup (Advanced)
- 21 Troubleshooting
- 22 Technical Specifications
- 23 Notices

Using the Main Menu15
3. Configure the following:
• Device Model: Shows the model number of your system.
• Device No.: Select the remote control address of the system.
• Language: Set the system languages. Available options are English, French, and Spanish.
• Video Standard: Select NTSC (North America) or PAL (Europe).
• Instant Playback: Select the amount of time (in minutes) the system will go back when
instant playback is activated in live view.
• Logout Time: Select the idle time (in minutes) before the system will logout the current
user.
• Navigation Bar: Check to enable the Navigation Bar that comes up when you left click
in live view.
• Mouse Pointer Speed: Use the slider to adjust the mouse speed.
4. Click Apply.
15.8.2 Setting Date & Time
As part of the initial setup, you will set the system date & time. This menu allows you to adjust
the date & time, and configure settings for Daylight Savings Time (DST) and Network Protocol
Time (NTP).
CAUTION
It is important to always ensure your system date and time are accurate. Inaccurate time stamps may render
your footage unusable for court evidence.
To set system date and time:
1. From the Live View display, right-click to open the Quick Menu, then click Main Menu.
2. Click SYSTEM, then click the General tab, then Date&Time on the top panel.
3. Configure system time:
• System Time: Set the current date and time.
• Time Zone: Select your system time zone.
• Date Format: Choose how the date and time appear.
• Date Separator: Choose the symbol that separates date from time.
• Time Format: Choose from 12–hour or 24–hour time.
#LX400111; r. 5.0/56648/56651; en-US 65