
User's Manual

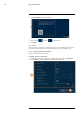


Table Of Contents
- 1 Important Safeguards
- 2 Package Contents
- 3 Recorder Overview
- 4 Basic System Setup
- 5 Camera Installation
- 6 Using the Mouse
- 7 Using the On–Screen Display
- 8 Recording
- 9 Playback
- 10 Backup
- 11 Motion Detection
- 12 Face Detection
- 13 Active Deterrence
- 14 Managing Passwords and User Accounts
- 15 Using the Main Menu
- 16 Smart Home & Voice Assistance
- 17 Pan/Tilt/Zoom (PTZ) Cameras
- 18 Connecting Audio Devices
- 19 Replacing the Hard Drive
- 20 DDNS Setup (Advanced)
- 21 Troubleshooting
- 22 Technical Specifications
- 23 Notices

Using the Main Menu15
4. Configure the following:
If you want to use Lorex’s email server (recommended):
• Mail Select: Select Lorex Mail.
• Receiver: Select up to 3 email addresses that will receive alerts. Enter each email address
into the field Email Address below.
• Subject: Enter a subject line for email alerts.
• Attachment: Enable (
) to include a image attachment of the camera.
NOTE
You must enable the Snapshot option for motion detection on each camera you would to receive attach-
ments. For details, see , page .
• Sending Interval: Enter the interval in minutes between email alerts.
• Health: Check to enable health check emails. Health check emails will be sent periodi-
cally to ensure that the system is functioning normally.
• Sending Interval: Enter the interval in minutes for health check emails.
If you want to use your own email server (advanced):
• Mail Select: Select the mail server you want to use, or select Customize to use your own.
• SMTP Server: Enter the SMTP server address.
• Port: Enter the port used by the SMTP server.
• Username: Enter the SMTP user name.
• Password: Enter the SMTP password.
• Email Schedule: Click to setup a weekly schedule for email alerts.
• Receiver: Select up to 3 email addresses that will receive alerts. Enter each email address
into the field Email Address below.
• Sender: Enter the sender’s email address.
• Subject: Enter a subject line for email alerts.
• Attachment: Enable (
) to include a image attachment of the camera.
NOTE
You must enable the Snapshot option for motion detection on each camera you would to receive attach-
ments. For details, see , page .
• Encrypt Type: Select SSL or TLS if your server uses encryption. Select None if your
server does not use encryption.
• Sending Interval: Enter the interval in minutes between email alerts.
• Health: Check to enable health check emails. Health check emails will be sent periodi-
cally to ensure that the system is functioning normally.
• Sending Interval: Enter the interval in minutes for health check emails.
5. Click Test to send a test email to ensure settings are configured properly.
6. Click Apply.
15.7.4 P2P Setting
The P2P Setting menu is used only to enable / disable remote access to the system using a P2P
connection.
CAUTION
P2P connection is the primary method used for remote access to your security system using the Lorex Home app.
If you disable P2P connectivity, you will only be able to access your system over the Internet using DDNS. See
20 DDNS Setup (Advanced), page 94 for details.
To change P2P setting:
1. From the Live View display, right-click to open the Quick Menu, then click Main Menu.
#LX400111; r. 5.0/56648/56651; en-US 63