
User's Manual
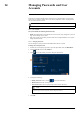

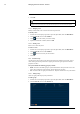


Table Of Contents
- 1 Important Safeguards
- 2 Package Contents
- 3 Recorder Overview
- 4 Basic System Setup
- 5 Camera Installation
- 6 Using the Mouse
- 7 Using the On–Screen Display
- 8 Recording
- 9 Playback
- 10 Backup
- 11 Motion Detection
- 12 Face Detection
- 13 Active Deterrence
- 14 Managing Passwords and User Accounts
- 15 Using the Main Menu
- 16 Smart Home & Voice Assistance
- 17 Pan/Tilt/Zoom (PTZ) Cameras
- 18 Connecting Audio Devices
- 19 Replacing the Hard Drive
- 20 DDNS Setup (Advanced)
- 21 Troubleshooting
- 22 Technical Specifications
- 23 Notices

Managing Passwords and User Accounts14
3. Click Add Group.
4. Configure the following:
• Group Name: Enter a name for the group.
• Memo: (Optional) Enter a description of the group.
• Authority: Check the permissions you would like the user account to have. Under the
System tab, select the menus the user account may access. Under the Playback tab, select
which channels the user account may access recorded video from. Under the Covert tab,
select the channels the user account may view live video from.
5. Click OK.
14.2.2 Modifying Groups
Change an existing group’s name or permissions.
To modify a group:
1. From the Live View display, right-click to open the Quick Menu, then click Main Menu.
2. Click ACCOUNT, then click the GROUP tab.
3. Click
next to the group you want to modify.
4. Update group details as needed, then click OK.
14.2.3 Deleting Groups
Remove a group.
To delete a group:
1. From the Live View display, right-click to open the Quick Menu, then click Main Menu.
2. Click ACCOUNT, then click the GROUP tab.
3. Click
next to the group you want to delete.
4. Click OK.
#LX400111; r. 5.0/56648/56651; en-US 46