
User's Manual

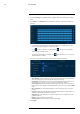


Table Of Contents
- 1 Important Safeguards
- 2 Package Contents
- 3 Recorder Overview
- 4 Basic System Setup
- 5 Camera Installation
- 6 Using the Mouse
- 7 Using the On–Screen Display
- 8 Recording
- 9 Playback
- 10 Backup
- 11 Motion Detection
- 12 Face Detection
- 13 Active Deterrence
- 14 Managing Passwords and User Accounts
- 15 Using the Main Menu
- 16 Smart Home & Voice Assistance
- 17 Pan/Tilt/Zoom (PTZ) Cameras
- 18 Connecting Audio Devices
- 19 Replacing the Hard Drive
- 20 DDNS Setup (Advanced)
- 21 Troubleshooting
- 22 Technical Specifications
- 23 Notices

Active Deterrence13
5. Click Setup next to Warning Light to configure preferences:
• Duration: Choose how long the warning light will stay on when motion is detected.
• Select Warning Light for a solid white light, or Strobe for a flashing light. If you select
Strobe, set how quickly the light will flash under Strobe Frequency.
6. Click Setup next to Area to set an active area for automatic deterrence.
• The camera image appears with a grid overlay. The green area is the active area for
deterrence.
• Click or click-and-drag to add / remove boxes from the active area.
• In the example image above, only motion around the garage or on the porch will trigger
the warning light.
• Right-click when finished.
7. Click Setup next to Schedule to set the weekly schedule for automatic deterrence.
• The default schedule is active during the night, between 5pm and 7am.
• Click Modify to change the schedule for the corresponding day of the week.
• Click OK when finished.
#LX400111; r. 5.0/56648/56651; en-US 41