
User's Manual

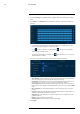


Table Of Contents
- 1 Important Safeguards
- 2 Package Contents
- 3 Recorder Overview
- 4 Basic System Setup
- 5 Camera Installation
- 6 Using the Mouse
- 7 Using the On–Screen Display
- 8 Recording
- 9 Playback
- 10 Backup
- 11 Motion Detection
- 12 Face Detection
- 13 Active Deterrence
- 14 Managing Passwords and User Accounts
- 15 Using the Main Menu
- 16 Smart Home & Voice Assistance
- 17 Pan/Tilt/Zoom (PTZ) Cameras
- 18 Connecting Audio Devices
- 19 Replacing the Hard Drive
- 20 DDNS Setup (Advanced)
- 21 Troubleshooting
- 22 Technical Specifications
- 23 Notices

Face Detection12
4. Click Register to add a face to the database. The USB drive will automatically load.
5. Click + to upload a new face image.
6. Use the Register window to add additional information to the face entry, including name and
gender.
7. Click OK to save.
The added face will appear in the face database.
12.3.2 Add by USB Drive (Batch Add)
Face pictures can also be imported in batches which is useful when adding a large number of
faces at one time.
12.3.3 Add Captured Faces
You can add images to build the face database by using images that have been captured in AI
mode.
NOTE
To capture faces using Face Detection, AI mode must be enabled in Live View. From the Live View display,
right-click Quick Menu and hover over the Live View option. Click on AI mode to enable.
To add a face captured by AI mode:
1. From the Live View display, AI mode will display recently captured faces on the right side
of the screen.
#LX400111; r. 5.0/56648/56651; en-US 38