
User's Manual

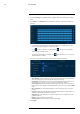


Table Of Contents
- 1 Important Safeguards
- 2 Package Contents
- 3 Recorder Overview
- 4 Basic System Setup
- 5 Camera Installation
- 6 Using the Mouse
- 7 Using the On–Screen Display
- 8 Recording
- 9 Playback
- 10 Backup
- 11 Motion Detection
- 12 Face Detection
- 13 Active Deterrence
- 14 Managing Passwords and User Accounts
- 15 Using the Main Menu
- 16 Smart Home & Voice Assistance
- 17 Pan/Tilt/Zoom (PTZ) Cameras
- 18 Connecting Audio Devices
- 19 Replacing the Hard Drive
- 20 DDNS Setup (Advanced)
- 21 Troubleshooting
- 22 Technical Specifications
- 23 Notices

Face Detection12
9. (OPTIONAL) Click Copy to apply the settings for the current channel to one or more other
channels (see 15.12 Copying Settings to Another Channel, page 80 for full instructions on
using the copy function).
12.2 Configuring Face Recognition
You can configure the system to detect faces and respond with various actions.
To configure face recognition:
1. From the Live View display, right-click to open the Quick Menu, then click Main Menu.
2. Click EVENTS, then click the Face Recognition tab on the side panel.
3. Select a camera to configure face recognition for.
4. Click to enable (
) / disable ( ) face recognition on the selected channel.
5. Click Setup next to Schedule to choose which days and times of the week to enable face
recognition:
• Click or click-and-drag along the each of the blue timelines to quickly add or remove
time from each day’s schedule in 15–minute segments.
• Click
beside 2 or more days to link schedules ( ). This allows you to quickly
change multiple schedules at once.
• To make fine adjustments to a schedule, click
. This will allow you to set exact start
and end times for a schedule.
#LX400111; r. 5.0/56648/56651; en-US 35