
User's Manual

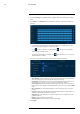


Table Of Contents
- 1 Important Safeguards
- 2 Package Contents
- 3 Recorder Overview
- 4 Basic System Setup
- 5 Camera Installation
- 6 Using the Mouse
- 7 Using the On–Screen Display
- 8 Recording
- 9 Playback
- 10 Backup
- 11 Motion Detection
- 12 Face Detection
- 13 Active Deterrence
- 14 Managing Passwords and User Accounts
- 15 Using the Main Menu
- 16 Smart Home & Voice Assistance
- 17 Pan/Tilt/Zoom (PTZ) Cameras
- 18 Connecting Audio Devices
- 19 Replacing the Hard Drive
- 20 DDNS Setup (Advanced)
- 21 Troubleshooting
- 22 Technical Specifications
- 23 Notices

Face Detection12
5. Click View Settings next to Select Area to configure which areas of the image will target
faces.
6. Click Setup next to Schedule to choose which days and times of the week to enable face
detection:
• Click or click-and-drag along the each of the blue timelines to quickly add or remove
time from each day’s schedule in 15–minute segments.
• Click
beside 2 or more days to link schedules ( ). This allows you to quickly
change multiple schedules at once.
• To make fine adjustments to a schedule, click
. This will allow you to set exact start
and end times for a schedule.
7. You can set various events to happen when the alarm is triggered including:
• Show Message: Check to enable an on-screen pop-up when one of your cameras detects
a face. On-screen pop-up shows the channels an event occurred on.
• Send Email: Check to enable email alerts. You must configure email alerts before you
will be able to receive them (see 15.7.3 Configuring Email Alerts, page 61).
• Record Channel: Select the channels that will record when a face is detected on the se-
lected channel. Set the length of recording following a video loss event in the Post_REC
field.
• PTZ Activation: Set connected PTZ cameras to start a tour, pattern, or go to a preset
location.
• Sequence: Sequence mode will begin. Select the numbered tiles next to this option to in-
clude the corresponding channels in the sequence.
• Snapshot: Select the numbered tiles next to this option to save a snapshot of the corre-
sponding channels.
• Buzzer: Check to enable the system buzzer.
• Warning Light: Check to enable the system warning light.
8. Click Apply.
#LX400111; r. 5.0/56648/56651; en-US 34