
User's Manual
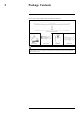


Table Of Contents
- 1 Important Safeguards
- 2 Package Contents
- 3 Recorder Overview
- 4 Basic System Setup
- 5 Camera Installation
- 6 Using the Mouse
- 7 Using the On–Screen Display
- 8 Recording
- 9 Playback
- 10 Backup
- 11 Motion Detection
- 12 Face Detection
- 13 Active Deterrence
- 14 Managing Passwords and User Accounts
- 15 Using the Main Menu
- 16 Smart Home & Voice Assistance
- 17 Pan/Tilt/Zoom (PTZ) Cameras
- 18 Connecting Audio Devices
- 19 Replacing the Hard Drive
- 20 DDNS Setup (Advanced)
- 21 Troubleshooting
- 22 Technical Specifications
- 23 Notices

Basic System Setup4
4.1 STEP 1: Connect cameras
Test your cameras prior to selecting a permanent mounting location by connecting the cameras
and cables to your recorder locally. Push and twist the BNC connector clockwise to secure it to
the BNC port.
NOTE
This step is for verification of the camera image only. It is recommended to connect cameras to a nearby power
adapter for this step. The Lorex Setup Wizard that runs at startup will assist you in naming and organizing your
cameras, so it is also recommended to leave cameras connected until the wizard asks you to install cameras in
their permanent mounting location.
NOTE
• Before selecting a permanent mounting location for your cameras, see , page for important notes and installa-
tion tips.
• The extension cable must be a single stretch of cable between the recorder and camera. You cannot connect
multiple extension cables to each other.
4.2 STEP 2: Connect router
Connect the recorder to your router using the included Ethernet cable.
4.3 STEP 3: Connect mouse
Connect the included mouse to a USB port on the recorder.
4.4 STEP 4: Connect monitor
OR
#LX400111; r. 5.0/56648/56651; en-US 6