
User's Manual
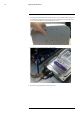


Table Of Contents
- 1 Important Safeguards
- 2 Package Contents
- 3 Recorder Overview
- 4 Basic System Setup
- 5 Camera Installation
- 6 Using the Mouse
- 7 Using the On–Screen Display
- 8 Recording
- 9 Playback
- 10 Backup
- 11 Motion Detection
- 12 Face Detection
- 13 Active Deterrence
- 14 Managing Passwords and User Accounts
- 15 Using the Main Menu
- 16 Smart Home & Voice Assistance
- 17 Pan/Tilt/Zoom (PTZ) Cameras
- 18 Connecting Audio Devices
- 19 Replacing the Hard Drive
- 20 DDNS Setup (Advanced)
- 21 Troubleshooting
- 22 Technical Specifications
- 23 Notices

DDNS Setup (Advanced)20
3. Select your recorder warranty from the dropdown next to Warranty. Enter the rest of your
product information.
NOTE
• The Device Name can be any name of your choice (for example, “Store Security System”).
• You can find your recorder’s MAC Address in the system information window on the recorder. From
the Live View display, right-click and click Info, or click
on the Navigation Bar.
4. Click Add Device.
Once submitted, your DDNS account information will be summarized under My DDNS De-
vices. Make a note of your DDNS URL, Username and Password, as they will be needed
to complete DDNS setup.
20.5 STEP 5: Enable DDNS on the Recorder
Enter your DDNS information into the menu of your recorder. You can find the information ref-
erenced below on your My Lorex account, or on the confirmation email sent to you after regis-
tering for DDNS service.
To configure DDNS in the recorder:
1. From the Live View display, right-click to open the Quick Menu, then click Main Menu.
2. Click NETWORK, then click the DDNS tab.
3. Click to enable ( ) DDNS connectivity.
4. Configure the following:
• DDNS Type: Select Lorex DDNS.
• Domain Name: Enter the first part of the DDNS domain that you requested during setup.
• User ID: Enter the username provided in the DDNS confirmation email.
• Password: Enter the password provided in the DDNS confirmation email.
5. Click Apply.
You will now be able to access your system remotely using DDNS. Enter the full domain
name into a web browser (e.g., http://www.tomsmithsecurity.lorexddns.net) and login using
the provided credentials.
NOTE
If your system uses an HTTP port other than 80, you will need to add a colon to the end of your DDNS domain
name and enter the port number (e.g., http://www.tomsmithsecurity.lorexddns.net:81)
#LX400111; r. 5.0/56648/56651; en-US 96