
User's Manual
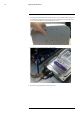


Table Of Contents
- 1 Important Safeguards
- 2 Package Contents
- 3 Recorder Overview
- 4 Basic System Setup
- 5 Camera Installation
- 6 Using the Mouse
- 7 Using the On–Screen Display
- 8 Recording
- 9 Playback
- 10 Backup
- 11 Motion Detection
- 12 Face Detection
- 13 Active Deterrence
- 14 Managing Passwords and User Accounts
- 15 Using the Main Menu
- 16 Smart Home & Voice Assistance
- 17 Pan/Tilt/Zoom (PTZ) Cameras
- 18 Connecting Audio Devices
- 19 Replacing the Hard Drive
- 20 DDNS Setup (Advanced)
- 21 Troubleshooting
- 22 Technical Specifications
- 23 Notices

DDNS Setup (Advanced)20
Setting up DDNS connectivity allows you to view your recorder from any computer or compati-
ble mobile device with Internet access.
NOTE
The primary connectivity option for the recorder uses the Lorex Home app to connect to your system over the In-
ternet without the need for port forwarding or DDNS registration.
• For instructions on using the Lorex Home app for mobile devices, see , page .
20.1 STEP 1: Port Forwarding
If you are using DDNS, you must port forward the HTTP and Client Ports (default: 80 and
35000) on your router to your recorder’s IP address before you can remotely connect to your
system:
• Manually port forward the required ports on your router to your recorder’s IP address by fol-
lowing your router manufacturer’s instructions. For more information on port forwarding, see
the reference guides on lorex.com.
20.2 STEP 2: Create a Lorex Account
1. Visit lorex.com and click Login at the top of the page.
2. Select Create an Account.
NOTE
If you have already set up an account, select I Have a LOREX Account and log in. Proceed directly to ,
page .
#LX400111; r. 5.0/56648/56651; en-US 94