
Owner's Manual

37
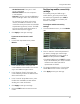
Using the Main Menu
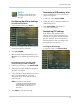
Network
The Network menu allows
you to configure the
system’s DDNS and network
settings.
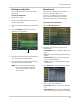
Configuring Network type: DHCP
& Static IP
The system has the ability to operate in
DHCP mode and Static IP mode.
DHCP allows the router to assign an IP
to the DVR. Static IP mod
e fixes the IP of
the DVR. Fixing an IP of the DVR
ensures that the IP will not change.
To configure DHCP and Static IP
settings
:
1 In the TYPE drop-do
wn menu, select DHCP
or Static. If you select DHCP, the router
automatically assigns an IP to your DVR.
• If you select Static, click the field beside
IP Addres
s, and enter in the IP address of
your choice.
• Enter your custom NetMask, Gateway,
DNS1 and DNS2 using the mouse.
• You must assign the IP in your router that
you wish to make static. For example, if
you assign 192.168.2.89 as the static IP in
the DVR, you must assign 192.168.2.89 in
your router as a static IP as well. Consult
your router’s user’s manual for details.
2 Click A
pply to save your settings.
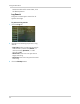
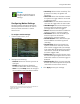
Enabling Auto Port Forwarding
Auto Port Forwarding allows the DVR to
open the required port on your router.
Note that this works on most routers. If
the auto port forwarding feature does
not work on your router, you may have
to manually open the port on your
router. You can also use the Auto Port
Forwarding Wizard, located on the
software CD.
To Enable Auto Port Forwarding:
1 In the Auto Port F
orwarding drop-down
menu, select Enable or Disable.
2 Click Apply
to save your settings.
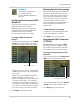
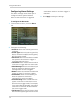
Changing the DVR’s Client and
HTTP Port
The DVR’s Default Client port is 9000.
The default HTTP port is 80. You must
port forward the Client Port and HTTP
port to your router for remote access.
To change the default Client port and
HTTP port:
1 Click the
field beside
Client (default port
9000). Enter the desired client port.
2 Click
the field beside HTTP Port (def
ault
port 80. Enter the desired HTTP port.
3 Click Appl
y
to save your settings.
Select DHCP or Static
Client Port & HTTP Port fields