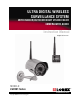
ULTRA DIGITAL WIRELESS SURVEILLANCE SYSTEM WITH INDOOR/OUTDOOR NIGHT VISION COLOR CAMERA WITH AUDIO Instruction Manual English Version 3.0 MODELS: LW2201 Series www.lorexcctv.com Copyright © 2009 Lorex Technology Inc.
Important Safeguards Thank you for purchasing the Ultra Digital Wireless Surveillance System. Lorex is committed to providing our customers with a high quality, reliable security product. Please visit us on the web for the most current Manuals, Quick Start Guides and Firmware. Additional Language Manuals are also available at: www.lorexcctv.com CAUTION RISK OF ELECTRIC SHOCK DO NOT OPEN CAUTION: TO REDUCE THE RICK OF ELECTRIC SHOCK DO NOT REMOVE COVER (OR BACK). NO USER SERVICABLE PARTS INSIDE.
Important Safeguards Important Safeguards In addition to the careful attention devoted to quality standards in the manufacture process of your video product, safety is a major factor in the design of every instrument. However, safety is your responsibility too. This sheet lists important information that will help to assure your enjoyment and proper use of the video product and accessory equipment. Please read them carefully before operating and using your video product. Installation 1.
Important Safeguards Service Use 13. Servicing - Do not attempt to service this video equipment yourself as opening or removing covers may expose you to dangerous voltage or other hazards. Refer all servicing to qualified service personnel. 19. Cleaning - Unplug the video product from the wall outlet before cleaning. Do not use liquid cleaners or aerosol cleaners. Use a damp cloth for cleaning. 14.
General Precautions General Precautions 1. All warnings and instructions in this manual should be followed 2. Remove the plug from the outlet before cleaning. Do not use liquid aerosol detergents. Use a water dampened cloth for cleaning 3. Do not use this unit in humid or wet places 4. Keep enough space around the unit for ventilation.
Features Features Ultra Digital Wireless Technology Provides Excellent Image Quality and Clarity Interference Free, secure and private signal Up to 450 ft Wireless Transmission Range* Weather Proof Metal Camera is Great for Indoor/Outdoor Surveillance Listen in with Exceptional Sound Clarity Safety Warning Feature Notifies You When out of Range * Maximum open space transmission range. The actual range is dependent upon building materials and other obstructions in path of wireless signal.
Table of Contents Table of Contents Getting Started .............................................................................................................................................. 8 Wireless Receiver ......................................................................................................................................... 9 Rear Panel.................................................................................................................................................
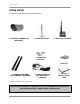
Getting Started Getting Started The System comes with the following components: 1 x WIRELESS CAMERA (with SUNSHADE)* 1 x MOUNTING STAND 1 x WIRELESS RECEIVER 1 x MOUNTING SCREW KIT 1 x RCA/BNC ADAPTER 2 X WIRELESS ANTENNA (FOR CAMERAS & RECEIVER) 2 x POWER ADAPTER (FOR RECEIVER & CAMERAS) 1 x PIECE OF DOUBLE-SIDED TAPE *Camera configuration may vary by model CHECK YOUR PACKAGE TO CONFIRM THAT YOU HAVE RECEIVED THE COMPLETE SYSTEM, INCLUDING ALL COMPONENTS SHOWN ABOVE.
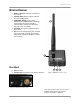
Wireless Receiver Wireless Receiver 1. Wireless Antenna: Connects to the back of the receiver. 2. Channel LEDs: When lit in green, indicates the active viewing mode. 3. VGA/QVGA* button: Press to switch between VGA and QVGA video resolutions; press and hold for several seconds to remove/replace channels from Auto-Scan. See page 14 for more details. 4. Front LED: Lit in green to indicate power to the receiver. 5.
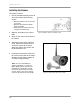
Wireless Receiver Installing the Camera To install the camera: 1. Use the included mounting screws to mount the stand to the mounting surface: • Mark the position of the screw holes on the wall. • Drill holes and insert the drywall plugs as needed. • Firmly attach the stand to the wall using the provided screws. 2. Slide the sunshade on the camera body. Figure 2.0 Attach stand to mounting surface 3. Screw on the antenna to the back of the camera. 4. Attach the camera to the mounting stand.
Setting up the Wireless Receiver Setting up the Wireless Receiver To set up the wireless receiver: 1. Screw on the antenna to the back of the receiver. 2. Connect the Yellow video cable and White audio cable (mono) to your TV, DVR, or observation system. Use the RCA/BNC Adapter (included) to connect the video cable to a BNC port. 3. Connect the Black power cable from the receiver to the cable of the Power Adapter; plug the Power Adapter to an outlet or surge protector. 4.
Viewing Modes Viewing Modes There are six different viewing modes available on the system: individual viewing of channels 1~4, Quad split-screen, and Auto-Scan. For details on Auto-Scan, see page 14. Press the Pair button repeatedly to switch between these viewing modes. AUTO Auto-Scan mode Quad mode Channel 1 PAIR Press the Pair button to change viewing modes* Channel 4 Channel 2 Channel 3 Figure 3.0 View Mode diagram *Images simulated.
On-Screen Display On-Screen Display 1 2 1. Signal Indicator – The signal indicator shows the strength of the signal being received from the camera. The number of bars in the Signal Indicator shows the strength of the signal – One or No Bars indicates the signal is poor, and 4 bars indicate a very strong signal. Note: Signal Indicator not shown while in Quad Mode. ATTENTION: If signal is low (e.g. 1 or 2 bars) adjust the antennas, or reposition the cameras or receiver for best performance. Figure 4.
Adding Cameras Adding Cameras The System comes with a camera that has already been paired. The Pairing Function assigns each camera to a different channel on the Wireless Receiver (up to 4 Cameras), and is necessary for configuring additional cameras. By default, the camera included with the system appears on channels 1 on the wireless receiver. Note: It is highly recommended to pair the cameras to the receiver before permanently mounting the cameras. 1.
Setting Dwell Time Setting Dwell Time You can set the length of time (in seconds) that the receiver displays channels while in Auto Scan. To set dwell time: 1. Make sure the Wireless Receiver and cameras are fully connected and powered on. 2. Press and hold the VGA/QVGA button and Pair button at the same until the Dwell Time screen appears. Continue holding both buttons. Figure 7.0 Press and hold the VGA/QVGA and Pair buttons at the same time 3.
Troubleshooting Troubleshooting If you have problems with your System, there is often a quick and simple solution. Please try the following: Problem There is no picture from a Camera. There is Interference with the Camera Picture. The picture is dropping The Picture is become Choppy or has There are problems with the Audio. The Picture appears to be grainy 16 Solution • Check all connections to the Camera. Make sure the adapter is plugged in. • Make sure that the Cameras and Receiver are both ON.
Appendix A: System Specifications Appendix A: System Specifications Receiver Specifications Receiver Receiving Frequency Range RX Sensitivity Demodulation Data Rate Supported Resolutions Power Requirement Power Consumption Operating Temp Range 2.400GHz~2.
Appendix B: About Digital Wireless Technology Appendix B: About Digital Wireless Technology The Digital Wireless signal transmission type used by the Lorex LW2201 series is also known as FHSS – Frequency Hopping Spread Spectrum. This type of signal is highly resistant to deliberate jamming as it generates a channel hopping sequence using an algorithm generated by the receiver system. The 2.4GHz (2.400-2.
It’s all on the Web! Tout est sur le Web! ¡Todo aparece sobre el Internet! Product Information Información acerca del producto Information sur le produit Specification Sheets Fichas de especificaciones Fiches signalétiques User Manuals Guides de l’utilisateur Guías del usuario Software Upgrades Actualizaciones del programa Mises à jour du logiciel Quick Start Guides Guías de arranque rápido Guides de début rapide Firmware Upgrades Actualizaciones del microprograma Mises à jour du micro-logiciel VISIT