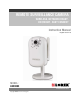
REMOTE SURVEILLANCE CAMERA WIRELESS, NETWORK READY, DAY/NIGHT, EASY CONNECT Instruction Manual English Version1.0 MODEL: LNE3003 www.lorexcctv.com Copyright © 2008 Lorex Technology Inc.
Important Safeguards Thank you for purchasing the LNE3003 Remote Surveillance Camera. Lorex is committed to providing our customers with a high quality, reliable security product. To learn more about the Wireless Easy Connect Network Camera, and to learn about our complete range of accessory products, including manuals, software updates, and firmware, please visit our website at: http://www.lorexcctv.
LNE3003 Surveillance Camera Important Safeguards In addition to the careful attention devoted to quality standards in the manufacture process of your video product, safety is a major factor in the design of every instrument. However, safety is your responsibility too. This sheet lists important information that will help to assure your enjoyment and proper use of the video product and accessory equipment. Please read them carefully before operating and using your video product. Installation 1.
Service Use 13. Servicing - Do not attempt to service this video equipment yourself as opening or removing covers may expose you to dangerous voltage or other hazards. Refer all servicing to qualified service personnel. 19. Cleaning - Unplug the video product from the wall outlet before cleaning. Do not use liquid cleaners or aerosol cleaners. Use a damp cloth for cleaning. 14.
LNE3003 Surveillance Camera General Precautions 1. All warnings and instructions of this manual should be followed. 2. Remove the plug from the outlet before cleaning. Do not use liquid aerosol detergents. Use a water dampened cloth for cleaning. 3. Do not use this unit in humid or wet places. 4. Keep enough space around the unit for ventilation. Slots and openings in the storage cabinet should not be blocked. 5.
LNE3003 Features LNE3003 Features Lorex’s new Wireless Easy Connect Network Camera (LNE3003) allows you to remotely monitor your home or business through a secure, password protected connection that requires no networking knowledge. Simply connect the camera to a router, run the installation CD and you are on your way to see, hear and protect what matters. The LNE3003 features high-resolution viewing, 10x digital zoom and two-way audio.
LNE3003 Surveillance Camera Table of Contents Getting Started .............................................................................................................................................. 8 System Requirements................................................................................................................................... 9 Additional Requirements ...........................................................................................................................
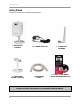
Getting Started Getting Started The system comes with the following components: 1 X NETWORK CAMERA 1 X MOUNTING STAND (3 PIECES) 1 X POWER ADAPTOR 1 X ETHERNET CABLE 1 X WIRELESS ANTENNA 1 X QUICK START GUIDE 1 X SOFTWARE/MANUALS CD CHECK YOUR PACKAGE TO CONFIRM THAT YOU HAVE RECEIVED THE COMPLETE CAMERA SYSTEM, INCLUDING ALL COMPONENTS SHOWN ABOVE.
LNE3003 Surveillance Camera System Requirements For setup and viewing, the LNE3003 Remote Surveillance Camera requires the following: • PC running Windows Vista / XP • Internet connection • Web browser: Internet Explorer 7 or later (with Active X), Mozilla Firefox, Opera (up to version 9.
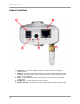
Camera Connections Camera Connections 1 2 5 3 4 1. Power port – Connect AC adaptor to this port and then connect AC adaptor to electrical outlet. 2. LAN port – Local Area Network port. Connect one end of the included network cable to this port, and then connect the other end of the network cable to a network router, switch, or active wall port. 3. Reset – Using a paper-clip, hold for 10 seconds to reset the camera to its default configuration. 4. Speaker port – Connect speakers for listen-in audio. 5.
LNE3003 Surveillance Camera Basic Setup Make the following connections prior to starting the camera for the first time. 1. Assemble the pedestal i. Attach the stand to the base. ii. Attach the mounting bracket to the stand. Figure 1.0 Assemble the pedestal 2. Assemble the camera i. Attach the camera to the completed pedestal. Use the thumb screws to secure the camera firmly. ii. Attach the wireless antenna to the back of the camera. iii.
Basic Setup Network Connections Network Cable COMPUTER (Not Included) WAN WAN 1 2 3 4 UP PWR 1 2 3 4 UP PWR ROUTER / SWITCH / ACTIVE WALL PORT (Not Included) Figure 1.
Positioning the camera Positioning the camera Before you install the camera, carefully plan where and how it will be positioned. Installation Warnings • Select a location for the camera that provides a clear view of the area you want to monitor, which is free from dust, and is not in line-of-sight to a strong light source or direct sunlight. • Route the cables so that they are not close to power or telephone lines, transformers, microwave ovens or other electrical equipment.
Using the Camera Using the Camera With the camera setup and connected, you can now set up local viewing, remote viewing, and wireless connectivity. Before starting the installation, please ensure your computer is connected to the same local network as the camera and has access to the Internet. It is recommended to install the camera when your computer is wired to the local network.
Using the Camera Figure 2.1 Find your camera from the list of devices 3. Click Find to discover Lorex cameras on your network. 4. Double-click the selected camera to launch DigiViewer in your default browser. Finding Your Camera as an UPnP Device (optional) You can also discover the camera as an UPnP (Universal Plug and Play) device by opening Network in Vista (My Network Places for Windows XP users). To discover your UPnP device: 1.
Setting up Yoics™ Remote Viewing Setting up local viewing With your camera now detected by DigiConsole, you can begin to view live images from your camera on your local network. When using Internet Explorer, you need to install Active X in order for DigiViewer to run properly; other supported browsers will require Quicktime. To setup local viewing: 1. With DigiViewer open in your default browser, enter admin in the username text field and admin in the password text field.
Setting up Yoics™ Remote Viewing Setting up Yoics™ Remote Viewing By default, the LNE3003 IP Camera is enabled for Yoics™ easy-connect remote access. Yoics™ remote viewing allows you to easily connect to your camera without needing to configure your network gateway device. Sign-up with Yoics™ to view your camera from a remote location anywhere, anytime. Note: Apple Quicktime™ is required for Yoics™ Remote Viewing. Download at www.apple.
Setting up Yoics™ Remote Viewing 3. Enter your personal information in the required fields (marked with *) and click Register. You will be sent an email confirming your registration; use the email address and password you entered when registering to login to lorex.yoics.com Registering your camera Once you have created an account with Yoics™, you must register your camera in order to enable Yoics™ remote viewing. To register you camera: 1. In your browser go to lorex.yoics.
Setting up Yoics™ Remote Viewing Remote Viewing using a Web browser To access your device remotely from a web browser: 1. In your browser, go to http://lorex.yoics.com and log in using your username and password. Click Yes in the security pop-up window. 2. Under My Stuff, click the camera you want to view. 3. Enter you username and password (by default, admin) to login to your camera. ATTENTION: You will be able to view live video for 5~10 minutes then the connection will drop.
Setting up Wireless Connectivity Setting up Wireless Connectivity With initial setup of the camera complete, you can configure settings in DigiViewer to employ a wireless network connection. To setup wireless connectivity: 1. From DigiViewer, click Settings, and then click Wireless. DigiViewer automatically scans for any wireless networks. 2. If not already enabled, select Enabled from the Wireless Mode drop-down menu. Figure 6.0 Enable a wireless connection 3.
Setting up Wireless Connectivity Figure 6.2 Your device may need to reconnect with new wireless settings Note: Changing wireless settings may require devices to reconnect. 5. Close the browser window. 6. Return to DigiConsole. From the Find menu, right-click on your camera and select Refresh the list of devices (If DigiConsole was closed earlier, run the software again and click Find). 7. Disconnect the network cable from the camera. 8. Double-click the camera to launch DigiViewer in your default browser.
Remote Viewing from iPhone™ or iPod touch™ Remote Viewing from iPhone™ or iPod touch™ To access your device remotely from iPhone™ or iPod touch™: 1. Using Safari, go to www.yoics.com and login using your Yoics username and password. 2. Click the name of the device you want to view. 3. Enter your username and password (by default, admin) to login to the camera. A. B. TIP! C. D. Figure 7.
Additional Information Additional Information For details on camera maintenance and firmware updates, please refer to the DigiConsole & DigiViewer Software Manual included on the CD bundled with this package. Focusing the camera You can manually adjust the focus of the LNE3003 Remote Surveillance Camera. Note: Make sure the camera is powered on and connected to a network before attempting to adjust the focus. To adjust the focus: 1. Open DigiViewer in your default browser.
Appendix 1: Camera Specifications Appendix 1: Camera Specifications 24
Appendix 1: Camera Specifications (cont’d.) Appendix 1: Camera Specifications (cont’d.
Appendix 1: Camera Specifications (cont’d.) It’s all on the Web! Product Information Specification Sheets User Manuals Software Upgrades Quick Start Guides Firmware Upgrades VISIT www.lorexcctv.com www.lorexcctv.com Lorex Technology Inc.