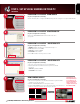
Home & Business Security Now with L15LD420/LD17LD420 Series Quick Start Guide WWW.LOREXCCTV.COM Information in this document is subject to change without notice. As our products are subject to continuous improvement, Lorex Technology and our subsidiaries reserve the right to modify product design, specifications and prices, without notice and without incurring any obligation. E&OE © 2008 LOREX. All rights reserved.
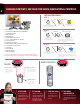
Time under 15 minutes under 30 minutes PACKAGE CONTENTS, INSTALLATION GUIDE, NAVIGATION & CONTROLS under 60 Time Hand Tools Installation Guide under 15 minutes STEP 1 under 60 minutes Time Hand Tools Time * under 30 minutes Hardware Tools over 60 minutes Hardware Router Skill Level Hi Speed Skills - Easy under 15 minutes under 30 minutes under 60 minutes over 60 minutes Time Under 20 Minutes* * Installation time may vary based on application and camera cabling under 15 minutes
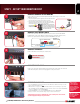
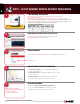
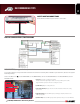
STEP 1 - SET UP YOUR MONITOR FIRST 1 CONNECT CAMERAS TO THE MONITOR: Connect the first camera to the CH1 input. Follow the same steps to connect the additional cameras. 1. Connect the Female BNC end of the supplied 60’ extension cable to the camera. Connect the male Power end of the extension cable to the camera. 2. Connect the Female end of the supplied 60’ extension cable to an open BNC camera input on the back of the System.
STEP 2 - SET UP LOCAL VIEWING ON YOUR PC THIS STEP RELATES TO REMOTE VIEWING OVER THE LAN (LOCAL AREA NETWORK) BY USING A PC LOCATED ON THE SAME NETWORK AS THAT OF THE SYSTEM. RETRIEVE SYSTEM INFORMATION: 1 1. Access the Main Menu Setup screens, and navigate to the MAIN MENU - EXTERNAL DEVICE - TCP/IP SETUP - IP SETUP option. 2. Record the MAC Address of your system. This information is NECESSARY for the DDNS Setup process. 3. Confirm that the DHCP MODE is set to AUTOMATIC.
STEP 2 - SET UP LOCAL VIEWING ON YOUR PC CONTINUED Lorex Client 2.2 irs Setup - main screen 5 (on your local computer for local viewing) Click the IRS Setup tab to configure the DDNS Settings (must be setup prior to using the H.264 Viewer). 6 Lorex Client 2.2 irs Setup - registering site (on your local computer for local viewing) Click on the “REGISTERING SITE” button to add a new site to your system. 7 Lorex Client 2.
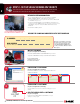
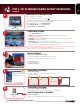
STEP 3 - SET UP INTERNET REMOTE SECURITY MONITORING PORT FORWARD YOUR ROUTER: 1 Port forward your router first before proceeding with the set-up. You muse foward Ports: 50000 (TCP/IP), 80: (WEB) All routers are different. To port forward your router, please refer to your router’s user manual. A router configuration guide featuring the most commonly used routers in the market is available on your Lorex Client Software CD and also on www.lorexcctv.com/support in the Consumer’s Guide Section.
STEP 3 - SET UP INTERNET REMOTE SECURITY MONITORING CONTINUED Enter DDNS Set-up on your System: 6 Mouse navigation (recommended) 1. Right click the MOUSE and press the Menu icon. 2. You will be to prompted to key in the User ID (ADMIN by default) and Password (leave it blank). 3. Press the Enter button and navigate to the MAIN MENU. 4. On the MAIN MENU, click on “EXTERNAL DEVICE”. 5. On “EXTERNAL DEVICE” select “TCP/IP SETUP”. 6. On TCP/IP SETUP select DDNS SETUP.
STEP 3 - SET UP INTERNET REMOTE SECURITY MONITORING CONTINUED 11 Lorex Client 2.2 irs Setup - main screen (on your remote computer for remote viewing) Click the IRS Setup tab to configure the DDNS Settings (must be setup prior to using the H.264 Viewer). 12 Lorex Client 2.2 irs Setup - registering site (on your remote computer for remote viewing) Click on the “REGISTERING SITE” button to add a new site to your system. 13 Lorex Client 2.
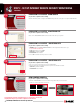
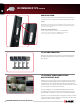
recommended tips LOCATE MONITOR CONNECTIONS: Tilt the monitor UP to loacte your monitor’s connections. DISPLAY CONFIGURATION / FUNCTION ICONS RECORD SETUP (storage calculator): The system provides a Storage Calculator to calculate the amount of recording time available on your Hard Drive, based on the System Recording Settings. Click on the Menu icon RECORD SET UP. to enter MAIN MENU. On the MAIN MENU, click on the RECORD MENU. On the RECORD MENU, click on 1.
recommended tips CONTINUED HDD Installation: The System comes with a pre-installed Hard Drive, however the unit will work with a replacement single SATA Hard Drive (up to 500GB). NOTE: Make sure that the System is OFF and the power cable has been disconnected before changing the Hard Drive. For detailed instructions, check the user’s manual. FORMATTING THE New Hard DRIVE: The New Hard Drive MUST be formatted. If a new HARD DRIVE is detected, the system will prompt you to FORMAT the drive.
Lorex CLIENT 2.2 internet remote software (irs) 11 1 2 3 4 5 6 1. Lorex IRS SETUP Setting up IRS is necessary in order to use the H.264 Viewer. 2. Lorex H.264 VIEWER Remote monitoring software recommended for Internet Remote Monitoring. H.264 video compression technology allows for efficient data transfer over the internet. You can view your system remotely while consuming less bandwidth. 3. Lorex SEARCH Search for recorded data to playback from a remote location. 4.
product support It’s all on the Web www.lorexcctv.com For detailed setup information, please refer to your User’s Manual. For additional information about determining your IP address, configuring your router, and port forwarding, please visit our website www.lorexcctv.com/support and click Consumer Guides Section or view guides from the CD included with your system. Email Support: support@lorexcorp.