
- Lorex Technology Router Brochure

Page 8
A Guide to Port Forwarding Your Router
Information in this document is subject to change without notice. As our products are subject to continuous improvement, Lorex Technology and our subsidiaries
reserve the right to modify product design, specifications and prices, without notice and without incurring any obligation. E&OE © 2006 LOREX. All rights reserved.
WWW.LOREXCCTV.COM
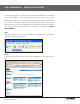
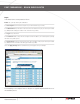
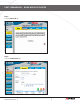
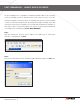
In the Name field enter a description of your network device (e.g. monitor)
In the Private IP field enter the computer network IP address you recorded previously during the Quick
Set Up Guide process.
In the Protocol field, select Both.
In the Private port enter the port number you need to port forward (e.g. 5000)
In the Public port re-enter the port number you entered in the private port field (e.g. 5000)
Select the Schedule to Always
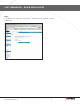
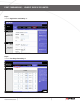
If more ports are required to be port forwarded, repeat the above steps. When complete, select
the Apply button located at the bottom of the page to save your changes.
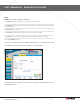
Port forwarding is now complete! Return to the quick set up guide and proceed with the rest of
the installation process.
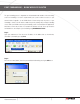
Step 5:
Enable the system by checking the enabled box
port forwarding – dLinK wireLeSS router