IEEE 802.11n Draft 2.
User’s Guide IEEE 802.11n Draft 2.
FCC Certifications Federal Communication Commission Interference Statement This equipment has been tested and found to comply with the limits for a Class B digital device, pursuant to Part 15 of the FCC Rules. These limits are designed to provide reasonable protection against harmful interference in a residential installation.
CE Mark Warning This equipment complies with the requirements relating to electromagnetic compatibility, EN 55022 class B for ITE, the essential protection requirement of Council Directive 2004/108/EC on the approximation of the laws of the Member States relating to electromagnetic compatibility. Company has an on-going policy of upgrading its products and it may be possible that information in this document is not up-to-date. Please check with your local distributors for the latest information.
OVERVIEW Thank you for purchasing this product. Read this chapter to know about your IEEE 802.11n Wireless Adapter. Unpacking information Before getting started, please verify that your package includes the following items: 1. IEEE 802.11n Wireless Adapter 2.
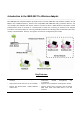
Introduction to the IEEE 802.11n Wireless Adapter The IEEE 802.11n Wireless adapter provides users to launch IEEE 802.11n wireless network at 150 Mbps in the 2.4GHz frequency, which is also compatible with IEEE 802.11b /g wireless devices. You can configure this adapter with ad-hoc mode to connect to other 2.4GHz wireless computers or with Infrastructure mode to connect to a wireless AP or router for accessing to Internet.
INSTALLATION GUIDE Installation Note: The following driver installation guide uses Windows XP as the presumed operation system. The procedures and screens in Windows 98se, 2000 and Vista are familiar with Windows XP. 1. Unplug the power cord of your computer from outlet. Remove the cover of your computer. 2. Install the adapter into a PCI socket, PCMCIA slot or USB port. 3. The “Found New Hardware Wizard“ pops up. (Note: This wizard won’t pop up in Windows 98 and ME.
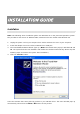
Note: If the CD-Rom fails to auto-run, please click on “My Computer” your CD-Rom Drive then double-click the “Setup” icon to start the this menu. 1. The language-selecting window pops up. Please select the language you use and click Next.
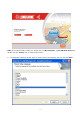
2. The welcome window pops up. Click the “Next” button to proceed. 3. . Click the “Install” button to start installing.
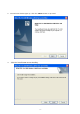
4. Please wait while installation 5. This Windows Logo testing warning window may pop up upon installation. Please click the “Continue Anyway” to continue.
6. Please wait again while installation 7. For Windows XP and 2000 users, please shut down the computer. If you are using Windows 98se or ME, the system may ask for restarting. Please select “No, I will restart my computer later.” and then shut the computer down. Click the “Finish” button to complete driver and utility installation.
MANAGEMENT GUIDE Read this chapter to understand the management interface of the device and how to manage the device. Making a Basic Network Connection Connecting with Microsoft Zero Configuration tool After specifying the Microsoft Zero Configuration tool to configure your wireless network, right click on the icon on system tray. Select “View Available Wireless Networks” to specify your wireless network. The tool shows the available wireless networks. Select your demanding network to connect with.
Connecting with 802.11n Wireless LAN Utility We provide this Utility for users to connect to a wireless network easily. It provides more information and configuration for this adapter. As default, the Utility is started automatically upon starting your computer and connects to a connectable wireless network with best signal strength and with no security setting. Right click on the icon in the system tray and select Open Config utility if the Utility does not start.
You may click on the tabs above to configure this adapter. The checkboxes below provide the following functions: Radio Off Check this checkbox to show the utility icon on your system tray, which is in the notification area at the lower-right corner of the windows desktop. You may also uncheck it to remove the utility icon from system tray. Check this checkbox to prevent this adapter form transmitting or receiving signals. Uncheck it to communicate.
3. Click the OK button to confirm that you are connecting to an open wireless network. 4. Click OK to add this network into the profile list. Note: This example is an open wireless network. If you are going to connect to a Wireless adapter with security protection, you will have to configure the encryption settings in this profile to be corresponding to the other wireless adapter.
Introduction to the Wireless LAN Utility Note: This management instruction uses Windows XP as the presumed operation system. Some functions are not supported in Windows 98se or Windows ME. General After starting the utility, the general page pops up This General tab provides the information of your current wireless network connection. You may click the Renew IP button to refresh those listed information.
Profile The Profile tab lists the preferred connections. You can click the buttons beside to do configure each connection. Add Click this button to add a connection profile for this adapter. Remove To remove a connection profile, click this profile on the profile list and click this button to delete it. Edit To modify the configurations for a profile, click this profile on the profile list and click this button to edit.
Available Network This available tab lists the reachable wireless network of this adapter. Refresh Add to Profile Click this button to rescan available networks around the adapter. To add an available Network to your profile list, select an available network and click this button to add.
Advanced This Advanced tab provides advanced configurations to this adapter. Every modification in this tab will be performed after clicking the Apply button. To restore the default settings of the advanced tab, click the Set defaults button to perform restoring. Fragment Threshold The maximum size of a packet that is going to be segmented and transmitted. Select the size from 256 to 2432(default) bytes. RTS Threshold Select the RTS Threshold form 0 to 2432(default) Wireless Mode 802.
Status This tab shows the current connection status of this adapter. Statistics See this tab to show the transmission activity record. Clicking the “Reset” button recounts the values from zero.
Wi-Fi Protect Setup The primary goal of Wi-Fi Protected Setup (Wi-Fi Simple Configuration) is to simplify the security setup and management of Wi-Fi networks. This adapter supports the configuration setup using PIN configuration method or PBC configuration method. If the wireless card supports Wi-Fi Protected Setup (WPS), you can establish a wireless connection between wireless card and router using either Push Button Configuration (PBC) method or PIN method.
1. PIN method Click the button “Pin Input Config (PIN)”, and then come to the following figure. Click the button “Yes”, you can select one of the AP. In this figure, you can operate these buttons “Refresh / Select / Cancel”. Select the name of one AP, then click “Select” button, you could use PIN method to configure the QSS.
Double click the Internet WEB browser icon on your desktop screen. Type the IP address of you selected router/AP into the URL and press Enter, and then you can enter the configuration. Please enter the WPS ( Wi-Fi ) configuration page, type the PIN code of adapter and click confirm button to build WPS connection. 2. PBC (Push Button Configuration) method After pushing the PBC button, please push the physical button on your AP or visual button on the WPS config page, then come to the following figure.
APPENDIX Windows Vista Driver Installation Note: The following driver installation guide uses Windows XP as the presumed operation system. The procedures and screens in Windows 98se, 2000 and Vista are familiar with Windows XP. 1. Unplug the power cord of your computer from outlet. Remove the cover of your computer. 2. Install the adapter into a PCI socket, PCMCIA slot or USB port. 3. The “Found New Hardware Wizard“ pops up. (Note: This wizard won’t pop up in Windows 98 and ME.
Note: If the CD-Rom fails to auto-run, please click on “My Computer” your CD-Rom Drive then double-click the “Setup” icon to start the this menu. 5. The language-selecting window pops up. Please select the language you use and click OK. 6. The welcome window pops up. Click the “Next” button to proceed.
7. . Click the “Install” button to start installing. 8. This Windows Logo testing warning window may pop up upon installation. Please click the “Install this driver software anyway” to continue. 9.
10. For Windows XP and 2000 users, please shut down the computer. If you are using Windows 98se or ME, the system may ask for restarting. Please select “No, I will restart my computer later.” and then shut the computer down. Click the “Finish” button to complete driver and utility installation.
AP mode management guide Software Access Point (Soft AP) Application: General To use this adapter as an access point, please click the “Mode” on Functional menu and select “Access Point”.
At the same time, you will find that the icon on the system tray is changed. After configuring the adapter in AP mode, this “General” page shows up, which shows the general information of this AP. SSID: BSSID: Config: Association Table: The SSID (network name) of the wireless network constructed by this AP.
Statistics See this tab to show the transmission activity record. Clicking the “Reset” button recounts the values from zero.
ICS This page allows users to select the adapter for connect to public network. Please click on the device that are used for connecting to public network, and then click the “Apply” button to execute.
PRODUCT SPECIFICATION Standard IEEE 802.11n draft 2.0, IEEE 802.11g, IEEE 802.11b, IEEE 802.3, IEEE 802.3u Interface Complies with USB 2.0 Security 64/128-bit WEP, WPA (TKIP with IEEE 802.1x), AES Receiver Sensitivity 802.11n Typical -68 dBm 802.11g Typical -73 dBm 802.11b Typical -84 dBm Data Rate 802.11b: 1, 2, 5.5 and 11Mbps 802.11g: 6, 9, 12, 18, 24, 36, 48, and 54Mbps 802.11n: up to 150 Mbps Transmit Power 16 dBm typically @ 802.11b 14 dBm typically @ 802.11g 13 dBm typically @ 802.
Benutzer Handbuch IEEE 802.11n Draft 2.
FCC Zertifizierungen FCC (Federal Communication Commission) Störungsmitteilung Dieses Gerät ist getestet worden und, gemäß Teil 15 der FCC Vorschriften, als den Beschränkungen eines digitalen Gerätes der Klasse B befunden worden. Diese Einschränkungen sind dazu bestimmt, angemessenen Schutz gegen schädliche Störungen bei der Benutzung im Wohnbereich zu bieten.
CE-Hinweis Dieses Gerät erfüllt die Anforderungen an die elektromagnetische Verträglichkeit gemäß EN 55022 Klasse B für ITE sowie die wesentlichen Anforderungen der Direktive des Europarats 2004/108/EC über die Annäherung der Gesetze der Mitgliedsstaaten im Hinblick auf die elektromagnetische Verträglichkeit. Da das Unternehmen seine Produkte permanent verbessert, kann es möglich sein, dass die in diesem Dokument enthaltenen Informationen nicht aktuell sind.
ÜBERSICHT Danke, dass Sie sich für dieses Produkt entschieden haben. Lesen Sie dieses Kapitel, um sich mit Ihrem IEEE 802.11n Wireless Adapter vertraut zu machen. Auspacken Prüfen Sie bitte zunächst, ob die Verpackung die folgenden Artikel enthält: 1. IEEE 802.11n Wireless Adapter 2.
Einführung in den IEEE 802.11n Wireless Adapter Der IEEE 802.11n Wireless Adapter ermöglicht Ihnen die Einrichtung eines IEEE 802.11g Funknetzwerks mit 150 Mbps und einer Frequenz von 2,4 GHz, das ebenfalls mit IEEE 802.11b/g Wireless-Geräten. Sie können den Adapter im Ad-hoc-Modus konfigurieren, um einen Internetzugang über einen Wireless AP (Access Point / Zugangspunkt) oder einen Router herzustellen.
INSTALLATIONSANLEITUNG Installation Hinweis: Die folgende Installationsanleitung für Treiber bezieht sich auf Windows XP als Referenz-Betriebssystem. Die Verfahren und Bildschirmanzeigen von Windows 98se und 2000 sind ähnlich wie bei Windows XP. 1. Ziehen Sie das Stromkabel Ihres Computers aus der Steckdose. Öffnen Sie das Gehäuse Ihres Computers. 2. Stecken Sie den Adapter in einen PCI-Sockel, PCMCIA-Steckplatz oder USB-Port. 3.
Hinweis: Wenn die CD-Rom nicht automatisch startet, klicken Sie bitte auf Arbeitsplatz CD-Rom-Laufwerk und anschließend doppelt auf das Setup- Symbol in diesem Menü. 1. Das Sprachauswahlfenster erscheint. Wählen Sie Ihre Sprache und klicken Sie auf Next.
2. Das Begrüßungsfenster erscheint. Klicken Sie auf Next (Weiter), um fortzufahren. 3.
4. Bitte warten Sie, während die Software installiert wird. 5. Während der Installation kann dieses Windows-Warnfenster eingeblendet werden. Klicken Sie bitte auf Continue Anyway (Trotzdem fortfahren), um fortzufahren.
6. Bitte warten Sie während des Installationsvorgangs. 7. Bei Windows XP und 2000 Nutzern: Bitte fahren sie Ihren Computer runter. Wenn Sie Windows 98se oder ME nutzen, kann das System einen Neustart fordern. Bitte wählen Sie “Nein, ich starte meinen Computer später neu.” Und fahren Sie den Computer runter. Drücken Sie “Beenden”, um die Komplettinstallation fortzuführen.
MANAGEMENT-ANLEITUNG Lesen Sie dieses Kapitel, um die Management-Benutzeroberfläche des Geräts kennenzulernen und sich mit dessen Steuerung vertraut zu machen. Standard-Netzwerkverbindung herstellen Verbindung mit dem Microsoft Zero Configuration tool Nachdem Sie das Microsoft Zero Configuration tool für die Konfiguration Ihres wireless auswählen, klicken Sie auf das Netzwerkes Symbol im Infobereich der Taskleiste.
Verbindung mit dem 802.11n Wireless LAN Utility Wir bieten dieses Utility für Nutzer, die Ihr Netzwerk möglichst einfach herstellen möchten. Das Utility startet automatisch, wenn Sie den Computer hochfahren, und baut automatisch eine Verbindung zu einem wireless Netzwerk mit der besten Signalstärke auf, das über keine Sicherheitseinstellungen verfügt. Klicken Sie auf dieses Symbol im Infobereich der Taskleiste und öffnen Sie Open Config utility, wenn das Utility nicht automatisch startet.
Verwendung dieses Adapters im Station-Modus 1. Klicken Sie doppelt auf das Symbol auf Ihrem Desktop. 2. Klicken Sie auf den Available Network-Button (Verfügbares Netzwerk), um nach verfügbaren Netzwerk-Adaptern zu suchen. Klicken Sie doppelt auf den Netzwerk-Adapter, zu dem Sie eine Verbindung herstellen möchten. 3. Klicken Sie auf OK, um zu bestätigen, dass Sie eine Verbindung zu einem offenen Funknetzwerk herstellen möchten. 4. Klicken Sie auf OK, um dieses Netzwerk zur Profilliste hinzuzufügen.
Hinweis: Dieses Beispiel bezieht sich auf ein offenes Funknetzwerk. Wenn Sie eine Verbindung zu einem Wireless-Adapter mit Sicherheitsschutz herstellen, müssen Sie die Verschlüsselungseinstellungen in diesem Profil entsprechend dem anderen Wireless-Adapter konfigurieren. Klicken Sie bitte auf die Dropdown-Liste Network Authentication (Netzwerk-Authentifizierung), um eine Authentifizierungsmethode auszuwählen. Wählen Sie unter Data encryption die Datenverschlüsselungsart.
Einführung in das Wireless LAN-Dienstprogramm Hinweise: Diese Anleitung bezieht sich auf Windows XP als Referenz-Betriebssystem. Einige der Funktionen werden von Windows 98se oder Windows ME nicht unterstützt. Allgemein (General) Nach dem Start des Dienstprogramms wird das allgemeine Menü angezeigt. Der Reiter General (Allgemein) bietet Informationen über Ihre aktuelle Funknetzwerk-Verbindung. Sie können die Angaben aktualisieren, indem Sie auf Renew (Aktualisieren) klicken.
Profile (Profil) Der Reiter Profile (Profil) bietet eine Liste der bevorzugten Verbindungen. Sie können auf die nebenstehenden Buttons klicken, um jede einzelne Verbindung zu konfigurieren. Add (Hinzufügen) Klicken Sie auf diesen Button, um diesem Button ein Verbindungsprofil hinzuzufügen. Remove (Entfernen) Um ein Verbindungsprofil zu löschen, klicken Sie auf den entsprechenden Eintrag in der Liste und anschließend auf diesen Button, um das Profil zu löschen.
Available Network (Verfügbares Netzwerk) Dieser Reiter enthält eine Liste der für diesen Adapter erreichbaren Funknetzwerke. Refresh Klicken Sie auf diesen Button, um erneut nach verfügbaren Netzwerken in der (Aktualisieren) Umgebung des Adapters zu suchen. Add to Profile (zu Um ein verfügbares Netzwerk Ihrer Profilliste hinzuzufügen, wählen Sie ein Profilen verfügbares Netzwerk aus und klicken Sie anschließend auf diesen Button.
Advanced (Erweitert) Der Reiter Advanced (Erweitert) bietet erweiterte Konfigurationsmöglichkeiten für diesen Adapter. Jede Änderung in diesem Reiter wird nach Klick auf den Apply-Button (Anwenden) ausgeführt. Klicken Sie auf Set defaults (Standardeinstellungen wiederherstellen), um die Standardeinstellungen wiederherzustellen. Power Save (Energiesparmodus) None (Keine) Deaktiviert die Energiesparfunktion. Min (Minimum) Minimaler Stromverbrauch. Max (Maximum) Maximaler Stromverbrauch.
Status Dieser Reiter zeigt den aktuellen Verbindungsstatus dieses Adapters. Statistics (Statistik) Dieser Reiter zeigt eine Aufzeichnung der Übertragungsaktivitäten. Klicken Sie auf den Reset-Button (Zurücksetzen), um die Werte wieder von 0 an zu zählen.
Wi-Fi Sicherheits Setup Das Hauptziel des Wi-Fi Sicherheits Setups (Wi-Fi Simple Configuration) ist es, das Einrichten der Sicherheitsdienste und deren Verwaltung im Wi-Fi Netzwerk zu vereinfachen. Dieser Adapter unterstützt die Konfiguration mittels PIN oder PBC ( Push button configuration, Knopfdruck).
Klicken Sie “Yes”, um einen AP auszuwählen ( you can select one of the AP). In diesem Bild haben Sie 3 Wahlmöglichkeiten “Refresh / Select / Cancel”.( Erneuern/ Auswählen/ Abbrechen) Wählen Sie den Namen eines APs aus und klicken dann auf “Select” , Sie können die PIN Methode wählen, um QSS zu konfigurieren. Doppelklicken Sie auf den Internet WEB browser icon Ihres Desktops. Geben Sie die IP Adresse Ihres ausgewählten Routers/AP in die URL und drücken Sie “Enter”, dann gelangen Sie zur Konfiguration.
2. PBC (Push Button Configuration) Methode ( Knopfdruck Methode) Nach dem Drücken der PBC Taste, drücken Sie bitte den physikaliscken Knopf des APs oder visuellen Knopfes auf der WPS config Seite, es erscheint folgendes Bild. Bitte wählen Sie die WPS ( Wi-Fi )Konfigurationsseite Ihres gewünschten Routers/ APs aus, und starten Sie die PCB Verbindung. Wenn die WPS Konfiguration erfolgreich war, ist das Profil entsprechend geändert.
ANHANG Treiber-Installation unter Windows Vista Hinweis: Die folgende Installationsanleitung für Treiber bezieht sich auf Windows XP als Referenz-Betriebssystem. Die Verfahren und Bildschirmanzeigen von Windows 98se und 2000 sind ähnlich wie bei Windows XP. 1. Ziehen Sie das Stromkabel Ihres Computers aus der Steckdose. Öffnen Sie das Gehäuse Ihres Computers. 2. Stecken Sie den Adapter in einen PCI-Sockel, PCMCIA-Steckplatz oder USB-Port. 3.
Hinweis: Wenn die CD-Rom nicht automatisch startet, klicken Sie bitte auf Arbeitsplatz CD-Rom-Laufwerk und anschließend doppelt auf das Setup- Symbol in diesem Menü. 5. Das Sprachauswahlfenster erscheint. Wählen Sie Ihre Sprache und klicken Sie auf Next.
6. Das Begrüßungsfenster erscheint. Klicken Sie auf Next (Weiter), um fortzufahren. 7.
8. Während der Installation kann dieses Windows-Warnfenster eingeblendet werden. Klicken Sie bitte auf Install this driver software anyway (Trotzdem fortfahren), um fortzufahren. 9. Bitte warten Sie während des Installationsvorgangs. 10. Bei Windows XP und 2000 Nutzern: Bitte fahren sie Ihren Computer runter. Wenn Sie Windows 98se oder ME nutzen, kann das System einen Neustart fordern. Bitte wählen Sie “Nein, ich starte meinen Computer später neu.” Und fahren Sie den Computer runter.
AP-Modus Management-Anleitung Software Access Point (Soft AP) Anwendung: Allgemein Um diesen Adapter als Accesspoint zu nutzen, Klicken Sie “Mode” im Menü und wählen Sie “Access Point” aus.
Gleichzeitig sehen Sie, dass sich das Symbol im Infobereich der Taskleiste geändert hat. Nach der Konfiguration des Adapters im AP-Modus wird das Fenster General (Allgemein) mit allgemeinen Informationen zu diesem Zugangspunkt eingeblendet.
Advanced (Erweitert) Beacon Interval (Signalintervall): DTIM Period (DTIM-Dauer): Preamble Mode (Präambel-Modus): Set Defaults (Standardeinstellungen): Apply (Anwenden): Definiert das Intervall zwischen den Signalen von 20~1000. Legt den DTIM-Dauer zwischen 1~255 fest. Klicken Sie auf die Dropdown-Liste, um die Präambel auf lang, kurz oder automatisch einzustellen. Klicken Sie auf diesen Button, um die Standardwerte der obigen Einstellungen wiederherzustellen.
ICS In diesem Fenster können Benutzer den Adapter für die Verbindung mit einem öffentlichen Netzwerk auswählen. Klicken Sie auf das Gerät, das für die Herstellung der Verbindung zu dem öffentlichen Netzwerk verwendet werden soll. Auf Apply (Anwendung), um die Verbindung herzustellen.
PRODUKT-SPEZIFIKATIONEN Standard IEEE 802.11n draft 2.0, IEEE 802.11g, IEEE 802.11b, IEEE 802.3, IEEE 802.3u Schnittstelle USB (23413) Sicherheit 64/128-bit WEP, WPA (TKIP mit IEEE 802,1x), AES Empfänger-Empfindlichkeit 802.11n Typical -68 dBm 802.11g Typical -73 dBm 802.11b Typical -84 dBm Kanal USA 11, Europa 13, Japan 14 Datenübertragungsrate 802,11b: 1, 2, 5,5 und 11Mbps 802,11g: 6, 9, 12, 18, 24, 36, 48, und 54Mbps 802.11n: bis zu 150 Mbps Übertragungsleistung 16 dBm typically @ 802.
Manuale d'uso Adattatore wireless USB IEEE 802.11n Draft 2.
Certificazioni FCC Dichiarazione della FCC sulle interferenze L'apparecchiatura è stata collaudata e riscontrata conforme ai limiti per i dispositivi digitali di classe B ai sensi della Parte 15 della normativa FCC. Tali limiti sono stati studiati per fornire una ragionevole protezione contro le pericolose interferenze negli impianti residenziali.
Marchio di conformità CE Questo apparecchio è conforme ai requisiti riguardanti la compatibilità elettromagnetica, EN 55022 classe B per ITE ovvero ai requisiti essenziali della Direttiva del Consiglio 2004/108/EC sull’armonizzazione delle leggi degli Stati Membri in materia di compatibilità elettromagnetica. La politica dell’azienda prevede l'aggiornamento costante dei propri prodotti; è quindi possibile che le informazioni contenute in questo manuale non siano aggiornate.
PRESENTAZIONE Grazie per avere acquistato questo prodotto. In questo capitolo sono presentati i componenti in dotazione all’adattatore wireless IEEE 802.11n. Volume della fornitura Prima di utilizzare l’apparecchio verificare che la confezione contenga i seguenti componenti: 1. Adattatore wireless IEEE 802.11b/g/n 2.
Introduzione all’adattatore wireless IEEE 802.11n L’adattatore wireless IEEE 802.11n consente agli utenti di installare la rete senza fili IEEE 802.11n a 150 Mbps con una frequenza di 2.4GHz ed è compatibile anche con dispositivi senza fili IEEE 802.11b/g. Grazie a questo adattatore è possibile configurare una modalità ad hoc per collegarsi ad altri computer 2.4GHz oppure una modalità infrastruttura per collegarsi a un punto d’accesso senza fili oppure a un router per la connessione a Internet.
GUIDA D’INSTALLAZIONE Installazione Nota: la seguente guida di installazione del driver si basa sul sistema operativo Windows XP. Le procedure e le schermate dei sistemi operativi Windows 98se e 2000 sono simili a quelle di Windows XP. 1. Estrarre il cavo di alimentazione del computer dalla presa. Rimuovere il coperchio del computer. 2. Collegare l’adattatore a una presa PCI, a uno slot PCMCIA oppure a una porta USB. 3. Compare la finestra “Trovato nuovo hardware“.
Nota: se il CD non si apre automaticamente, fare clic su “Risorse del computer” Unità DVD-RW poi fare clic due volte su “Setup” per avviare il menu. 1. Compare la finestra di selezione della lingua. Selezionare la lingua che si vuole utilizzare e fare clic su Continua.
2. Compare la finestra iniziale. Fare clic sul pulsante “Continua” per procedere. 3.
4. Attendere che l’installazione venga completata. 5. Durante l’installazione potrebbe comparire la finestra di verifica del logo Windows. In questo caso premere “Continua” per proseguire comunque l’operazione.
6. Attendere prima di effettuare l’installazione 7. Per utenti Windows XP e 2000 si prega di spegnere il computer. Se si utilizza Windows 98SE o ME, il sistema può chiedere di riavviare il computer. Si prega di selezionare "No, riavviare il computer in seguito" e quindi spegnere il computer. Fare clic su “Fine" per completare l'installazione del driver e utility.
UTILIZZO DELL’APPARECCHIO Questa sezione illustra le caratteristiche dell’interfaccia dell’apparecchio e fornisce istruzioni in merito al suo utilizzo. Stabilire una connessione di rete Collegamento con Microsoft Zero Configuration tool Dopo aver specificato lo strumento Microsoft Zero Configuration per configurare la rete wireless, cliccare l'icona sulla barra di sistema. Con il tasto destro del mouse. Selezionare Visualizza reti senza fili disponibili per specificare la propria rete wireless.
Per connettersi usando l‘utility 802.11n Wireless LAN Questo utility viene fornita a corredo per consentire agli utenti di collegarsi facilmente a una rete wireless. Fornisce più informazioni e possibilità di configurazione per questo adattatore. A livello predefinito, l'utility si avvia automaticamente all'avvio del computer e si connette alla rete wireless disponibile dotata del segnale più potente.
Per utilizzare l’adattatore in modalità Station 1. Fare clic sull’icona del desktop. 2. Fare clic sulla scheda “Rete disponibile” per visualizzare gli adattatori di rete wireless disponibili. Cliccare due volte sull’adattatore di rete a cui collegarsi. 3. Fare clic sul pulsante OK per confermare che è in corso una connessione a una rete wireless non protetta. 4. Fare clic su OK per aggiungere la rete alla lista dei profili.
Nota: in questo esempio c’è una rete senza fili non protetta. Se l'utente intende connettersi a un adattatore wireless con protezione di sicurezza, dovrà stabilire la crittografia di questo profilo in modo che sia corrispondente a quella stabilita per l’altro adattatore wireless. Fare clic sulla lista a discesa “Autenticazione rete” per selezionare un metodo di autenticazione e poi scegliere il tipo di “Crittografia dati”. Compilare tutti gli spazi necessari e cliccare su “OK”.
Introduzione alla funzione Wireless LAN Nota: queste istruzioni si basano sul sistema operativo Windows XP. Alcune funzioni non sono supportate in Windows 98se oppure in Windows ME. Generale Dopo l’avvio del programma si visualizza la pagina con le informazioni generali. La scheda General fornisce le informazioni sulla connessione di rete wireless attuale. Fare clic sul pulsante Renew per aggiornare le informazioni.
Profili La scheda Profile elenca le connessioni preferite. Ciccando sui pulsanti a lato è possibile configurare ogni connessione. Add Remove Fare clic su questo pulsante per aggiungere un profilo di connessione all’adattatore. Per eliminare un profilo fare clic sul profilo stesso e poi su questo pulsante. Edit Per modificare la configurazione di un profilo, cliccare sul profilo stesso nella lista profilo e poi sul pulsante per modificarlo.
Rete disponibile Questa scheda elenca le reti wireless disponibili per questo adattatore. Refresh Add to Profile Fare clic su questo pulsante per aggiornare le reti senza fili disponibili per l’adattatore. Per aggiungere una rete disponibile alla propria lista, selezionarne una e fare clic su questo pulsante.
Avanzate La scheda Advanced fornisce le impostazioni avanzate per l'adattatore. Per eseguire le modifiche è necessario fare clic sul pulsante Apply. Per ripristinare le impostazioni di default della scheda Advanced, fare clic sul pulsante Set defaults. Power Save None Min Max Turbo Mode OFF ON AUTO Disattiva la funzione di risparmio energetico.
Status Questa scheda mostra lo stato di connessione dell’adattatore attuale. Statistiche Questa scheda indica le statistiche relative ai dati trasmessi. Fare clic “Reset” per riportare il conteggio a zero.
Wi-Fi Protect Setup L'obiettivo primario di Wi-Fi Protected Setup (Wi-Fi Configurazione semplice) è quello di semplificare la configurazione e la gestione della sicurezza delle reti Wi-Fi. Questo adattatore supporta l'installazione di configurazione, utilizzando il metodo di configurazione PIN o il metodo di configurazione PBC.
1. Metodo PIN Fare clic sul pulsante "Pin Input Config (PIN)", e aspettare che appaia le seguente icona. Cliccare sul pulsante "Sì” e selezionare uno degli AP. In questa figura, è possibile utilizzare questi pulsanti "Aggiorna / Seleziona / Annulla". Selezionare il nome di un AP, quindi fare clic sul pulsante "Seleziona". È possibile utilizzare il metodo PIN configurare il QSS.
Fare doppio clic sull'icona del browser Internet sul vostro desktop. Digitare l'indirizzo IP del router / AP selezionato nella barra URL e premere Invio, e entrare nel pannello di configurazione. Accedere al pannello di configurazione WPS (Wi-Fi), digitare il codice PIN della scheda e fare clic sul pulsante conferma per la costruzione di una connessione WPS. 2.
APPENDICE Installazione driver per Windows Vista Nota: la seguente guida di installazione del driver si basa sul sistema operativo Windows XP. Le procedure e le schermate dei sistemi operativi Windows 98se e 2000 sono simili a quelle di Windows XP. 1. Estrarre il cavo di alimentazione del computer dalla presa. Rimuovere il coperchio del computer. 2. Collegare l’adattatore a una presa PCI, a uno slot PCMCIA oppure a una porta USB. 3. Compare la finestra “Trovato nuovo hardware“.
Nota: se il CD non si apre automaticamente, fare clic su “Risorse del computer” Unità DVD-RW poi fare clic due volte su “Setup” per avviare il menu. 5. Compare la finestra di selezione della lingua. Selezionare la lingua che si vuole utilizzare e fare clic su Continua.
6. Compare la finestra iniziale. Fare clic sul pulsante “Continua” per procedere. 7.
8. Durante l’installazione potrebbe comparire la finestra di verifica del logo Windows. In questo caso premere “Install this driver software anyway” per proseguire comunque l’operazione. 9. Attendere prima di effettuare l’installazione 10. Per utenti Windows XP e 2000 si prega di spegnere il computer. Se si utilizza Windows 98SE o ME, il sistema può chiedere di riavviare il computer. Si prega di selezionare "No, riavviare il computer in seguito" e quindi spegnere il computer.
Gestione modalità AP Software Access Point (AP Soft) Applicazione: Generale Per utilizzare questa scheda come un punto di accesso, fare clic sul "Mode" nel menu funzionali e selezionare "Access Point".
Allo stesso tempo, vi accorgerete che l'icona nella system tray è cambiata. Dopo la configurazione dell’adattatore in modalità AP, la scheda “General” indica le informazioni generali riguardanti il punto d’accesso. SSID: BSSID: Config: Association Table: Il codice SSID (nome della rete) della rete wireless basata sull’AP.
Avanzate Beacon Interval: DTIM Period: Preamble Mode: Set Defaults: Apply: Definisce l’intervallo beacon tra 20~1000 Imposta il periodo DTIM tra 1~255 Fare clic sulla lista a discesa per selezionare il preambolo: lungo, breve oppure auto Fare clic sul pulsante per ripristinare le impostazioni ai valori di default Fare clic sul pulsante per eseguire le modifiche. Statistiche Questa scheda indica l’attività di trasmissione dati. Fare clic sul pulsante “Reset” per riconteggiare i valori a partire da zero.
ICS Questa scheda consente agli utenti di selezionare l’adattatore per la connessione alla rete pubblica. Fare clic sul dispositivo che si utilizza per collegarsi alla rete pubblica, infine sul pulsante “Apply” per l’esecuzione.
DATI TECNICI Standard IEEE 802.11n bozza 2.0, IEEE 802.11g, IEEE 802.11b, IEEE 802.3, IEEE 802.3u Interfaccia USB 2.0 Sicurezza 64/128-bit WEP, WPA (TKIP con IEEE 802.1x), AES Sensibilità del ricevitore 802.11n tipici -68 dBm 802.11g tipici -73 dBm 802.11b tipici -84 dBm Canale USA 11, Europa 13, Giappone 14 Velocità di trasmissione 802.11b: 1, 2, 5.5 e 11Mbps 802.11g: 6, 9, 12, 18, 24, 36, 48, e 54Mbps 802.11n: fino a 150 Mbps Potenza di trasmissione 16 dBm in genere @ 802.11b 14 dBm in genere @ 802.
Manual del usuario Adaptador USB inalámbrico IEEE 802.11n Draft 2.
Certificaciones de la FCC Declaración de interferencias de la Comisión Federal de Comunicaciones Se ha comprobado que este aparato cumple los límites para dispositivos digitales de clase B, de conformidad con el apartado 15 de las normas de la FCC. Dichos límites han sido diseñados para proporcionar una protección razonable contra interferencias dañinas en instalaciones residenciales.
Advertencia de Marca de la CE Este equipo cumple los requisitos relativos a la compatibilidad electromagnética, EN 55022 clase B para ITE, el requisito de protección esencial de la Directiva del Consejo 2004/108/EC sobre la aproximación de las leyes de los Estados Miembros relativas a la compatibilidad electromagnética. La empresa tiene una política de mejora permanente de sus productos y puede ser posible que la información de este documento no esté actualizada.
DESCRIPCIÓN GENERAL Gracias por la compra de este producto. Lea este capítulo para conocer su Adaptador inalámbrico IEEE 802.11n. Información de desembalaje Antes de empezar, compruebe que su paquete incluye los siguientes elementos: 1. Adaptador inalámbrico IEEE 802.11n 2.
Introducción al Adaptador inalámbrico IEEE 802.11n El Adaptador inalámbrico IEEE 802.11n permite a los usuarios lanzar una red inalámbrica IEEE 802.11n a 150 Mbps en la frecuencia de 2,4 GHz, que es también compatible con dispositivos inalámbricos IEEE 802.11b/g. Puede configurar este adaptador con el modo ad-hoc para conectar con otros ordenadores inalámbricos de 2,4 GHz o con el modo infraestructura para conectar con un AP o un router inalámbrico para acceder a internet.
GUÍA DE INSTALACIÓN Instalación Nota: La siguiente guía de instalación del controlador utiliza Windows XP como sistema operativo supuesto. Los procedimientos y pantallas en Windows 98se y 2000 son similares a las de Windows XP. 1. Desenchufe el cable de alimentación del ordenador de la toma de corriente. Quite la tapa del ordenador. 2. Instale el adaptador en una toma PCI, una ranura PCMIA o un puerto USB. 3. Aparece la ventana "Found New Hardware Wizard" (Asistente de Encontrado Nuevo Hardware).
Nota: Si el CD-Rom no realiza el auto-arranque, haga clic en "My Computer" your CD-Rom Drive y después haga doble clic en el icono "Setup" para iniciar este menú. 5. Aparece la ventana del menú de selección del idioma. Seleccione el idioma que desee y haga clic en Next.
6. Aparece la ventana de bienvenida. Haga clic en el botón "Next" para proceder. 7.
8. Espere mientras dura la instalación. 9. Puede aparecer esta ventana de advertencia de prueba de Windows Logo después de la instalación. Haga clic en "Continue Anyway" para continuar.
10. Por favor espere mientras la instalación esta en progreso. 11. Usuarios de Windows XP y 2000 necesitan reiniciar el PC. Si está utilizando Windows 98se o ME, el propio sistema lo pedirá, pero por favor seleccione “No, reiniciaré mi Ordenador más tarde.” y seguido reinicie su PC a mano. Haga clic en el botón “Finish” para finalizar la instalación del driver y de las utilidades.
GUÍA DE GESTIÓN Lea este capítulo para comprender la interfaz de gestión del dispositivo y cómo gestionar el dispositivo. Realización de una conexión de red básica Conexión con Microsoft Zero Configuration herramienta Para configurar su conexión inalámbrica con la utilidad Microsoft Zero Configuration haga clic con el botón derecho en el icono de la barra de sistema. Seleccione “View Available Wireless Networks” para ver las redes disponibles. La utilidad muestra las redes disponibles.
Conectando con la Utilidad 802.11n Wireless LAN Se suministra esta utilidad para poder conectar fácilmente a distintas redes inalámbricas, mostrando más datos de información y de la configuración del adaptador. Por defecto la utilidad arranca automáticamente cuando enciende su sistema operativo y conecta a red inalámbrica con la mejor señal que no necesite configurar parámetros de seguridad.
Para utilizar este adaptador en Modo de Estación 1. Haga doble clic en el icono de su escritorio. 2. Haga clic en el botón "Available Network" para explorar adaptadores de red inalámbricos disponibles. Haga doble clic en el adaptador de red al cual se va a conectar. 3. Haga clic en el botón OK para confirmar que se va a conectar a una red inalámbrica abierta. 4. Haga clic para añadir esta red a la lista de perfiles. Nota: Este ejemplo es una red inalámbrica abierta.
- 108 -
Introducción a la Utilidad LAN Inalámbrica Nota: Esta instrucción de gestión utiliza Windows XP como sistema operativo supuesto. Algunas funciones no son aceptadas en Windows 98se o Windows ME. General (Generalidades) Después de poner en marcha la utilidad, aparece la página general. Esta lengüeta 'General' proporciona la información de su conexión de red inalámbrica actual. Puede hacer clic en el botón Renew para actualizar la información listada.
Profile (Perfil) La lengüeta 'Profile' lista las conexiones preferidas. Puede hacer clic en los botones contiguos para configurar cada conexión. Add Haga clic en este botón para añadir un perfil de conexión para este adaptador. Remove Para eliminar un perfil de conexión, haga clic en este perfil en el listado de perfiles y haga clic en este botón para borrarlo.
Available Network (Red disponible) Esta lengüeta 'Available' lista las redes inalámbricas alcanzables de este adaptador. Refresh Add to Profile Haga clic en este botón para reexplorar redes disponibles en torno al adaptador. Para añadir una red disponible a su listado de perfiles, seleccione una red disponible y haga clic en este botón para añadirla.
Advanced (Avanzadas) Esta lengüeta Advanced proporciona configuraciones avanzadas para este adaptador. Cada modificación en esta lengüeta será efectiva después de hacer clic en el botón Apply. Para restaurar los ajustes por defecto de la lengüeta 'Advanced', haga clic en el botón Set defaults para realizar la restauración. Power Save None Min Max Modo Turbo OFF ON AUTO (ahorro de energía) Desactiva la función Ahorro de energía. Consumo de energía mínimo Consumo de energía máximo 802.
Estado Esta lengüeta muestra el estado de la conexión actual de este adaptador. Statistics (Estadísticas) Vea esta lengüeta para mostrar el registro de actividad de transmisión. Haciendo clic en el botón "Reset" recuenta los valores desde cero.
Wi-Fi Protect de instalación El principal objetivo de la “Configuración Simple de Wi-Fi” del WPS (Wi-Fi Protected Setup) es simplificar la configuración de los parámetros de seguridad y la administración de redes inalámbricas. Este adaptador soporta la configuración mediante PIN o PBC (Push Button Configuración). Si una tarjeta inalámbrica soporta WPS (Wi-Fi Protected Setup), se puede establecer la conexión entre ella y el Punto de Acceso con PBC o por PIN.
Haga clic en “Yes” para seleccionar un Punto se Acceso. El modo de acceso se puede configurar mediante los botones “Refresh”, “Select” y “Cancel”. Seleccione un Punto de Acceso, seguido haga clic en “Select” y seleccione el método PIN para configurar el QSS. Haga doble clic en el icono de su navegador para Internet, a continuación teclee la IP de su Punto de Acceso o Router para configurar ahí también el PIN del modo WPS.
2. Metodo PBC (Push Button Configuration) Después de presionar el botón PBC en su adaptador pulse en el Punto de Acceso también el botón físico para PBC o si no está disponible, haga clic en el botón del menú de configuración WPS. Por favor entre en el menú de la configuración WPS de su Router o Punto de Acceso y a continuación inicie la conexión PBC. Cuando la configuración es correcta se ha cambiado el perfil disponible.
APÉNDICE Instalación del controlador de Windows Vista Nota: La siguiente guía de instalación del controlador utiliza Windows XP como sistema operativo supuesto. Los procedimientos y pantallas en Windows 98se y 2000 son similares a las de Windows XP. 1. Desenchufe el cable de alimentación del ordenador de la toma de corriente. Quite la tapa del ordenador. 2. Instale el adaptador en una toma PCI, una ranura PCMIA o un puerto USB. 3.
Nota: Si el CD-Rom no realiza el auto-arranque, haga clic en "My Computer" your CD-Rom Drive y después haga doble clic en el icono "Setup" para iniciar este menú. 5. Aparece la ventana del menú de selección del idioma. Seleccione el idioma que desee y haga clic en Next.
6. Aparece la ventana de bienvenida. Haga clic en el botón "Next" para proceder. 7.
8. Puede aparecer esta ventana de advertencia de prueba de Windows Logo después de la instalación. Haga clic en " Install this driver software anyway " para continuar. 9. Por favor espere mientras la instalación esta en progreso. 10. Usuarios de Windows XP y 2000 necesitan reiniciar el PC. Si está utilizando Windows 98se o ME, el propio sistema lo pedirá, pero por favor seleccione “No, reiniciaré mi Ordenador más tarde.” y seguido reinicie su PC a mano.
Guía de gestión del modo AP Software Access Point (AP Soft) Aplicación: General (Generalidades) Para utilizar el adaptador como Punto de Acceso por favor haga clic en “Mode” y seleccione “Access Point”.
Al mismo tiempo verá que el icono de la barra de sistema ha cambiado. Después de configurar el adaptador en modo AP aparece esta página "General", que muestra la información general de este AP. SSID: BSSID: Config: Association Table: El SSID (nombre de red) de la red inalámbrica construida por este AP.
Advanced (Avanzadas) Beacon Interval: DTIM Period: Preamble Mode: Set Defaults: Apply: Define el intervalo entre avisos sonoros desde 20 hasta 1000 Ajusta el periodo DTIM entre 1 y 255 Haga clic en la lista desplegable para escoger que el preámbulo sea largo, corto o automático. Haga clic en este botón para restaurar los ajustes anteriores por defecto. Haga clic en este botón para ejecutar los cambios.
Statistics (Estadísticas) Vea esta lengüeta para mostrar el registro de actividad de transmisión. Haciendo clic en el botón "Reset" recuenta los valores desde cero.
ICS Esta página permite a los usuarios escoger el adaptador para conectar a la red pública. Haga clic en el dispositivo que se utiliza para conectar a la red pública, y después haga clic en el botón "Apply" para ejecutar.
ESPECIFICACIÓN DEL PRODUCTO Norma IEEE 802.11n draft 2.0, IEEE 802.11g, IEEE 802.11b, IEEE 802.3, IEEE 802.3u Interfaz USB 2.0 Seguridad WEP 64/128 bit, WPA (TKIP con IEEE 802.1x), AES Sensibilidad del receptor 802.11n típicos -68 dBm; 802.11g típicos -73 dBm; 802.11b típicos -84 dBm Canal USA 11, Europa 13, Japón 14 Velocidad de transferencia de datos 802.11b: 1, 2, 5.5 y 11 Mbps 802,11g: 6, 9, 12, 24, 36, 48 y 54 Mbps 802.11n: hasta 150 Mbps Potencia de transmisión 16 dBm típicamente @ 802.
LONGSHINE Technologie (Europe) GmbH Post Address: P.O.Box 1460 D-22 904 Ahrensburg Tel: ++49-(0)-4102-4922-0 House Address: An der Strusbek 9 D-22 926 Ahrensburg Fax: ++49-(0)-4102-40109 WEB: http://www.longshine.de E-MAIL: sales@longshine.