0/100 Fast Ethernet PCI Adapter English Deutsch Italienisch Französisch Spanisch Ver. 4.
FCC Statement This device compiles with Part 15 of the FCC Rules. Operation is subject to the following two conditions: (1) This device may not cause harmful interference, and (2) This device must accept any interference received, including interference that may cause undesired operation. Warning! This equipment has been tested and found to comply with the limits for a Class B digital device, pursuant to Part 15 of the FCC Rules.
1. Introduction Congratulations on the purchasing of your new 10/100 NWay Fast Ethernet PCI adapter. This document describes the Installation of network adapter. This adapter supports 10BASE-T/100BASE-TX Fast Ethernet and complies with the electrical and protocol requirements of the PCI Local Bus Specification, revision 2.2. The Wake-On-LAN feature is optional for the adapter. 1.1 Features The 10/100 Fast Ethernet PCI adapter is a cost effective, high-performance network interface card.
2. Installation This section describes how to install the adapter. For connecting to the network, you must have the following: 1. Network adapter card installed to your computer. 2. Cabling (compatible with network topology) 3. Connect the Wake-On-LAN cable to the motherboard (If the WOL function is supported on the adapter) 4. Software for the adapter card contains both configuration utilities and drivers 2.
2.2 Install the Adapter 1. Turn off the computer. 2. Remove the computer’s cover, in accordance to its manual. 3. Insert the contact edge of the adapter card into the connector of any available PCI Bus master expansion slot. Press the card firmly into the connector to PCI slot. Please make sure that the card’s contacts are fully seated in the PCI slot. 4. Install the bracket screw that secures the card to the Computer chassis. 5. Connect the WOL cable to the motherboard.
2.3 Connect Fast Ethernet Category 5 UTP cable is required for Fast Ethernet operation. The maximum cable run between the adapter and the supporting hub is 300ft (100m). Make the network connection by plugging one end of the cable into the RJ-45 receptacle of the adapter, and the other end into one port in the hub. 2.4 Connect 10Mbps Ethernet Category 3, Category 4, and Category 5 UTP cable, as well as EIA/TIA 568 100 ohm STP cable, all qualification under Ethernet cabling rules.
2.5 Drivers and Utilities Diskette The [Divers and Utilities] diskette contains all the popular operating system drivers. y Novell NetWare(client /server) y Windows NT 3.5, NT4.0/2000/XP y Windows 95/98/ME y Microsoft Client (NDIS 2.0 DOS/OS2) y Windows For Workgroup 3.11 y Linux Red Hat 6.0, 6.1 y …. and so on 2.6 Software Installation Please refer to “Quick Installation Guide” 2.
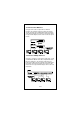
After choosing the item, the screen will display like, ˡ̂˷˸ʳ˜˗ˁˁˁˁˁˁˁˁˍʳ˃˃ʳ˸˃ʳˊ˷ʳ˶˃ʳ˃˃ʳ˃˄ʳ ˡ˸̇̊̂̅˾ʳ˦̃˸˸˷ˁˁˍʳ˄˃˃ˠ˵̃̆ʳ ˜˂ˢʳ˕˴̆˸ʳˁˁˁˁˁˁˍʳ˘˃˃˃˛ʳ ˜́̇˸̅̅̈̃̇ʳˁˁˁˁˁˍʳ˄˄ʳ ˙̈˿˿ˀ˗̈̃˿˸̋ʳˁˁˁˍʳ˗˼̆˴˵˿˸˷ʳ ʳ ʳʳʳʳʳʳʳʳʳʳʳʳʳʳʳʳʳʳʳʳʳʳˣ˴̆̆ʳ˖̂̈́̇ʳʳ˙˴˼˿ʳ˖̂̈́̇ʳ ˔ˁʳ ˜˂ˢʳ˥˸˺˼̆̇˸̅ʳ ˕ˁʳ ˄˃˃ˠ˵̃̆ʳ˟̂̂̃˵˴˶˾ʳ ˖ˁʳ ˄˃ˠ˵̃̆ʳ˟̂̂̃˵˴˶˾ʳ ˗ˁʳ ˖˴˵˿˸ʳ˖̂́́˸˶̇˼̂́ʳ ʳ test reminds you that the connection link might be fail, either the cable is not connected or the cable link fails.
To wake up Target Machine with Magic Packet Step1: Target Machine: Target Machine is necessary to use the WOL cable link the Wake On LAN connector on adapter with your motherboard. Check BIOS ACPI, Wake On LAN function must be enable. Step2: Target Machine: Select then the system will setup wakeup event and wait a magic packet to do system wakeup Step3: Master Machine: Select to send a magic packet and wake up the target machine.
Quick Installation Guide Please take the following steps for driver installation. Microsoft Windows 95/Windows 98/Windows ME 1. Turn off the computer. 2. Insert the adapter into the available PCI slot. 3. Restart the computer. 4. After Microsoft Windows reboot, the PCI Ethernet Controller will be found. 5. The system will prompt for driver installation. 6. Insert the “Driver and Utilities” diskette into diskette driver and press . 7. For Windows 95, Key in a:\ path to install driver for the adapter.
Microsoft Windows 2000 1. Turn off the computer. 2. Insert the adapter into the available PCI slot. 3. Restart the computer. 4. After Microsoft Windows reboot, the 10/100Mbps Fast Ethernet Adapter will be found and the system will assign the default network driver to the adapter. 5. Select “Control Panel” from “Start” menu bar 6. Select “Network and Dial-Up Connection” folder and click “Local Area Connection”. 7. Click “Configure” item and select “Driver” 8.
Novell Netware System Please execute the following commands: For Netware Client LSL RTSODI IPXODI NETX or VLM F: LOGIN For Netware Server LOAD RTSSRV BIND IPX TO RTSSRV The help file in the diskette will describe the detail driver installation information for all popular operating systems.
10/100 Fast Ethernet PCI Adapter English Deutsch Italienisch Französisch Spanisch Ver. 4.
FCC Statement This device compiles with Part 15 of the FCC Rules. Operation is subject to the following two conditions: (1) This device may not cause harmful interference, and (2) This device must accept any interference received, including interference that may cause undesired operation. Warning! This equipment has been tested and found to comply with the limits for a Class B digital device, pursuant to Part 15 of the FCC Rules.
1. Einführung Glückwunsch zu Ihrem Kauf des neuen 10/100 N-Way Fast Ethernet PCI Adapter. Dieses Handbuch beschreibt die Installation des Netzwerk Adapters. Dieser Adapter unterstützt 10BASE-T/100BASE-TX Fast Ethernet und entspricht den elektrischen und Protokoll Voraussetzungen der PCI Local Bus Spezifikation, Revision 2.0 und 2.1. Die Wake-On-LAN Eigenschaft ist optional für diesen Adapter. 1.1 Eigenschaften Der 10/100 Fast Ethernet PCI Adapter ist eine günstige hochleistungs Netzwerk Interface Karte.
2. Installation Dieser Abschnitt beschreibt die Installation des Adapters. Für die Verbindung mit dem Netzwerk benötigen Sie folgendes: 1. Eine Installierte Netzwerk Karte.. 2. Verkabelung (Kompatible mit der Netzwerk Topologie) 3. Verbindung des Wake-On-LAN Kabels mit dem Motherboard (Falls die WOL Funktion unterstützt wird) 4. Software für die Adapter Karte enthält Konfiguration Tools und Treiber. 2.
2.2 Installation des Adapters 1. Schalten Sie den Computer aus. 2. Entfernen Sie das Gehäuse, wie in Ihrem Computer Handbuch beschrieben. 3. Stecken Sie die Kontaktleiste in einen freien PCI Steckplatz. Drücken Sie die Karte vorsichtig in den PCI Steckplatz. Versichern Sie sich das die Karte einen guten Kontakt mit dem Steckplatz hat. 4. Befestigen Sie die Karte mit der Schraube am Computer Gehäuse. 5. Verbinden Sie das WOL Kabel mit dem Motherboard. (Falls der Adapter WOL unterstützt) 6.
2.3 Verbindung Fast Ethernet Kategorie 5 UTP Kabel ist vorgeschrieben für Fast Ethernet Operation. Die maximale Kabellänge zwischen dem Adapter und einem Hub ist 300ft (100m). Stecken Sie das Netzwerkkabel in die Buchse des Adapters und das andere Ende in einen Anschluß des Hubs. 2.4 Verbindung 10Mbps Ethernet Kategorie 3, Kategorie 4, und Kategorie 5 UTP Kabel, sowie EIA/TIA 568 100 Ohm STP Kabel, Die maximale Kabellänge zwischen dem Adapter und einem Hub ist 300ft (100m).
2.5 Treibers und Utilities Diskette Die [Divers und Utilities] Diskette enthält alle Treiber für die populären Betriebssysteme. y Novell NetWare (Client /Server) y Windows NT 3.5 , NT4.0 / 2000 / XP y Windows 95/98/ME y Microsoft Client (NDIST 2.0 DOS/OS2) y Windows For Workgroup 3.11 y Linux y …. und so weiter 2.6 Software Installation Bitte sehen Sie unter „Kurzanleitung“ nach. 2.7 Test Programm Diese Test Programm überprüft die Konfiguration des Adapters und zeigt mögliche Fehlerquellen auf.
Wenn Sie wählen , erscheint folgender ähnlicher Bildschirm, ˡ̂˷˸ʳ˜˗ˁˁˁˁˁˁˁˁˍʳ˃˃ʳ˸˃ʳˊ˷ʳ˶˃ʳ˃˃ʳ˃˄ʳ ˡ˸̇̊̂̅˾ʳ˦̃˸˸˷ˁˁˍʳ˄˃˃ˠ˵̃̆ʳ ˜˂ˢʳ˕˴̆˸ʳˁˁˁˁˁˁˍʳ˘˃˃˃˛ʳ ˜́̇˸̅̅̈̃̇ʳˁˁˁˁˁˍʳ˄˄ʳ ˙̈˿˿ˀ˗̈̃˿˸̋ʳˁˁˁˍʳ˗˼̆˴˵˿˸˷ʳ ʳ ʳʳʳʳʳʳʳʳʳʳʳʳʳʳʳʳʳʳʳʳʳʳˣ˴̆̆ʳ˖̂̈́̇ʳʳ˙˴˼˿ʳ˖̂̈́̇ʳ ˔ˁ˜˂ˢʳ˥˸˺˼̆̇˸̅ʳ ˕ˁ˄˃˃ˠ˵̃̆ʳ˟̂̂̃˵˴˶˾ʳ ˖ˁ˄˃ˠ˵̃̆ʳ˟̂̂̃˵˴˶˾ʳ ˗ˁ˖˴˵˿˸ʳ˖̂́́˸˶̇˼̂́ʳ ʳ Test zeigt Ihnen ob die Kabelverbindung in Ordnung ist.
Starten des Ziel PCs mit einem „Magic Packet“ Step1: Ziel PC: Beim Ziel PC mus das WOL Kabel der Karte mit dem Motherboard verbunden sein. Prüfen Sie im BIOS ACPI, Wake On LAN Funktion muß Eingeschaltet sein. Step2: Ziel PC: Wählen Sie Dann wartet das System auf ein „magic packet“ um selbständig zu starten. Step3: Master PC: Wählen Sie um ein „magic packet“ zu senden und den Ziel PC zu starten.
Kurzanleitung Bitte folgen Sie den Schritten für die Treiber Installation Microsoft Windows 95 / Windows 98 / Windows ME 1. Schalten Sie den Computer aus. 2. Stecken Sie den Adapter in einen freien PCI Steckplatz 3. Starten Sie den Computer 4. Nach dem Start wird der Adapter von Microsoft Windows erkannt. 5. Das System fordert Sie zur Treiber Installation auf. 6. Stecken Sie die “Treiber und Utilities” Diskette in das Disketten Laufwerk und Drücken Sie . 7.
Microsoft Windows 2000 1. Schalten Sie den Computer aus. 2. Stecken Sie den Adapter in einen freien PCI Steckplatz 3. Starten Sie den Computer 4. Nachdem Microsoft Windows gestartet ist, wird der Adapter erkannt und der Standard Treiber installiert. 5. Wählen Sie EINSTELLUNGEN vom START Menü. 6. Wählen Sie NETZWERK UND DFÜ-VERBINDUNGEN und klicken Sie auf LAN VERBINDUNGEN. 7. Klicken Sie auf KONFIGURIEREN und wählen Sie TREIBER. 8.
Novell Netware System Bitte führen Sie folgende Eingaben durch: Für Netware Client LSL RTSODI IPXODI NETX oder VLM F: LOGIN Für Netware Server LOAD RTSSRV BIND IPX TO RTSSRV Die Hilfe Datei auf der Diskette enthält nähere Erklärungen.
Scheda Fast Ethernet 10/100 PCI English Deutsch Italienisch Französisch Spanisch Ver. 4.
FCC Statement This device compiles with Part 15 of the FCC Rules. Operation is subject to the following two conditions: (1) This device may not cause harmful interference, and (2) This device must accept any interference received, including interference that may cause undesired operation. Warning! This equipment has been tested and found to comply with the limits for a Class B digital device, pursuant to Part 15 of the FCC Rules.
1. Introduzione Congratulazioni per l’acquisto della scheda Fast Ethernet 10/100 NWay PCI. Questo documento descrive l’installazione della scheda di rete. Questo adattatore supporta Fast Ethernet 10BASE-T/100BASE-TX ed è conforme ai requisiti elettrici e di protocollo delle Specifiche PCI Local Bus, revisione 2.2. Su questa scheda la caratteristica Wake-On-LAN è opzionale. 1.1 Caratteristiche La scheda Fast Ethernet 10/100 PCI è un’interfaccia di rete ad elevate prestazioni ed economica.
2. Installazione Questa sezione descrive la procedura d’installazione della scheda. Per collegarsi a una rete, è necessario quanto segue: 1. Scheda di rete installata nel computer. 2. Cablaggio (compatibile con la topologia della rete) 3. Collegare il cavo Wake-On-LAN alla scheda madre (se la funzione WOL è supportata dalla scheda) 4. Software della scheda che contiene sia le utility di configurazione che i driver 2.
2.2 Installazione della scheda 1. Spegnere il computer. 2. Aprire il computer così come descritto nel manuale dello stesso. 3. Inserire il connettore a pettine della scheda in uno slot d’espansione bus master PCI disponibile. Premere saldamente la scheda nello slot PCI. Accertarsi che i contatti della scheda siano perfettamente inseriti nello slot PCI. 4. Installare la vite che fissa il supporto della scheda al telaio del computer. 5.
2.3 Collegamento a Fast Ethernet Per un utilizzo di tipo Fast Ethernet è richiesto un cavo UTP categoria 5. La lunghezza massima del cavo tra la scheda e lo hub di supporto è di 300 ft (100 m). Realizzare la connessione di rete inserendo un’estremità del cavo nella presa RJ-45 della scheda e l’altra estremità in una porta dello hub. 2.
2.5 Dischetto con driver e utility Il dischetto [Driver e Utility] contiene i driver per tutti i più comuni sistemi operativi. y Novell NetWare(client /server) y Windows NT 3.5, NT4.0 / 2000 / XP y Windows 95/98/ME y Microsoft Client (NDIS 2.0 DOS/OS2) y Windows per Workgroup 3.11 y Linux Red Hat 6.0, 6.1 y …. e così via 2.6 Installazione del software Consultare la “Guida rapida di installazione” 2.
Dopo aver scelto , apparirà una schermata simile alla seguente, Node ID........: Network Speed..: I/O Base ......: Interrupt .....: Full-Duplex ...: 00 e0 7d c0 00 01 100Mbps E000H 11 Disabled Pass Count Fail Count A.I/O Register B.100Mbps Loopback C.10Mbps Loopback D.Cable Connection Il test rammenta che la connessione potrebbe fallire perché il cavo non è collegato oppure perché il collegamento è difettoso.
distanza. Per risvegliare una macchina target con Magic Packet Fase 1: Macchina target: La macchina target deve usare il cavo WOL di collegamento tra il connettore Wake On LAN della scheda di rete e la scheda madre. Controllare che nel del BIOS ACPI sia abilitata la funzione Wake On LAN.
programma di test funziona solo dal prompt di DOS. Guida rapida d’installazione Per l’installazione dei driver seguire i passi descritti a continuazione. Microsoft Windows 95/Windows 98/Windows ME 1. Spegnere il computer. 2. Inserire la scheda in uno slot PCI disponibile. 3. Riavviare il computer. 4. Una volta avviato Microsoft Windows, verrà riconosciuta una Controller Ethernet PCI. 5. Il sistema richiederà l’installazione dei driver. 6. Inserire il dischetto “Driver e Utility” nell’unità da 3.
Microsoft Windows 2000 1. Spegnere il computer. 2. Inserire la scheda in uno slot PCI disponibile. 3. Riavviare il computer. 4. Dopo l’avvio di Windows, verrà riconosciuta la Scheda Fast Ethernet 10/100Mbps e il sistema le assegnerà un driver di rete predeterminato. 5. Selezionare “Avvio”, “Pannello di controllo” 6. Selezionare la cartella “Connessione di rete e di accesso remoto” e fare clic su “Connessione di area locale”. 7. Fare clic su “Configura” e selezionare “Driver”. 8.
Novell Netware System Eseguire i seguenti comandi: Per Client Netware LSL RTSODI IPXODI NETX o VLM F: LOGIN Per Server Netware LOAD RTSSRV BIND IPX TO RTSSRV Il file Help del dischetto descriverà le informazioni dettagliate di installazione dei driver per i sistemi operativi più comuni.
Adaptateur PCI 10/100 Fast Ethernet English Deutsch Italienisch Französisch Spanisch Version 4.
FCC Statement This device compiles with Part 15 of the FCC Rules. Operation is subject to the following two conditions: (1) This device may not cause harmful interference, and (2) This device must accept any interference received, including interference that may cause undesired operation. Warning! This equipment has been tested and found to comply with the limits for a Class B digital device, pursuant to Part 15 of the FCC Rules.
1. Introduction Nous vous remercions d’avoir choisi le nouvel adaptateur PCI 10/100 NWay Fast Ethernet. Ce mode d’emploi décrit comment installer l’adaptateur de réseau. Cet adaptateur supporte 10BASE-T/100BASE-TX Fast Ethernet et suit les exigences électriques et de protocole requises par les spécifications du bus local PCI, révision 2.2. Le Wake-on-LAN (WOL) est une caractéristique optionnelle de cet adaptateur. 1.
y y Un lecteur de disquette 3,5”, 1,44 MB Les câbles suivants: Pour un fonctionnement à 10Mbps, un câble UTP de catégorie 3, 4 ou 5 Pour un fonctionnement à 100Mbps, un câble UTP de catégorie 5 2. Installation Dans cette section, nous décrirons comment installer l’adaptateur. Afin de pouvoir vous connecter au réseau, vous devez avoir : 1. Une carte de réseau installée dans votre ordinateur. 2. Les câbles nécessaires (compatibles avec la topologie du réseau) 3.
Note : S’il manquait un des articles de la liste ci-dessus, veuillez prendre contact avec votre distributeur ou revendeur. 2.2 Installation de l’adaptateur 1. Eteignez l’ordinateur. 2. Enlevez le couvercle de protection, comme indiqué sur le mode d’emploi de l’appareil. 3. Insérez l’extrémité requise de votre carte de réseau dans la prise de n’importe quel slot d’extension disponible du bus de maîtrise PCI. Enfoncez fermement votre carte dans la prise du slot PCI.
2.3 Connexion au Fast Ethernet Pour le Fast Ethernet, il faut un câble UTP de catégorie 5. La longueur du câble maximum entre l’adaptateur et le hub lui correspondant est de 100 mètres. Connectez le réseau en branchant l’une des extrémités du câble dans la prise RJ-45 de l’adaptateur, et l’autre extrémité dans l’un des ports du hub. 2.4 Connexion Ethernet 10Mbps Câbles UTP de catégorie 3, 4 et 5, ainsi que des câbles STP EIA/TIA 568 de 100 ohms, tous en accord avec les réglementations du câblage Ethernet.
2.5 Disquette pilote et utilitaire La disquette [pilote et utilitaire] contient le pilote correspondant aux systèmes les plus courants. y Novell NetWare(client /server) y Windows NT 3.5 , NT4.0 / 2000 / XP y Windows 95/98/ME y Microsoft Client (NDIS 2.0 DOS/OS2) y Windows For Workgroup 3.11 y Linux Red Hat 6.0, 6.1 y …. etc 2.6 Installation du logiciel Prière de vous référer au « Guide d’installation rapide » 2.
Le test Power Management est uniquement disponible pour l’adaptateur WOL. Après avoir choisi la section , l’écran affichera, Node ID........: Network Speed..: I/O Base ......: Interrupt .....: Full-Duplex ...: ʳ 00 e0 7d c0 00 01 100Mbps E000H 11 Disabled Pass Count Fail Count A.I/O Register B.100Mbps Loopback C.10Mbps Loopback D.
chaque fois qu’un paquet de réveil (wakeup packet) lui arrive. Réveiller le périphérique à l’aide du Magic Packet Etape 1: L’appareil périphérique: L’appareil périphérique doit être raccordé au câble WOL et pour cela il faut relier la prise Wake-on-LAN de l’adaptateur à la carte mère. Vérifier BIOS ACPI, la fonction Wake-on-LAN doit être activée.
Device State 1: Device State 2: Device State 3: PASS PASS PASS Note : Le logiciel de test de l’adaptateur ne peut pas être utilisé sous le mode DOS Windows 95/98. Ne chargez aucun logiciel de pilote, de gestion de mémoire et d’anti-virus. Le logiciel-test ne fonctionne qu’avec un démarrage DOS pur.
Guide d’installation rapide Suivez les étapes suivantes pour installer le pilote. Microsoft Windows 95/Windows 98/Windows ME 1. Eteignez l’ordinateur. 2. Insérez l’adaptateur dans le slot PCI disponible. 3. Redémarrez l’ordinateur. 4. Après le redémarrage de Microsoft Windows, le système trouvera seul le contrôleur du PCI Ethernet. 5. Le système vous demandera d’installer le pilote. 6. Insérez la disquette « pilote et utilitaire » dans le lecteur de disquette et appuyez sur 7.
Microsoft Windows 2000 1. Eteignez l’ordinateur. 2. Insérez l’adaptateur dans le slot PCI disponible. 3. Redémarrez l’ordinateur. 4. Après avoir redémarré Microsoft Windows, l’adaptateur Fast Ethernet 10/100Mbps aura été trouvé et le système lui assignera un pilote d’adaptateur de réseau par défaut. 5. Sélectionnez « Panneau de configurations » à partir de « démarrer » sur la barre de menu 6. Sélectionnez le fichier « Connexion réseau et Dial-Up » et cliquez sur « Connexion zone locale ». 7.
Novell Netware System Veuillez suivre les commandes suivantes: Pour Netware Client LSL RTSODI IPXODI NETX ou VLM F: LOGIN Pour Netware Server LOAD RTSSRV BIND IPX TO RTSSRV Le fichier d’aide dans la disquette décrira en détail comment installer le pilote avec les systèmes opérationnels les plus courants.
Adaptador PCI de Fast Ethernet 10/100 English Deutsch Italienisch Französisch Spanisch Ver. 4.
FCC Statement This device compiles with Part 15 of the FCC Rules. Operation is subject to the following two conditions: (1) This device may not cause harmful interference, and (2) This device must accept any interference received, including interference that may cause undesired operation. Warning! This equipment has been tested and found to comply with the limits for a Class B digital device, pursuant to Part 15 of the FCC Rules.
1. Introducción Le felicitamos por la compra de su nuevo adaptador PCI de Fast Ethernet NWAY 10/100. Este documento describe la instalación del adaptador de red. Este adaptador soporta Fast Ethernet de 10BASE-T/100BASE-TX y cumple con los requisitos, tanto eléctricos como de protocolo, de la Especificación de Bus Local PCI, revisión 2.2. El ‘Wake-On-LAN’ es una característica opcional para este adaptador. 1.
1.2 Requisitos de Sistema Para utilizar el adaptador, son necesarios los siguientes componentes: y Una ranura de expansión PCI master, y que cumpla con las especificaciones del bus PCI, revisiones 2.2 y Un lector 3.5”, de disquetes de 1.44 Mb y Los cables siguientes: Para operar a 10Mb/s, un cable UTP de Categoría 3, 4ó5 Para operar a 100Mb/s, un cable UTP de Categoría 5 2. Instalación Esta sección describe cómo instalar el adaptador. Para conectar a la red, se debe disponer de lo siguiente: 1.
2.2 Instalar el Adaptador 1. 2. Apagar el ordenador. Quitar la tapa del ordenador, de acuerdo con las instrucciones del manual del mismo. 3. Insertar el punto de contacto de la tarjeta adaptador dentro del conector de cualquiera de las ranuras PCI que estén libres. Presionar la tarjeta con firmeza, hasta asegurar que los contactos de la tarjeta estén completamente asentados en la ranura PCI. 4. Instalar el tornillo de la abrazadera que fija la tarjeta al chasis del ordenador. 5.
2.3 Conexión Fast Ethernet 100Mbps Se requiere cable UTP de categoría 5 para la operación en modo Fast Ethernet. La máxima extensión de cable entre el adaptador y su hub de soporte es de 100m (300’). Asegurar la conexión a la red, enchufando un extremo del cable a una toma RJ-45 del adaptador, y el otro a un puerto del hub. 2.4 Conexión de Ethernet a 10Mbps Cable UTP de Categoría 3, 4 y 5, y también cable STP EIA/TIA 568 de 100 ohmios, conformándose todos a las normas del cableado Ethernet.
2.5 Disquete de Controladores y Utilidades Este disquete contiene controladores para todos los sistemas operativos populares y Novell NetWare (cliente/servidor) y Windows NT 3.5 , NT4.0 / 2000 / XP y Windows 95/98/ME y Microsoft Cliente (NDIS 2.0 DOS/OS2) y Windows For Workgroup 3.11 y Linux Red Hat 6.0, 6.1 y …. etcétera 2.6 Instalación del Software Ver la “Guía de Instalación Rápida” 2.
para el adaptador WOL. Al elegir la opción , la pantalla mostrará el siguiente, ˡ̂˷˸ʳ˜˗ˁˁˁˁˁˁˁˁˍʳ˃˃ʳ˸˃ʳˊ˷ʳ˶˃ʳ˃˃ʳ˃˄ʳ ˡ˸̇̊̂̅˾ʳ˦̃˸˸˷ˁˁˍʳ˄˃˃ˠ˵̃̆ʳ ˜˂ˢʳ˕˴̆˸ʳˁˁˁˁˁˁˍʳ˘˃˃˃˛ʳ ˜́̇˸̅̅̈̃̇ʳˁˁˁˁˁˍʳ˄˄ʳ ˙̈˿˿ˀ˗̈̃˿˸̋ʳˁˁˁˍʳ˗˼̆˴˵˿˸˷ʳ ʳʳʳʳʳʳʳʳʳʳʳʳʳʳʳʳˣ˴̆̆ʳ˖̂̈́̇ʳʳ˙˴˼˿ʳ˖̂̈́̇ʳ A.˜˂ˢʳ˥˸˺˼̆̇˸̅ʳ B.˄˃˃ˠ˵̃̆ʳ˟̂̂̃˵˴˶˾ʳ C.˄˃ˠ˵̃̆ʳ˟̂̂̃˵˴˶˾ʳ D.˖˴˵˿˸ʳ˖̂́́˸˶̇˼̂́ʳ ʳ La prueba de sirve para comprobar si hay problemas de conexión del cable, como por ejemplo, un cable mal enchufado.
En la máquina objetiva, es necesario utilizar el cable WOL para conectar el conector Wake On-LAN en el adaptador con la placa madre. Comprobar el BIOS ACPI, la función Wake On LAN debe ser activada. Paso2:Máquina objetiva: Seleccionar , entonces el sistema configurará un evento de reactivación y éste esperará un paquete de activación remota para realizar la reactivación del sistema.
utilizarse bajo el modo DOS de Windows 95/98. No se debe cargar controladores de dispositivo, gestión de memoria o software anti-virus. El programa de comprobación sólo puede funcionar en MS DOS puro Guía de Instalación Rápida Seguir los pasos siguientes para la instalación de los controladores. Microsoft Windows 95/Windows 98/Windows ME 1. Apagar el ordenador. 2. Insertar el adaptador en una ranura PCI que esté disponible. 3. Reiniciar el ordenador. 4.
Windows NT 1. Apagar el ordenador. 2. Insertar el adaptador en una ranura PCI que esté disponible. 3. Reiniciar el ordenador. 4. Hacer clic en la barra del menú de “Inicio” y seleccionar “Configuración”, después el ajuste del “Panel de Control”. 5. Seleccionar el icono de “Red” 6. Si se trata de la primera vez que se instala un adaptador de red en la máquina, el sistema preguntará si deseamos instalar el adaptador. Seleccionar “Sí”. 7.
Microsoft Windows XP 1. Apague el PC. 2. Enchufe la tarjeta en un Slot PCI disponible. 3. Encienda el PC. 4. Cuando Microsoft Windows arranca encontrará la tarjeta 10/100Mbps Fast Ethernet y asignara un controlador estándar por defecto. 5. Seleccione la Opción “Panel de Control” del Menú “Inicio“ 6. Seleccione el icono “Conexiones de Red” y haga clic en “Conexión Area Local” y seleccione “Propiedades”. 7. Haga clic en “Configurar” y seleccione “Controlador” 8.