Operating Manual for ForceCut™ 40i/50i Constant Arc Pilot Arc Plasma Cutters
ForceCut 40i and 50i plasma cutters Table of Contents Table of Content Pg. i Thank you From LONGEVITY® Pg. ii Warranty/Shipping Damage/Order Information Pg. 1-2 Introduction Pg. 3 Warning and Safety Tips Pg. 4-5 Specifications and Ratings Pg. 6 What’s Included? Pg. 7 Basic Installation, Wiring, Air Regulator Assembly, and Setup Instructions Pg. 8-13 Main Unit Knob/Button/Function Pg. 14 Assembly of Plasma Cutter Torches Pg. 15 Basic Plasma Cutter Operation Pg.
PLASMA CUTTERS www.LWELD.com THANK YOU! We, at LONGEVITY®, want to thank you for purchasing our product. You are almost ready to experience LONGEVITY® Welding first hand. LONGEVITY® definitely appreciates your business and understand that this equipment may be overwhelming to setup and operate so we have prepared a manual that will assist you in understand your new plasma cutter/welder.
Plasma Cutters www.LWELD.com Warranty LONGEVITY Plasma Cutters, Welders, and Multi-Purpose Welders are covered for specific Parts and Labor warranty at our facility. For detailed information regarding your specific LONGEVITY welder or cutter, please view our Terms and Policies page on our website at the following website link: http://www.longevityinc.com/terms/ Shipping Damage Your machine is insured against damage during shipping. Keep all packing materials and containers in case machine must be returned.
PLASMA CUTTERS www.LWELD.com In Warranty Service Customers, who own machines that are in warranty and require service, should contact our Warranty Department by email at help@longevity-inc.com to obtain a return authorization code. When doing so, please provide the following information: Order No.
Plasma Cutters www.LWELD.com Introduction The LONGEVITY® ForceCut™ series plasma cutters offer a revolutionary new approach to plasma cutting technology. LONGEVITY® plasma cutters use the newest technology available in the welding industry with the help of Toshiba internal components. By producing the units with inverter technology, we are able to produce smaller and more efficient units.
PLASMA CUTTERS www.LWELD.com Warning Welding and plasma cutting may be dangerous to the operator and to bystanders, if the equipment is not operated properly. Welding or cutting must be performed in accordance with all relevant safety regulations. Carefully read and understand this instruction manual before installing and operating this equipment. Changing function modes during welding may damage equipment. Before welding, disconnect the electrode-holder cable from the equipment.
Plasma Cutters www.LWELD.com Safety Tips Consider the following tips to ensure safe operation of your welding/cutting equipment: Ensure that this welding equipment is installed in an area free of corrosive chemical gases, flammable gases or materials, and explosive chemicals. The area should contain little dust, and have a humidity of no more than 80%. Operate the welding equipment in an area sheltered from direct sunlight and precipitation.
PLASMA CUTTERS www.LWELD.com Specifications and Ratings Type Parameter ForceCut 40D Pilot Arc Input Voltage (V) 6 ForceCut 50D Pilot Arc 220v 1-Phase 50amp Cup Capacity max/sev (in.) Up to ½” Up to 5/8” Input Current (Amp) 20Amp 110v/30Amp220v 20Amp 110v/30Amp220v Output Current (Amps) 40 50 No-load Voltage (V) 100/200v 100/200v Current Range (Amp) 10-40 10-50 Rated Duty Cycle (%) 60 60 Efficiency 85 85 Power Factor (Cos0) 0.93 0.
Plasma Cutters www.LWELD.com What’s Included: Main Unit Cutting Torch (Ground) Earth Clamp Water separator with bracket Air Hose Teflon Tape Air Hose Valves (2) Consumables: 1 piece tip, 1 piece electrode 20amp Power Plug Pictures of Accessories: (Note: Torch Picture Varies on Model Purchased) www.longevity-inc.
PLASMA CUTTERS www.LWELD.com Installation and Setup Instructions: The item numbers referenced in the following paragraphs, refer to the numbered parts display in the diagrams shown below. LONGEVITY® has an instructional setup installation video on our website at www.longevity-inc.com, which we ask that you view prior installing the unit. The video shows the complete assembly of the machine. The video is located in the Resources section of the website under manuals and installation/set-up videos.
Plasma Cutters www.LWELD.com Identifying the Ground wire Caution: The machine may appear to operate with an incorrectly connected ground wire, but it will not operate properly. Selecting the correct ground wire is important for proper machine operation and personnel safety. Ground wires on LONGEVITY® Welding machines are usually one of the following colors: The ground wire is a dark green with a yellow stripe. The wire may also be just SOLID GREEN.
PLASMA CUTTERS www.LWELD.com Finished Plug: Wiring Introduction for 110 Volt - 20amp Breaker Caution: The machine may appear to operate with an incorrectly connected ground wire, but it will not operate properly. Selecting the correct ground wire is important for proper machine operation and personnel safety. Ground wires on LONGEVITY® Welding machines are usually one of the following colors: The ground wire is a dark green with a yellow stripe. The wire may also be just SOLID GREEN.
Plasma Cutters www.LWELD.com Identifying the Neutral Wire For 110vac service, the brown wire is is a hot wire. As you may know, 110vac features one hot wire, a neutral wire, and a ground wire. If you are wiring to 110vac, your blue wire is neutral, brown is hot and the green with yellow or SOLID GREEN is the ground. Note: Hot Wires May also be WHITE and BLACK if a GREEN WIRE is one of the three wires. Therefore, GREEN is ALWAYS GROUND. In this case one of the wires is neutral and one is hot.
PLASMA CUTTERS www.LWELD.com Basic Installation Instructions Pictured Model ForceCut™ 50i (Note: All Models have the same connections): ForceCut™ 50i Pilot Arc: 12 www.longevity-inc.
Plasma Cutters www.LWELD.com Water Separator Assembly to Unit (Pictured ForceCut™ 50i Plasma Cutter): LONGEVITY® includes a Water separator with the ForceCut 40i and 50i. You must attach the bracket to the machine, and fasten the separator to the bracket. Locate the INLET and OUTLET labeled on the separator and attach the Air line coming from the Compressor to the INLET side of the separator. Attach the clear hose that comes with the machine to the OUTLET side of the separator.
PLASMA CUTTERS www.LWELD.com 2. Power Indicator : Shows unit is powered on. Indicator is present in some models with a green LED bulb. 3. O.C. Over Current Light: Illuminates when the duty cycle has been exceeded or the machine has overheated due to improper ventilation. Discontinue use until lamp goes out. Allow the fan to continue to run. Once lamp goes out, you may resume using the unit. 4. Digital Display: Displays the approximate amount of amperage set to on the unit. 5.
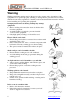
Plasma Cutters www.LWELD.com Assembly of Plasma Torch: The plasma cutter torch handle is made of fire and heat resistant materials. Avoid dropping the torch or striking anything with it. Assemble the consumables as pictured above, and described below. 1. Insert the electrode. Tighten it with pliers. 2. Seat the swirl ring on the electrode. 3. Place the copper tip on the ring, ensuring that is seated flat. 4. Place the shield cup over the tip and secure.
PLASMA CUTTERS www.LWELD.com Basic Operation 1. Ensure that all cables are connected to the machine. 2. Ensure that the machine’s OFF/ON switch is set to OFF, and plug the machine into the electrical outlet. 3. Connect the air compressor supply line to the air input side on the unit. 4. Turn the ON/OFF switch to ON. The cooling fans should operate and the ON indicator LED or power switch (if applicable) should illuminate. 5. Clean the contact point on the work piece to ensure a good electrical connection.
Plasma Cutters www.LWELD.com Summary Chart of Plasma Cutters: Plasma Cutters ForceCut® LP-40D Plasma Cutters ForceCut® LP-40D Pilot Arc Plasma Cutters ForceCut® LP-50D Plasma Cutters ForceCut® LP-50D Pilot Arc Plasma Cutters ForceCut® LP-60D www.longevity-inc.
PLASMA CUTTERS www.LWELD.com Plasma Cutters (230 V Input) 40 A @ 100% Duty Cycle (110 V Input) 18 ForceCut® LP-70 Plasma Cutters 70 A at 60% 1 1/4 in (230 V Input) 1 1/4 in 5/8 in 8000 watts ForceCut® LP-80 Plasma Cutters 80 A at 60% 1 1/2 in (230 V Input) 1 1/2 in 3/4 in 9000 watts MaxArc® LP-100 Plasma Cutters 100 A at 60% (230 V Input 1- phase) 2 in 1/4 in 10,000 watts ForceCut® 60I Plasma Cutters 60 A @ 60% Duty Cycle 1 1/4 in (220 V Input) 1 1/4 in 3/4 in 6500 watts 2 in www.
Plasma Cutters www.LWELD.
PLASMA CUTTERS www.LWELD.com Typical Applications Chart of Plasma Cutters: Technology Plasma Cutters ForceCut® LP-40D Typical Applications Hobbyist, Auto-Body, Plumbers, Sheet Metal Work, Thin Material, HVAC ForceCut® Hobbyist, Auto-Body, Plumbers, Sheet Metal work, LP-40D Pilot Thin materials.
Plasma Cutters www.LWELD.com Cutting Methods Different material thicknesses require different cutting techniques. Thin material: Start perpendicular to the work piece. It is unnecessary to angle or start on the edge, as the arc will pass through quickly. Medium material: Angle the torch tip to avoid damaging the tip. Once the arc passes through the material, you may begin cutting normally. Thick material: Drill a pilot hole through which to start your arc, or start on the edge of the work piece.
PLASMA CUTTERS www.LWELD.com Tips For LONGEVITY Plasma Cutting provided by www.plasma-cutters.com and www.freeweldingforum.com Using a LONGEVITY Plasma Cutter with either High Frequency or Pilot Arc technology is very easy to use, and since each LONGEVITY unit is quality tested at our in house testing facility before it is shipped , most of our customers take right out of the box, plug it in and get to work.
Plasma Cutters www.LWELD.com Check List Suggestions Connect the air supply to your LONGEVITY Plasma Cutter and consult your owner's manual to ensure the correct PSI. The PSI is about 65-75. Each LONGEVITY Plasma Cutter, regardless if it uses Pilot Arc or High Frequency technology, comes with an air flow regulator and water catcher. Reference the owner's manual of your LONGEVITY Plasma Cutter for specifications and care instructions of your air flow regulator and filter.
PLASMA CUTTERS www.LWELD.com to be sure you are using the correct gloves, eye protection, welding leathers, face shield, etc. You can find all of the necessary equipment as stated in the owner's manual of your LONGEVITY Plasma Cutter in the accessories section of our website. The old adage says to measure twice and cut once, but we want to go ahead and suggest you make a sample cut (of the same caliber as the intended use) with your LONGEVITY Plasma Cutter before you get started.
Plasma Cutters www.LWELD.com Use extended tips on your LONGEVITY Plasma Cutter for tough to reach corners, tracing a pattern, or areas with tight spaces. Pilot Arc technology allows you to ignite the arc without the tip touching the metal. Use a torch guide or tip shield to protect your consumable. The more often you drag your torch tip across the material or stop and restart the Pilot Arc, the shorter the life span of your consumables will be.
PLASMA CUTTERS www.LWELD.com the awesome power of your LONGEVITY Plasma Cutter, remember we want you to be able to enjoy the results of your work time and time again. So, in situations when you are going to be cutting thick metals at high amperage with your LONGEVITY Plasma Cutter, we recommend you start with the torch pointed at a 45 degree angle. This angled approach allows for the first blast of metal to be released with out back splash on to your valuable consumables.
Plasma Cutters www.LWELD.com All articles are composed by the LONGEVITY Facility Testing Team and are written with expressed interest of maintain a strong standard in LONGEVITY Global Inc. quality, to help address topics, and answer questions for amateur and experienced users alike. Please remember to always exercise extreme causation and abide by all provided safety specification. Sample Photos: For more information on plasma cutting from professionals go to www.freeweldingforum.com and www.
PLASMA CUTTERS www.LWELD.com Routine Maintenance The life of your machine and the quality of the work performed using your machine, will be enhanced by practicing periodic routine maintenance. 28 At regular intervals, clear dust that may accumulate in the machine using clean and dry compressed air. If the working condition has heavy smoke and pollution, the welding machine should be cleaned once a month. Keep the machine exterior clean with mild soap and water.
Plasma Cutters www.LWELD.com Troubleshooting If your unit is not properly functioning, please call us immediately toll free at 1-877566-4462 for support. We have included a small table here to diagnose most common problems. Problems, Causes, and Solutions Problems Machine will not turn on. The machine runs, but nothing is happening Consumables (tips) are being consumed Heavy Underside Slag (Cutting) Poor Cut Quality Inconsistent Arc Plasma Cutter Pilot Does not Ignite O.C.
PLASMA CUTTERS www.LWELD.com LONGEVITY® Global, Inc. thanks you for your purchase and opportunity to be able to serve you. If, after reviewing this manual, you have any problems in setting up or operating your machine, contact us at help@longevity-inc.com. LONGEVITY® Global, Inc. Toll-Free 1-877-LONG-INC / 1-877-566-4462 Website: www.longevity-inc.com Sales: sales@longevity-inc.com Customer Service: help@longevity-inc.com Dealers: dealers@longevity-inc.