Table Tracker U S E R M A N UA L Installation, Warranty and Service Information Long Range Systems, Inc. 4550 Excel Parkway, Suite 200 Addison, TX 75001 800.437.4996 • www.pager.
Table Of Contents Installation and Setup . . . . . . . . . . . . . . . . . . . . . . . . . . . . . . . . . . . . . . . . . . . . 2 Basic Installation . . . . . . . . . . . . . . . . . . . . . . . . . . . . . . . . . . . . . . . . . . . . . . . . . . . . . 2 Table Tracker . . . . . . . . . . . . . . . . . . . . . . . . . . . . . . . . . . . . . . . . . . . . . . . . . . . 3 Basic Operation . . . . . . . . . . . . . . . . . . . . . . . . . . . . . . . . . . . . . . . . . . . . . . . . . . . . . .
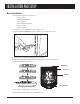
INSTALLATION AND SETUP Basic Installation 1. Unpackage all system components. - All-in-one PC - 2.4GHz USB Antenna - Table Trackers - Table Tracker Charger(s) - Starter Unit(s) - Clearing Unit(s) 2. Setup All-In-One PC Monitor in the expeditor area 3. Plug the 2.4 GHz USB Antenna into a USB Port on the All-In-One PC 4. Power on PC - using the surge protector provided 5. Plug in the Table Tracker Charger(s) (usually placed by the cash register) 6.
Table Tracker Basic Operation 1. The Cashier taking orders should ALWAYS place each Table Tracker on the Starter Unit before handing them out to ensure the timer is started on the touch screen PC. This will ensure the accuracy of your reports. When handing the unit to the customer, the cashier must explain to the customer that the Table Tracker units must be placed on the table where they will be sitting. 2. The customer takes the Table Tracker and lays it on any available table. 3.
Table Tracker Monitor Main Display - All in One PC/Monitor This will display the • Order number given to the customer. • Table that the Order number is currently located. • The amount of time elapsed since order started. Displays Today’s Score This indicates the daily percentage of orders successfully delivered within the secured preset timers. Average Time This indicates the average time it takes to process orders.
When switching to the Configuration or Reports Menus, the user is required to enter a Managers Access Code. The standard access code is 5-6-7-8-9. To Cancel access at any time, press the To edit an entry, press the button. button.
UHF System ID This is a unique ID of the transmitter that allows paging messages between the host transmitter and staff pagers. Group Paging Enables or disables group paging. Online Reporting Enables or disables online reporting. DB Backup Creates a backup for the current Database on the PC. Change Language This option allows the user to switch the currently displayed language between English, Polish, and Spanish.
Interval Timing Interval Time is the time that is considered acceptable for order deliveries. Using the 1st Warning Time and 2nd Warning Times, the Table Tracker Monitor can display how long an order is up before the time elapsed is considered unacceptable for its delivery. The Interval Times are set in seconds (180 = 180 seconds) Any time under the Interval Time will appear white on the monitor. After the 1st Warning Time but before the 2nd Warning time, the Order will change to yellow on monitor.
Zigbee Devices This feature will list and add any 2.4 GHz USB Module and RT1202 device currently connected to the PC and LAN Network for RF Communication purposes. Zigbee Configuration Zigbee Preset This allows for changing the channel of the USB antenna to one of four preset channels. Note: Contact LRS before changing this setting. The channel of the antenna must match the Starter Unit. Associating Znode Devices This feature allows for associating a Znode. To Associate a New Znode: 1.
Removing a Device From the List To remove a device from the list, press the X located to the right of the device name. Inventory This view will list all Table Trackers currently associated and display the last reported communication between the system and the Table Tracker. Alarm This menu allows the user to create new alarms to remind the staff to perform a set task.
To create a new Alarm: 1. Press Add New Alarm 2. Enter a name for the Alarm 3. Press the … button and Type the Message for the Alarm. 4. Press the … at Receivers and type in the Pager Numbers of the recipients of that Alarm. Press the Check when done entering the Pager Numbers. 5. Select the type of Alarm as Hourly, Daily, Monthly, or One Time. 6. Enter the Time (AM or PM) the Alarm will go off. 7. Press Save when done.
Warranty Long Range Systems, Inc. warrants this product against any defects that are due to faulty material or workmanship for a one-year period after the original date of consumer purchase excluding power supplies and Table RFID tags which have a thirty day warranty. This warranty does not include damage to the product resulting from accident, misuse or improper electrical connection.
FCC STATEMENT 1. This device complies with Part 15 of the FCC Rules. Operation is subject to the following two conditions: (1) This device may not cause harmful interference. (2) This device must accept any interference received, including interference that may cause undesired operation. 2. Changes or modifications not expressly approved by the party responsible for compliance could void the user's authority to operate the equipment.