
Instruction Manual

7
6
Loading The Logun S-16 continued
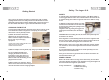
Having filled one half of the magazine, invert and fill the second half.
Once the magazine has been fully loaded refit it to the rifle by sliding
back into the magazine chamber until it clicks.
Engage the safety cross-bolt. To load a pellet into the rifle draw back
the cocking bolt. In the process of drawing back the bolt you will
automatically depress the cocking bolt catch. Having drawn the bolt
fully backwards, slide it fully forwards until the cocking bolt catch
engages.
The rifle is now cocked and loaded. To fire, disengage the safety
cross-bolt by pushing it from the right so it protrudes on the left side
of the rifle and, if safe to do so, take aim and squeeze the trigger.
To load the next pellet, draw the cocking bolt fully back and then slide
it fully forward until the cocking bolt catch engages. This
indexes the magazine and the sear connects with the hammer
assembly.
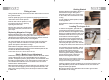
Each half of the magazine contains eight pellets. After firing eight
pellets, remove the magazine , invert it and refit. Eight more pellets
are ready to be aimed and fired.
DO NOT PUSH THE COCKING BOLT FORWARD UNTIL YOU ARE READY TO USE THE RIFLE.
THE SAFETY CROSS BOLT IS AN ADDITIONAL SAFETY DEVICE BUT SHOULD NEVER BE
RELIED UPON TO PROVIDE AN ABSOLUTE GUARANTEE AGAINST THE RIFLE FIRING.
NOTE: IF THE ‘O’ RING ON THE MAGAZINE BECOMES DRY, LOADING OF PELLETS INTO
THE RIFLE CAN BECOME TIGHT RESULTING IN POOR LOADING. LUBRICATION
(SYNTHETIC GREASE) IS RECOMMENDED ON THE ‘O’ RING.
NOTE
THE BOLT MUST BE FULLY FORWARD AND
THE LOCKING CATCH ENGAGED FOR THE
RIFLE TO PERFORM PROPERLY
Adjusting The Trigger
Make sure the rifle is unloaded by removing the magazine and ensure
there are no pellets in the breech. Remove the air bottle and apply the
safety cross-bolt.
Invert the rifle and secure in a rifle stand or similar stabilising device.
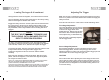
First Stage Adjustment
The travel adjustment screw for the first
stage is situated under the trigger blade.
To remove the trigger blade use a
2.0mm Allen Key. Simply undo the allen
bolt and this will reveal the adjustment
screw, adjust using a 1.5mm Allen Key.
Once the travel is sufficiently adjusted
refit the trigger blade.
Second Stage Adjustment
Second stage adjustment screw is accessed through the recess
behind the trigger block, nearest to the pistol grip. The screw is
adjusted clockwise to reduce sear contact and lighten trigger pull and
anti-clockwise to increase weight of trigger pull.
CAUTION
Care must be taken when adjusting the second stage, because if it is
set too light the cocking action of the rifle will override the sear and
the trigger will not set, making the rifle inoperative. If this does occur
you must remove the magazine to avoid double loading and then set
to a heavier setting.