
User's Manual


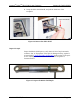
Table Of Contents
- Table of Contents
- Chapter 1: Introduction
- Chapter 2: Theory of Operation
- Chapter 3: Safety
- Chapter 4: Clinical Guide
- Chapter 5: Preparing the System for Use
- Chapter 6: Operating Instructions
- Chapter 7 - Troubleshooting and Maintenance
- Handling Error Messages and Notifications
- Troubleshooting
- Initialization Error Message Appears
- System Does Not Turn On
- Inadequate or No Aiming Beam
- No Laser Energy Emission
- “Popping” or “Tapping” Coming Sound from the Fiber Port
- Fiber Burn Back
- Unrecognized Fiber
- A Notification or Error Message Appears on the Control Panel
- System Overheats
- Message Appears: Attach an Authorized Fiber
- Message Appears: Attach fiber
- Message Appears: Attach footswitch
- Message Appears: Check footswitch
- Message Appears: Check interlock
- Message Appears: Insert debris shield
- Message Appears: No lasers
- Message Appears: Energy high
- Message Appears: Energy low
- Message Appears: Rate high
- Message Appears: Rate low
- Routine Periodic Maintenance
- Hospital/Clinic Staff Maintenance
- Professional Maintenance
- Chapter 8: System Requirements and General Information
- Appendix A: EMC Guidance and Manufacturer's Declaration

Lumenis
®
Pulse
TM
50H / 100H Laser Systems Inspect the Debris Shield
UM-20006520DE, Rev. A Page 60
4. Grasp the debris shield handle, and pull the shield out of the
receptacle.
Figure 14: Remove the debris shield
Inspect the Optic
Inspect the debris shield optic to verify that it is free of any burn marks,
scratches, dust, or fingerprints. If the optic is damaged or dirty, replace it
as instructed in Change the Debris Shield Optic in this section. If the optic
is free of damage, reinsert the debris shield into the receptacle as
instructed below.
Figure 15: Inspect the Debris Shield Optic
Debris shield handle
Optic