
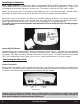
Installation Instructions


6
CaretakerSentry®
v3.10
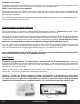
Installing the Batteries:
Base - larger batteries: The Base unit requires 4 rechargeable 2400 mAH NiMH batteries (included). They
will provide you with up 24 hours of battery back- up protection in the event of a power failure. They will not
be damaged by continually charging in the base unit. The ratings on these can be 2400 mAh or higher.
Whenyourstgetyourunit-thesebatterieswillprobablybelow,orevenfullydischarged-andwillneedto
be charged overnight before being able to provide you the 24 hour battery back-up protection.
Remove the cover on the bottom of the Base unit. Install the 4
batteries
as shown in the plastic engraving in
the battery compartment area. A few seconds after you install these, you might hear “Running on battery
power”andREDPowerLEDwillash-whentheunitis operatingon thebackupbatteries.
(If you do not hear this
announcement
and the Power LED is on solid, the unit is already plugged
in to AC power).
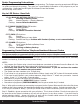
Master ON/OFFSwitch:
CaretakerSentry has a Master ON/OFF switch on the bottom of the base unit – just right of the rechargeable
batteries compartment on the base unit. This switch controls all power – back up batteries and power from the
AC adapter. This switch should be ON at all times while the unit is in use. This switch should only be turned
OFF if the CaretakerSentry unit is taken out of service – during transportation or no longer needed.
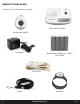
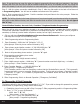
Connecting the Base Unit:
Power Connection:
Simply plug the AC Adapter into the nearest electrical outlet. Plug the other end of the AC power adapter into
the Base unit. You need to push the plug into the
opening
in the Base unit and twist 90’ clockwise to lock in place.
To
remove
in the future, simply rotate 90’ counter-clockwise and pull outward.
Caution: Do not plug the AC Adapter into an outlet which is controlled by a switch. The switch
could
accidentally
be turned off, thus rendering the Base unit inoperable after approximately 24
hour when the back-up batteries become discharged.