
User Manual


55) Begin the LevelMatePRO setup
The LevelMatePRO app has a Setup Wizard that will guide you through the
setup process. Each step in the Setup Wizard is detailed below. Completing
each step will automatically advance you to the next step until the process is
complete. Beginning with Step 2, each step includes a ‘Back’ button at the top
left of the screen to allow you to return to the previous step if needed.
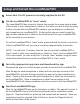
Step 1) Select your vehicle type (figure 3). If your exact vehicle type is not
listed simply select the vehicle type that most closely represents your vehicle
type and is of the same category with regard to towable or driveable. This is
important because certain parts of the setup process will vary based on whether
you selected a towable or driveable vehicle type. To aid in your selection, a
graphic representation of each vehicle type is displayed at the top of the screen
as each is selected. Once you have made a selection tap the ‘Next’ button at the
bottom of the screen to continue.
Step 2) If you selected a towable vehicle type (travel trailer, fifth wheel or
popup/hybrid) you will be presented with a screen where you will test the
Bluetooth Signal Strength to insure that your selected mounting location is
suitable (figure 4). Since your LevelMatePRO is an OEM version and was
installed by the RV manufacturer there is no opportunity to reposition the unit and
therefore the Signal Strength test is not necessary for your unit. So just tap the
button labeled Check Signal Strength and then the button labeled Next to
proceed to step 3.
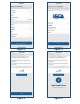
Step 3) Make your selections for Measurement Units, Temperature Units and
the Driving Side Of Road for your country (figure 6). Defaults for these options
are based on the country you defined in the registration process so for most
users these will already be set to the selections you will use.
Step 4) Enter the dimensions for the width and length of your vehicle (figure 7).
Instructions indicating where to take these measurements on your selected
vehicle type are below the front/back and side graphic images of the vehicle.
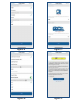
Step 5) Make your selections for Installation Orientation, Idle Time Until
Sleep, Wake On Motion, Reverse Front View and Measurement Display