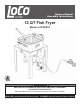
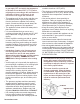
Owners Manual Assembly Instructions 12 QT Fish Fryer Model: LCFFSS12 WARNING READ INSTRUCTION MANUAL BEFORE ATTEMPTING TO ASSEMBLE OR OPERATE THIS PRODUCT. Adult assembly required. Keep screws and parts out of reach of children. INSTALLER: Leave this manual with the consumer. CONSUMER: Keep this manual for future reference.
This instruction manual contains important information necessary for the proper assembly and safe use of the appliance. Read and follow all warnings and instructions before assembling and using the appliance. Follow all warnings and instructions when using the appliance. Keep this manual for future reference. SAFETY SYMBOLS Basic safety precautions should always be observed when using this appliance. Read and understand the meaning of these symbols before assembling and using this appliance.
TABLE OF CONTENTS Warnings 1, 3-6 Parts Diagram and Parts List 7 Hardware 8 Assembly Instructions 8-11 Operating Instructions 12-14 Care and Maintenance 15 Troubleshooting 16 Warranty Information 17 lococookers.
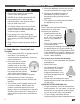
WARNINGS SAVE THESE INSTRUCTIONS • The installation must conform with local codes or, in absence of local codes, with the National Fuel Gas Code, ANSI Z223.1/NFPA 54, Storage and Handling of Liquefied Petroleum Gases, ANSI/NFPA 58; or Natural Gas and Propane Installation Code, CSA B149.1; Propane Storage and Handling, CSA B149.2. • This appliance is not designed for use with natural gas. • Never operate this appliance on or under any apartment or condominium balcony or deck.
WARNINGS • • • • • • • • • or gas supply OFF and wait for the temperature to decrease to less than 350ºF (177ºC) before relighting burner according to the manufacturer’s instructions. If there is a lid (cover), do not remove the lid as oxygen will feed the fire. This appliance will be hot during and after use. Use insulated mitts or gloves for protection from hot surfaces or splatter from cooking liquids. Closed-toed shoes should always be worn during operation of this appliance.
WARNINGS: LP TANK DANGER 1. Do not store a spare LP gas cylinder under or near this appliance. 2. NEVER fill the cylinder beyond 80% full. 3. If the instructions in 1 and 2 are not followed exactly, a fire causing serious injury or death may occur. 4. The safety release valve on the LP tank could activate the leaking of gas and cause a severe fire and increase the risk of serious injury or death. 5.
WARNINGS: LP TANK LP TANK FILLING: • Use only licensed and experienced dealers. • LP dealer must purge tanks before filling. • Dealer should NEVER fill LP tank more than 80% of LP tank volume. Volume of propane in tanks will vary by temperature. • A frosted regulator indicates gas overfill. Immediately close LP tank valve and call LP gas dealer for assistance. • Do not release liquid propane (LP) gas into the atmosphere. This is a hazardous practice.
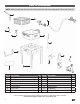
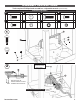
PARTS DIAGRAM NOTE: Wash all parts that will come into contact with food with warm soapy water. Rinse and towel dry.
ASSEMBLY INSTRUCTIONS Tools required: Phillips head screwdriver • Adjustable wrench (Not included) A 6 B M6x14 Screw E M5x10 Screw 3 Assembly Hardware 6 C M6x22 Screw M6 Flat Washer F M5 Flat Washer 3 G M5 Lock Washer 1 2 D M5x12 Screw 2 3 H M5 Hex Nut 3 8 10 A A B x4 B x4 B A 2 Hex nut previously removed from burner. Wrench-tighten. 3 3 Remove wing nut, washer and hex nut from threaded stud on burner. Burner exits side of stand with holes. lococookers.
ASSEMBLY INSTRUCTIONS 3 One washer and wing nut previously removed from burner. Hand-tighten. 9 4 A x2 B x2 11 B Cutout in venturi shield rests over burner.
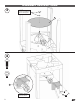
ASSEMBLY INSTRUCTIONS 5 D C x2 C D x2 D 12 7 6 4 13 14 Plug electrode wire into back of ignitor. lococookers.
ASSEMBLY INSTRUCTIONS 8 5 1 E x3 H Thermometer clips to fry pot for easy viewing. 2 F E F G x3 G x3 H x3 Basket rests on edge of pot for draining.
OPERATING INSTRUCTIONS CONNECTING REGULATOR TO LP TANK: 1. Place LP tank on a secure, level and stable surface. 2. Turn regulator control knob to the OFF position by rotating counterclockwise to a full stop. 3. Turn LP tank OFF by turning hand wheel clockwise to a full stop. 4. Remove the protective cap from LP tank. Always use cap and strap supplied with valve. DO NOT use a POL transport plug. It will defeat the safety feature of the valve. 5. Hold regulator, insert nipple into LP tank valve.
OPERATING INSTRUCTIONS WARNING LP hose is a tripping hazard. Special Care must be observed. 4. Open the LP tank valve fully by turning counterclockwise. 5. Electronic Ignitor Lighting: Press and hold the ignition button while rotating the regulator control knob clockwise until the burner is lit. DO NOT stand with head or arms over burner. Match Lighting: Using a long ignited match (fireplace match), place flame directly over the burner.
OPERATING INSTRUCTIONS DISCONNECTING REGULATOR FROM LP TANK: 1. Turn regulator control knob counterclockwise to the OFF position. 2. Turn LP tank OFF by turning hand wheel clockwise to a full stop. 3. Turn the coupling nut counterclockwise to loosen the connector. Loosen by hand only. DO NOT use tools. 4. When disconnected, the regulator should be hung from the hook attached to the appliance. DETERMINING THE MAXIMUM FILL LEVEL WHEN USING A VESSEL WITHOUT A MAXIMUM FILL LINE: 1.
CARE AND MAINTENANCE PROPER CARE AND MAINTENANCE WILL KEEP YOUR APPLIANCE OPERATING SMOOTHLY CAUTION • Allow appliance to fully cool to 115ºF (46ºC) before performing any cleaning. • Keep the appliance area clear and free from combustible materials, gasoline and other flammable vapors and liquids. • Do not obstruct the flow of combustion and ventilation air. • Check burner and venturi tube for insects and insect nests. A clogged tube can obstruct gas flow and can result in a fire beneath the appliance.
TROUBLESHOOTING PROBLEM Burner will not light. Burner does not stay lit. Oil does not reach desired cooking temperature. lococookers.com POSSIBLE CAUSE Bad connection between the regulator and LP tank. SOLUTION Make sure the regulator coupling nut is fully tightened on the LP tank valve. The LP tank is empty. Refill LP tank at an authorized dealer or purchase new filled LP tank. Ignition button was not pushed Press and hold the ignition and held. button until burner is lit.
WARRANTY INFORMATION The appliance has been manufactured under the highest standards of quality and workmanship. We warrant to the original consumer/purchaser that all aspects of this product will be free of defects in material and workmanship for one (1) year from the date of purchase. A replacement for any defective part will be supplied free of charge for installation by the consumer. Requests for expedited shipments of warranted parts will be at the consumer’s/purchaser’s expense.
lococookers.
LoCo - Crazy Good Cookers, LLC. 506 Manchester Expressway • Suite A2 • Columbus, Georgia 31904 Email: customerservice@lococookers.com Connect with us @lococookers • lococookers.
Manual del propietario Instrucciones de montaje Freidora de pescado de 12 QT Modelo: LCFFSS12 ADVERTENCIA LEA EL MANUAL DE INSTRUCCIONES ANTES DE INTENTAR MONTAR U OPERAR ESTE PRODUCTO. Requiere montaje de adultos. Mantenga los tornillos y las piezas fuera del alcance de los niños. INSTALADOR: Deje este manual con el consumidor. CONSUMIDOR: Guarde este manual para referencia futura.
Este manual de instrucciones contiene importante información necesaria para el correcto ensamblaje y uso seguro del aparato. Lea y siga todas las advertencias e instrucciones antes de armar y usar el aparato. Siga todas las advertencias e instrucciones cuando use el aparato. Guarde este manual para referencia futura. SÍMBOLOS DE SEGURIDAD Siempre se deben observar las precauciones básicas de seguridad al usar este aparato.
ÍNDICE Advertencias 1, 3-6 Diagrama de piezas y lista de piezas 7 Accesorios 8 Instrucciones de montaje Instrucciones de funcionamiento 8-11 12-14 Cuidado y mantenimiento 15 Resolución de problemas 16 Información de garantía 17 lococookers.
ADVERTENCIAS GUARDE ESTAS INSTRUCCIONES • La instalación debe cumplir con los códigos locales o, en ausencia de códigos locales, con el Código Nacional de Gas Combustible, ANSI Z223.1/NFPA 54, Almacenamiento y Manipulación de Gases de Petróleo Licuado, ANSI/NFPA 58; o Código de instalación de gas natural y propano, CSA B149.1; Almacenamiento y manipulación de propano, CSA B149.2. • Este aparato no está diseñado para usarse con gas natural.
ADVERTENCIAS • Este aparato estará caliente durante y después de su uso. Use mitones o guantes aislantes para protegerse de superficies calientes o salpicaduras de líquidos de cocción. También debe usarse siempre calzado cerrado durante el funcionamiento de este aparato. • El blindaje térmico del aparato debe estar siempre en su lugar durante el uso. • Se recomienda que nunca use una olla para cocinar de más de 30 cuartos y 12” (305 mm) de diámetro. Una olla más grande puede ocasionar que se vuelque.
ADVERTENCIAS: TANQUE LP PELIGRO 1. No almacene un cilindro de gas LP de repuesto debajo o cerca de este aparato. 2. NUNCA llene el cilindro más allá del 80 % de su capacidad. 3. Si las instrucciones en 1 y 2 no se siguen exactamente, puede producirse un incendio que causa lesiones graves o la muerte. 4. La válvula de liberación de seguridad en el tanque LP podría activar la fuga de gas y causar un incendio severo y aumentar el riesgo de lesiones graves o la muerte. 5.
ADVERTENCIAS: TANQUE LP LLENADO DE TANQUES LP: • Use solo distribuidores autorizados y con experiencia. • El distribuidor de LP debe purgar los tanques antes de llenarlos. • El concesionario NUNCA debe llenar el tanque de LP más del 80 % del volumen del mismo. El volumen de propano en los tanques variará según la temperatura. • Un regulador congelado indica un sobrellenado de gas. Cierre de inmediato la válvula del tanque de LP y llame al distribuidor de gas LP para obtener ayuda.
DIAGRAMA DE LAS PIEZAS NOTA: Lave todas las piezas que entrarán en contacto con los alimentos con agua jabonosa tibia. Enjuague y seque con una toalla. 1 2 3 4 5 6 7 8 12 11 13 14 10 9 Pieza n°. 1 2 3 4 5 6 7 Descripción Asa de la canasta de pescado Canasta de pescado Conjunto de quemador/regulador/manguera Electrodo SureSparkTM Termómetro Olla de 12 QT Portafósforos Cant. Pieza n°.
INSTRUCCIONES DE MONTAJE Herramientas necesarias: Destornillador Phillips • Llave ajustable (no incluidos) A 6 B Tornillo M6x14 E Tornillo M5x10 3 Accesorios de montaje 6 C Tornillo M6x22 Arandela plana M6 F Arandela plana M5 2 D Tornillo M5x12 2 3 G Arandela de seguridad M5 3 H Tuerca hexagonal M5 3 8 1 10 A B A x4 B B A x4 Tuerca hexagonal previamente extraídas de quemador. Apriete con una llave.
INSTRUCCIONES DE MONTAJE 3 Una arandela y tuerca de mariposa previamente extraídas de quemador. Apriete a mano. 9 4 A x2 B x2 11 B El recorte en el protector venturi descansa sobre el quemador.
INSTRUCCIONES DE MONTAJE 5 D C x2 C D x2 D 12 7 6 4 13 14 Enchufe el cable del electrodo en la parte posterior del encendedor. lococookers.
INSTRUCCIONES DE MONTAJE 8 5 1 H E x3 F x3 El termómetro se sujeta a la olla para freír para una fácil visualización. E F 2 G G x3 H x3 La canasta descansa sobre el borde de la olla para el escurrido.
INSTRUCCIONES DE FUNCIONAMIENTO CONEXIÓN DEL REGULADOR AL TANQUE LP: 1. Coloque el tanque LP en una superficie segura, nivelada y estable. 2. Gire la perilla de control del regulador a la posición OFF (apagado) girándola en sentido antihorario hasta el tope completo. 3. Apague el tanque LP girando la rueda manual en sentido horario hasta el tope completo. 4. Retire la tapa protectora del tanque LP. Use siempre la tapa y la tira provista con la válvula. NO utilice una tapa de transporte POL.
INSTRUCCIONES DE FUNCIONAMIENTO ADVERTENCIA La manguera de LP representa un peligro de tropiezo. Se debe tener especial cuidado cuando esté cerca. 4. Abra completamente la válvula del tanque LP girándola en sentido contrario a las agujas del reloj. 5. Encendido del encendedor electrónico: Mantenga presionado el botón de encendido mientras gira la perilla de control del regulador en sentido horario hasta que se encienda el quemador. NO se pare con la cabeza o los brazos sobre el quemador.
INSTRUCCIONES DE FUNCIONAMIENTO REGULADOR DE DESCONEXIÓN DEL TANQUE LP: 1. Gire la perilla de control del regulador en sentido antihorario a la posición OFF (apagado). 2. Apague el tanque LP girando la rueda manual en sentido horario hasta el tope completo. 3. Gire la tuerca de acoplamiento en sentido antihorario para aflojar el conector. Afloje solo a mano. NO utilice herramientas. 4. Cuando está desconectado, el regulador debe colgarse del gancho conectado al aparato.
CUIDADO Y MANTENIMIENTO UN CUIDADO Y MANTENIMIENTO ADECUADOS MANTENDRÁN SU APARATO FUNCIONANDO SIN PROBLEMAS PRECAUCIÓN • Deje que el aparato se enfríe completamente a 115 ºF (46 ºC) antes de realizar cualquier limpieza. • Mantenga el área del aparato limpia y libre de materiales combustibles, gasolina, y otros vapores y líquidos inflamables. • No obstruya el flujo de aire de combustión y ventilación. • Revise el quemador y el tubo venturi en busca de insectos y nidos de insectos.
RESOLUCIÓN DE PROBLEMAS PROBLEMA El quemador no se enciende. SOLUCIÓN Asegúrese de que la tuerca de acoplamiento del regulador esté completamente apretada en la válvula del tanque LP. El tanque LP está vacío. Vuelva a llenar el tanque LP en un distribuidor autorizado o compre un tanque LP nuevo lleno. El botón de encendido no se Mantenga presionado el botón de mantuvo presionado. encendido hasta que se encienda el quemador. La batería no está instalada Asegúrese de que los extremos + correctamente.
INFORMACIÓN DE GARANTÍA El aparato ha sido fabricado bajo los más altos estándares de calidad y mano de obra. Garantizamos al consumidor/comprador original que todos los aspectos de este producto estarán libres de defectos materiales y de mano de obra por un (1) año a partir de la fecha de compra. Se proporcionará un reemplazo para cualquier pieza defectuosa sin cargo para la instalación por parte del consumidor.
lococookers.
LoCo - Crazy Good Cookers, LLC. 506 Manchester Expressway • Suite A2 • Columbus, Georgia 31904 Correo electrónico: customerservice@lococookers.com Conéctese con nosotros en @lococookers • lococookers.